This is a follow up of the ‘how to install the ELK stack on CentOS 8’. That is a basic setup with no security at all. There is no encryption, no username and password setup, nothing. Not even firewall rules to filter ports. And as it’s known security can’t only rely on one factor but on a combination of few.
In this guide you will read about:
– Setting up firewall rules for the ELK stack on CentOS 8
– Placing NGINX as a reverse proxy for the Kibana dashboards (all directives explained)
– Setting up a username and password to log in to NGINX
– Creating a self-signed key and certificate pair to encrypt communications from browsers to NGINX
– Allow httpd through SELinux
Let’s then start this how to secure the ELK stack on CentOS 8 guide.
If you find the articles in Adminbyaccident.com useful to you, please consider making a donation.
Use this link to get $200 credit at DigitalOcean and support Adminbyaccident.com costs.
Get $100 credit for free at Vultr using this link and support Adminbyaccident.com costs.
Mind Vultr supports FreeBSD on their VPS offer.
Firewall
If I’m not mistaken CentOS 8 comes with ‘firewalld’ on by default. And some people just deactivate all of it. Just as some plainly do with SELinux. Some tools are there for a reason and turning them off completely doesn’t look very wise. On a very basic setup we’d need the firewall to be working and allowing some ports, like:
– Port 22 for SSH connections.
– Port 5044 for clients like filebeat to transfer information from devices to logstash.
– Port 80 for HTTP (will be redirected to 443 on NGINX later)
– Port 443 for HTTPS
First we need to check the firewall is on.
$ sudo systemctl status firewalld
We need to see this:
Active: active (running)
If it’s stopped:
Active: inactive (dead)
To start it up:
$ sudo systemctl start firewalld
Once it’s up and running we should place a few rules.
For port 22 and therefore SSH connections:
$ sudo firewall-cmd --permanent --zone=public –add-port=22/tcp
It can also be set up by this:
$ sudo firewall-cmd --permanent --zone=public –add-service=22/tcp
For port 80, HTTP connections:
$ sudo firewalld-cmd --permanent --zone=public –add-port=80/tcp
For port 443, HTTPS connections:
$ sudo firewalld-cmd --permanent --zone=public –add-port=443/tcp
Finally for port 5044, for the filebeats data transmission:
$ sudo firewall-cmd --permanent --zone=public --add-port=5044/tcp
Optional: Instead of opening port 80 and 443 one can choose a different one, just to have a bit more discretion. Be aware nmap will find it out anyway. Hiding ports doesn’t really work that easily.
By the way, if you followed the script on Github for the ELK stack one has to disable port 5601. Like follows:
$ sudo firewall-cmd --permanent --zone=public –remove-port=5601/tcp
The reason for this is, if you follow this security setup, content won’t be visited directly through Kibana and hence opening port 5601 but through ports 80 (redirecting HTTP to HTTPS) and 443 with NGINX as a reverse proxy for Kibana. In turn Kibana will not be able to be visited from anywhere (server.host directive) but will be pointed to ‘127.0.0.1’. Because 5601 won’t be used, we close it. This is only necessary if you applied the same script as on Github.
Kibana
Now we’ll need to change the ‘server.host’ directive in Kibana. We’ll just change it from a value of ‘0.0.0.0’ to ‘127.0.0.1’.
To find the line we need to edit we’ll use the next command.
# grep -n ‘server.host’ /etc/kibana/kibana.yml
And this will tell us it’s sitting on line 7. Make changes with your editor of choice so finally it looks like this:
server.host: "127.0.0.1"
Once this change has been done we’ll restart the kibana service so it’s effective.
$ sudo systemctl restart kibana.service
Moving on.
NGINX
With the above change in Kibana there’s no way we can visit the dashboards, unless we have a browser on the same machine or make use of curl from and in the same box. We need to place NGINX as a reverse proxy, grabbing the connection from the socket at localhost:5601 and bring it to HTTP and HTTPS.
Time to install NGINX
$ sudo dnf install -y nginx
Once nginx is in place we can generate the key and certificates so we can have nice TLS connections. Remembert these are self-signed.
To generate the key:
$ sudo openssl genpkey -algorithm RSA -out /etc/nginx/cert.key
To generate the cert (change the details to fit your nees):
$ sudo openssl req -new -x509 -days 365 -key /etc/nginx/cert.key -out /etc/nginx/cert.crt -sha256 - subj "/C=US/ST=New York/L=New York/O=Organization/OU=Organization Unit/CN=yourdomain"
Now the Diffie Hellman parameters.
$ sudo openssl dhparam -out /etc/nginx/dhparam.pem 2048
Once we have both we can set a password for a user. We can use a different user by changing it from ‘kibadmin’ to whatever we fancy.
"kibadmin:`openssl passwd -apr1`" | sudo tee -a /etc/nginx/htpasswd.users
A hash of the password will be stored in /etc/nginx/htpasswd.users.
Now that we have the key and certificate pair as well as the username and password it’s time to configure NGINX.
Although there’s a copy of the original nginx.conf file I always copy the original and change its name.
$ sudo mv /etc/nginx/nginx.conf /etc/nginx/nginx.conf.original
Create an empty one.
$ sudo touch /etc/nginx/nginx.conf
And we place the following big block in it. I’ll explain a few bits below.
#user nobody;
worker_processes 1;
# This default error log path is compiled-in to make sure configuration parsing
# errors are logged somewhere, especially during unattended boot when stderr
# isn't normally logged anywhere. This path will be touched on every nginx
# start regardless of error log location configured here. See
# https://trac.nginx.org/nginx/ticket/147 for more info.
#
#error_log /var/log/nginx/error.log;
#
#pid logs/nginx.pid;
events {
worker_connections 1024;
}
http {
include mime.types;
default_type application/octet-stream;
#log_format main '$remote_addr - $remote_user [$time_local] "$request" '
# '$status $body_bytes_sent "$http_referer" '
# '"$http_user_agent" "$http_x_forwarded_for"';
#access_log logs/access.log main;
sendfile on;
#tcp_nopush on;
#keepalive_timeout 0;
keepalive_timeout 65;
#gzip on;
server {
listen 80 default_server;
listen [::]:80 default_server;
return 301 https://$host$request_uri;
}
server {
listen 443 ssl http2;
listen [::]:443 ssl http2;
auth_basic "Restricted Access";
auth_basic_user_file /etc/nginx/htpasswd.users;
ssl_certificate /etc/nginx/cert.crt;
ssl_certificate_key /etc/nginx/cert.key;
ssl_session_timeout 1d;
ssl_session_cache builtin:1000 shared:SSL:10m;
ssl_protocols TLSv1.2 TLSv1.3;
ssl_ciphers ECDHE-ECDSA-AES128-GCM-SHA256:ECDHE-RSA-AES128-GCM-SHA256:ECDHE-ECDSA-AES256-GCM-SHA384:ECDHE-RSA-AES256-GCM-SHA384:ECDHE-ECDSA-CHACHA20-POLY1305:ECDHE-RSA-CHACHA20-POLY1305:DHE-RSA-AES128-GCM-SHA256:DHE-RSA-AES256-GCM-SHA384;
ssl_prefer_server_ciphers off;
ssl_session_tickets off;
ssl_dhparam /etc/nginx/dhparam.pem
access_log /var/log/nginx/elk.log;
add_header Strict-Transport-Security "max-age=63072000" always;
location / {
proxy_set_header Host $host;
proxy_set_header X-Real-IP $remote_addr;
proxy_set_header X-Forwarded-For $proxy_add_x_forwarded_for;
proxy_set_header X-Forwarded-Proto $scheme;
proxy_pass http://localhost:5601;
proxy_read_timeout 90;
proxy_redirect http://localhost:5601 https://$host$request_uri;
}
}
}
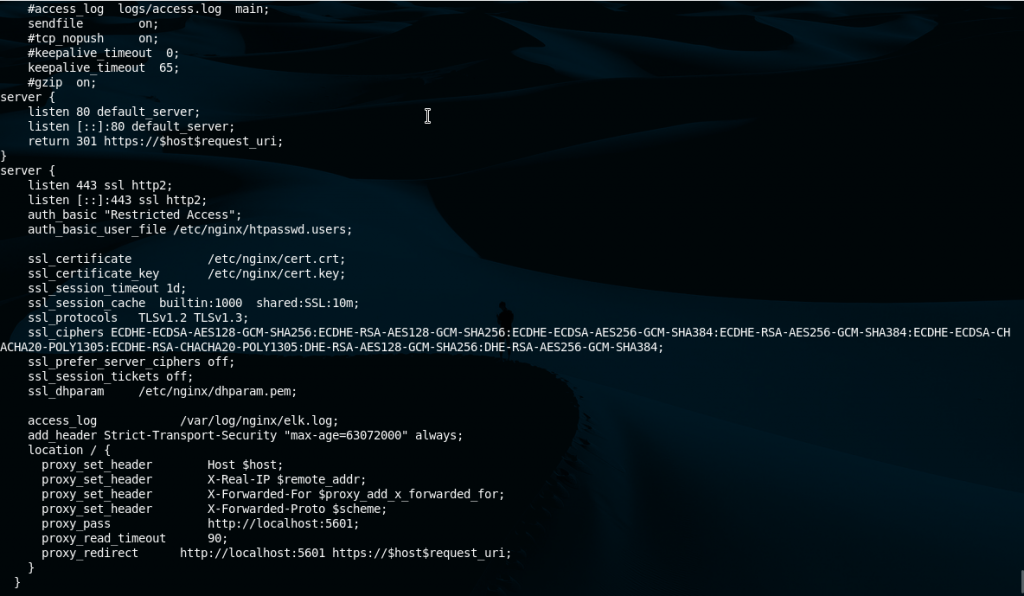
As promised some bits are explained here below. As always is a good recommendation to check a few bits of these ‘recommended’ configurations on the internet.
This block below allows incoming connections from port 80 to be served (remember we have set the firewall to accept those). However these are redirected to HTTPS, which is encrypted. Plain HTTP isn’t.
server {
listen 80 default_server;
listen [::]:80 default_server;
return 301 https://$host$request_uri;
}
These other two directives restrict the access to the resource. The type of authentication is not the latest and greatest but will work, and remember the connection is encrypted, so the password can’t be sniffed.
auth_basic "Restricted Access";
auth_basic_user_file /etc/nginx/htpasswd.users;
Moving on to the certificates and encryption bits.
ssl_certificate /etc/nginx/cert.crt;
ssl_certificate_key /etc/nginx/cert.key;
ssl_session_timeout 1d;
ssl_session_cache builtin:1000 shared:SSL:10m;
ssl_protocols TLSv1.2 TLSv1.3;
ssl_ciphers ECDHE-ECDSA-AES128-GCM-SHA256:ECDHE-RSA-AES128-GCM-SHA256:ECDHE-ECDSA-AES256-GCM-SHA384:ECDHE-RSA-AES256-GCM-SHA384:ECDHE-ECDSA-CHACHA20-POLY1305:ECDHE-RSA-CHACHA20-POLY1305:DHE-RSA-AES128-GCM-SHA256:DHE-RSA-AES256-GCM-SHA384;
ssl_prefer_server_ciphers off;
ssl_session_tickets off;
ssl_dhparam /etc/nginx/dhparam.pem
The first two set the paths for the certificate and the key. The paths are the same as used above for its generation. If you choose a different path as output on the generation remember to change it here as well.
The session cache will stay for 1000 sessions and will have a 10 megabyte capacity. More details on this link.
Protocols. What to say. Only TLS 1.2 and 1.3 are allowed. That is what is supported nowadays but one can set it to 1.1 or lower if there is a need to, for example some old equipment with outdated operating systems/browser but mandatory to be used for any reason.
In terms of the cipher suites to use there are many options here. To make things easy the Mozilla folks have prepared a configurator so depending on your needs you can get full setups.
The ‘ssl_prefer_server_ciphers’ directive sets no prefference on what cipher to use.
The ‘ssl_session_tickets’ directive is set to off so any client reconnecting again will not make use of the old keys stored in the server from the original session.
The ‘ssl_dhparam’ sets the Diffie Hellman parameters.
Let’s now go and grab the final block.
access_log /var/log/nginx/elk.log;
add_header Strict-Transport-Security "max-age=63072000" always;
location / {
proxy_set_header Host $host;
proxy_set_header X-Real-IP $remote_addr;
proxy_set_header X-Forwarded-For $proxy_add_x_forwarded_for;
proxy_set_header X-Forwarded-Proto $scheme;
proxy_pass http://localhost:5601;
proxy_read_timeout 90;
proxy_redirect http://localhost:5601 https://$host$request_uri;
The access_lgo directive has no mistery but the ‘add_header Strict-Transport-Security’ is important. This header counters the possibility of downgrading a connection from HTTPS to HTTP as demonstrated in this article explaining an attack to get passwords.
The ‘proxy_set_header’ directive group does basically allow NGINX to be a proxy in cojunction with ‘proxy_pass’ and ‘proxy_redirect’. For more details visit the following link.
Now that NGINX has been configured and set up we will check we haven’t missed a bit and everythings working.
$ sudo nginx -t
If sucessful we shall now fire it up not before enabling it to be controlled by systemd.
$ sudo systemctl enable nginx.service
$ sudo systemctl start nginx.service
SELinux
One small step but a very important one. We need to allow HTTP connections on SELinux. We’ll do that by issuing the following command.
$ sudo setsebool -P httpd_can_network_connect 1
Test
Once all of these tweaks are in place we can visit our ip address with a browser and start enjoying our ELK stack securely.
You should be redirected to HTTPS and asked for a username and password at a prompt.
So far this is all for the how to secure the ELK stack on CentOS 8. In a later article we’ll set up some ‘Beats’ so we get logs and digest them into the stack. We’ll add some encryption for those communications from end devices to this server. In the meanwhile you can check this script on github to get all you’ve read here in just a few minutes time.
If you find the articles in Adminbyaccident.com useful to you, please consider making a donation.
Use this link to get $200 credit at DigitalOcean and support Adminbyaccident.com costs.
Get $100 credit for free at Vultr using this link and support Adminbyaccident.com costs.
Mind Vultr supports FreeBSD on their VPS offer.