What is the Cloudflare Argo Tunnel service? In short, a tunneled connection between a host and Cloudflare’s network. A longer depiction can be read in a blog entry of theirs, but I would put it as a secure way to connect the services you want to publish using their network as a shield. An example will help to better understand this.
Let’s say we want to self-host a personal website at home or at any cloud service, such as Digital Ocean. Or better yet, we have one or several on premise services and we are willing to publish those services out in the world using Cloudflare’s networks. All of these scenarios mean some ports will be open to the world, or to just Cloudflare’s IPs if we are careful enough. However, even if we take care of this we will have to set this at the firewall/routing level and take care of any changes in that list.
We can go beyond that in order to publish our services, so we don’t have to open ports in our firewall and do not need to check an IP list recurrently either. In our case we will use Cloudflare’s Argo Tunnel service to publish a website. Detailed guides in their documentation exist for Windows, Linux and macOS hosts, but this guide will use FreeBSD as the reference platform.
Summary
We will install the cloudflared daemon in order to use Cloudflare’s Argo Tunnel service. For that the pre-requisites will have to be already in place. Then we will log in, using cloudflared. Then we will configure cloudflared to connect to Cloudflare’s network. After configuring, we will create a tunnel connection, will route traffic through the tunnel, and finally will run a tunnel to serve content from our site.
If you find the articles in Adminbyaccident.com useful to you, please consider making a donation.
Use this link to get $200 credit at DigitalOcean and support Adminbyaccident.com costs.
Get $100 credit for free at Vultr using this link and support Adminbyaccident.com costs.
Mind Vultr supports FreeBSD on their VPS offer.
Pre-requisites.
- Add a website to Cloudflare. Link to official documentation.
- Change the domain servers to Cloudflare’s. Link to official documentation.
Step 1 .- Install the cloudflared daemon
Either using packages or compiling from ports installing cloudflared is a piece of cake. I would recommend to use packages to avoid redundant compiling time and be comfortable.
sudo pkg install -y cloudflared
Once installed just enable the service by either editing the /etc/rc.conf file or issuing any of the following two commands:
Option 1 –> sudo sysrc cloudflared_enable=”YES”
Option 2 –> sudo service cloudflared enable
Note: As of writing this guide, I have been unable to run cloudflared in the traditional way things are run on FreeBSD. To be clear, I run the binary by directly invoking it, not as a daemon run from /etc/rc.d. Even following other clues like copying the cloudflared’s configuration into /usr/local/etc/cloudflared/config.yaml haven’t worked. I’ll update this post whenever I find the final solution.
Now cloudflared is installed on this box it’s time to configure the tunnel connection.
Step 2.- Log in into Cloudflare via CLI
As simple as this next command:
/usr/local/bin/cloudflared tunnel login
Tip: There’s no need to run this as root or elevated privileges.
As a reply to the issued command, we will be prompted with an URL we will visit with our browser. Once we have visited the URL a certificate will be automatically downloaded and placed under the user’s path in a hidden directory named .cloudflared.
Now we have logged in into Cloudflare’s services and downloaded a certificate, we can move on and configure the cloudflared daemon in order to use Cloudflare’s Argo Tunnel service to publish a website using FreeBSD.
Step 3.- Create a tunnel with Cloudflare
No, there’s no need to create a VPN connection with Cloudflare’s network. We will leverage cloudflared and will receive our credentials to use with the tunnel.
/usr/local/bin/cloudflared tunnel create <NAME for the tunnel>
Tip: You can be as imaginative as you want to name your tunnels, but the more descriptive you are the happier you’ll be in the long run, when you come back to this box and troubleshoot it.
As the result of this tunnel creation command you will receive the credentials to use the tunnel in a json file. The file contains relevant information, such as your account ID, the tunnel’s ID and its secret.
With this json file it is now time to configure cloudflared to use the tunnel.
Step 4.- Configure cloudflared
As explained in the official documentation we need to create a file declaring three simple arguments. The configuration file must sit in the .cloudflared directory and be called ‘config.yaml’.
url: http://localhost:8000
tunnel: <Tunnel-UUID>
credentials-file: /root/.cloudflared/<Tunnel-UUID>.json
Tip: You can test this with a site you don’t really care much about if things go south. I used my personal domain to test this solution.
Example:
[user@cloudflare ~]$ cat .cloudflared/config.yaml
url: http://172.16.40.5:80
tunnel: 25626f56-b4e5-2255-368c-10fa631kl247
credentials-file: /home/user/.cloudflared/25626f56-b4e5-2255-368c-10fa631kl247.json
[user@cloudflare ~]$
Once this configuration file is in place it’s time to route traffic towards the tunnel.
Step 5.- Route traffic to the tunnel
To route traffic for a website one must run the following command:
/usr/local/bin/cloudflared tunnel route dns <UUID or NAME> <hostname>
I personally used the following one:
/usr/local/bin/cloudflared tunnel route dns 1k54117b-2c64-4bow-blsv-d56345e9f315 albertvalbuena.com
You will be wondering where did I got the UUID from. The UUID is the tunnel’s ID. And yes, I scrambled the data so my real data is not published on the internet.
Tip: If this is your first time configuring this, it will probably swallow anything without and ID and hostname and it will place those for you.
Now cloudflared is aware of where to route the traffic it is time to test the tunnel.
Step 6.- Run the tunnel
If everything has run smoothly up until this point, there shouldn’t be any issue to run the tunnel with the following command:
/usr/local/bin/cloudflared tunnel run <UUID or NAME>
To check the tunnel status one can simply issue this other command.
/usr/local/bin/cloudflared tunnel info <UUID or NAME>
To list the tunnels you may have set up issue this next one.
/usr/local/bin/cloudflared tunnel list
At this stage we should find the tunnel is working after issuing the ‘tunnel info’ command. You should be able to see the tunnel’s name, id, creation date, as well as the connector’s id, the origin IP and where is the tunnel connecting to.
Tip: As mentioned earlier I haven’t been able to run cloudflared as the typical daemon after declaring it at /etc/rc.conf. It is logical this is happening since there is no dedicated entry for cloudflared in the /etc/rc.d directory. Instead I have used this next command:
nohup /usr/local/bin/cloudflared tunnel run <UUID or NAME> &
As much unhappy I am with this, the solution works flawlessly after testing. I will look for a possible entry in the /etc/rc.d directory and update this guide at a later time with the results.
We are now running our tunnel and we may want to verify a few things.
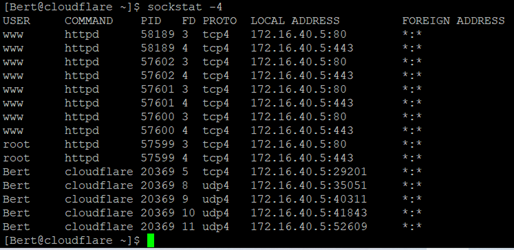
Step 7.- Check the connections with Cloudflare
In order to check connections FreeBSD has a nice utility called ‘sockstat’. Issuing ‘sockstat -4’ should show you similar results to you with an Apache HTTP instance running as well as the cloudflared daemon.
Alternatively, the netstat command can be also used.
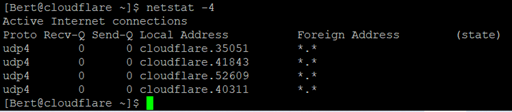
Now we know the connection has been stablished between or server and Cloudflare
Step 8.- Check your DNS entries
As a pre-requisite you should’ve changed your DNS from your provider’s ones to Cloudflare’s. Now it is time to verify the automatically pulled entries Cloudflare has presented to us.
My tips for this are:
- Remove any ‘A record’ entry. These are published by Cloudflare’s DNS. Remember they act as a proxy, not just for the HTTP and HTTPS traffic but for DNS too.
- DNSChecker will help see this above, since your domain may have different ‘A records” published depending on your location in the world.
- Look for, and if not present create, at least one ‘CNAME record’ for the domain you want to use in that website.
- Be patient and keep cool if anything doesn’t work the first time.
- Use the dnsreconv tool to verify results for the DNS entries. Alternatively you can use any DNS entry web service like mxtoolbox for DNS or DNSChecker .
Step 9.- Final test in the browser
As we set the goal up in the beginning of this guide. We want to use Cloudflare’s Argo Tunnel service to publish a website. And people visit websites using browsers in their desktops, not running crazy commands in the CLI.
You should go and use a browser and visit the site you want to publish. I used a domain for testing and set up a plain html page in an Apache HTTP instance. This is how it looks.
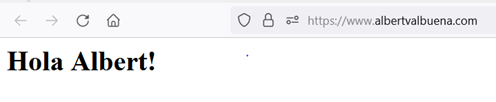
You should want to achieve similar results, with a final webpage to be visible with a browser, so your friends, customers or lurkers on the internet can see it.
Security Considerations
Do not think this is a security panacea. Bad requests can be issued and passed to your website anyway through Cloudflare, as much as they are actively blocking some bad traffic. The counter measure for those bad and harm intended requests is the same as always: a good implementation of the software in use and a sane web server configuration. A WAF as a complementary tool that can be implemented within Cloudflare’s network, with a cost, or alternatively you can set up ModSecurity on your server.
You can use these two guides if you want to set up a WAF on your server.
- A generic guide can be read here.
- If you plan to use WordPress there’s another dedicated guide over here.
- Scripts for that can also be seen here. Use them at your own risk and only after deep inspection.
Remember, Cloudflare is acting as a proxy. If you pay protection services you will be covered by those, and only those. Make sure you understand what you are paying for and what the service do and can not do. You can also implement them on your server, but do it with extra care.
And yes, you can use this in FreeBSD jails. But make sure your firewalling and routing is rock solid security wise. As much as any intrusion should theoretically be enclosed in the jail, if your networking set up is not secure enough, other jails or hosts in the network can be affected.
Security Testing
In order to verify there are no other holes in your firewall/network than those you are already aware of you can use the great tool nmap. Remember to use a box outside your network and to point to your public IP/s. You can comfortably run it from Windows, Mac or Linux desktops, but if you insist to run it from a CLI use this command:
sudo nmap -T4 -A -v <TARGET IP>
Other tools and techniques can be used, such as running ZAP, Burp Suite or any other security pentesting tool you can throw at it. Check Cloudflare’s policy on that before using them and make sure you have permission to perform this type of analysis.
Final thoughts
Cloudflare has a great infrastructure catalogue and to use Cloudflare’s Argo Tunnel service to publish a website is an attractive solution in order to avoid opening ports in your setup and to leverage other services from them. It’s free or charge for small sites and if you don’t leverage paid services, of course. To me it is a great way to connect with them and use other services like the CDN, the WAF and the rest of their catalogue.
If you find the articles in Adminbyaccident.com useful to you, please consider making a donation.
Use this link to get $200 credit at DigitalOcean and support Adminbyaccident.com costs.
Get $100 credit for free at Vultr using this link and support Adminbyaccident.com costs.
Mind Vultr supports FreeBSD on their VPS offer.