
Drupal 7 is approaching its original EOL (End of Life) date (Nov. 2021) which has been extended to November 2022 due to COVID’s impact. Most companies are using Linux already and have their upgrade plans in the works or are thinking about them. This is a good time to switch platform and use Drupal 9 on FreeBSD.
Drupal 9 has been out in the market for quite some time now, however some sources indicate the 7th iteration from Drupal is still the most used one with a 61.1% market share, against a tiny 6.4% use in Drupal 9 and a respectable but insufficient 28.2% for Drupal 8. Why is this? Well, I have no other reason than stating Drupal is mostly used by corporations who try to leverage their investment as long as they can and upgrading platforms is always costly and certainly a challenge for many live projects.
If you find the articles in Adminbyaccident.com useful to you, please consider making a donation.
Use this link to get $200 credit at DigitalOcean and support Adminbyaccident.com costs.
Get $100 credit for free at Vultr using this link and support Adminbyaccident.com costs.
Mind Vultr supports FreeBSD on their VPS offer.
Pre-requisites:
A FreeBSD box with a FAMP stack already installed. The following scripts may be helpful to get that in just minutes.
- UNIX-socket config + Apache HTTP with Event MPM + PHP-FPM can be found here.
- TCP-socket config + Apache HTTP with Event MPM + PHP-FPM can be found here.
Tip: You may also want to have this FAMP stack with some hardening. For basic TLS enablement just use this script and adapt the self-certificate values to yours (country, email, etc). For a full hardening choose this other script.
WARNING: Use the scripts linked here at your own discretion. Read them and make sure you understand all the bits. I shall not be liable for any damage, including data loss, if you use them.
Before getting into the beef of this how to install Drupal 9 on FreeBSD 13.0 just acknowledge I will make use of the FreeBSD Jails using the iocage framework. You can avoid the use of such by skipping the first step, numbered as zero, and just start the guide at the step 1.
Tip: Skip step zero if you are using this guide in Digital Ocean droplets.
Step 0. Create a Jail for the Drupal 9 install
We’ll create a FreeBSD jail using iocage.
[albert@BSDVM ~]$ sudo iocage create -r 13.0-RELEASE --name drupal-9 ip4_addr="hn0|192.168.1.93/24"
drupal successfully created!
[albert@BSDVM ~]$
Once created we check this new jails is now listed.
[albert@BSDVM ~]$ sudo iocage list
+-----+-----------+-------+--------------+--------------+
| JID | NAME | STATE | RELEASE | IP4 |
+=====+===========+=======+==============+==============+
| - | drupal-9 | down | 13.0-RELEASE | 192.168.1.93 |
+-----+-----------+-------+--------------+--------------+
| - | famp | down | 13.0-RELEASE | 192.168.1.87 |
+-----+-----------+-------+--------------+--------------+
| - | mysql80 | down | 13.0-RELEASE | 192.168.1.82 |
+-----+-----------+-------+--------------+--------------+
| - | mysql81 | down | 13.0-RELEASE | 192.168.1.83 |
+-----+-----------+-------+--------------+--------------+
| - | mysql82 | down | 13.0-RELEASE | 192.168.1.83 |
+-----+-----------+-------+--------------+--------------+
| - | wordpress | down | 13.0-RELEASE | 192.168.1.92 |
+-----+-----------+-------+--------------+--------------+
[albert@BSDVM ~]$
Update the Drupal jail we’ve just created.
[albert@BSDVM ~]$ sudo iocage update drupal-9
Installing updates...Scanning /zroot/iocage/jails/drupal/root/usr/share/certs/blacklisted for certificates...
Scanning /zroot/iocage/jails/drupal/root/usr/share/certs/trusted for certificates...
done.
release: 13.0-RELEASE -> 13.0-RELEASE-p4
Updated jail successfully.
drupal updates have been applied successfully.
[albert@BSDVM ~]$
It’s time now to fire up the jail.
[albert@BSDVM ~]$ sudo iocage start drupal-9
* Starting drupal
+ Started OK
+ Using devfs_ruleset: 1000 (iocage generated default)
+ Using IP options: ip4.addr=hn0|192.168.1.93/24 ip4.saddrsel=1 ip4=new ip6.saddrsel=1 ip6=new
+ Starting services OK
+ Executing poststart OK
[albert@BSDVM ~]$
We’ll get into the Drupal’s jail console and start the first step from there.
[albert@BSDVM ~]$ sudo iocage console drupal-9
FreeBSD 13.0-RELEASE-p4 (GENERIC) #0: Tue Aug 24 07:33:27 UTC 2021
Welcome to FreeBSD!
Release Notes, Errata: https://www.FreeBSD.org/releases/
Security Advisories: https://www.FreeBSD.org/security/
FreeBSD Handbook: https://www.FreeBSD.org/handbook/
FreeBSD FAQ: https://www.FreeBSD.org/faq/
Questions List: https://lists.FreeBSD.org/mailman/listinfo/freebsd-questions/
FreeBSD Forums: https://forums.FreeBSD.org/
Documents installed with the system are in the /usr/local/share/doc/freebsd/
directory, or can be installed later with: pkg install en-freebsd-doc
For other languages, replace "en" with a language code like de or fr.
Show the version of FreeBSD installed: freebsd-version ; uname -a
Please include that output and any error messages when posting questions.
Introduction to manual pages: man man
FreeBSD directory layout: man hier
To change this login announcement, see motd(5).
root@drupal-9:~ #
The FreeBSD jail for Drupal 9 has just been installed, updated and since we are now logged into it we can make use of it like if this was just a VM.
Step 1.- Install the FAMP stack
If you are using just one box to deliver this Drupal installation this next URL contains the script for this automated FAMP stack install. Just install git to download the following script. Use it if you want.
https://github.com/Adminbyaccident/FAMP/blob/master/event-php-fpm-unix-socket.sh
Tip: This first step is a pre-requisite. If you already have a FAMP stack installed just skip this process and go straight to step 2.
Before installing git let’s just make a configuration adjustment so this box makes use of the latest available packages instead of the quarterly released ones.
root@drupal-9:~ # sed -ip 's/quarterly/latest/g' /etc/pkg/FreeBSD.conf
root@drupal-9:~ #
With this change made just it’s time to install git.
root@drupal-9:~ # pkg install -y git
Bootstrapping pkg from pkg+http://pkg.FreeBSD.org/FreeBSD:13:amd64/latest, please wait...
Verifying signature with trusted certificate pkg.freebsd.org.2013102301... done
[drupal-9] Installing pkg-1.17.2...
[drupal-9] Extracting pkg-1.17.2: 100%
Updating FreeBSD repository catalogue...
[drupal-9] Fetching meta.conf: 100% 163 B 0.2kB/s 00:01
[drupal-9] Fetching packagesite.pkg: 100% 6 MiB 3.3MB/s 00:02
Processing entries: 100%
FreeBSD repository update completed. 31215 packages processed.
All repositories are up to date.
Updating database digests format: 100%
The following 35 package(s) will be affected (of 0 checked):
New packages to be INSTALLED:
ca_root_nss: 3.71
.....
.....
3) Restart server.
If you installed the CONTRIB option please note that the scripts are
installed in /usr/local/share/git-core/contrib. Some of them require
other ports to be installed (perl, python, etc), which you may need to
install manually.
root@drupal-9:~ #
Time now to clone the FAMP stack repository from my personal Github.
root@drupal-9:~ # git clone https://github.com/Adminbyaccident/FAMP.git
Cloning into 'FAMP'...
remote: Enumerating objects: 451, done.
remote: Counting objects: 100% (224/224), done.
remote: Compressing objects: 100% (224/224), done.
remote: Total 451 (delta 140), reused 0 (delta 0), pack-reused 227
Receiving objects: 100% (451/451), 147.72 KiB | 2.02 MiB/s, done.
Resolving deltas: 100% (276/276), done.
root@drupal-9:~ #
Once cloned all the scripts found in Adminbyaccident’s FAMP github have been downloaded to your box. You want to make use those scripts to install the FAMP stack for this step. I’ll use the UNIX-socket one.
root@drupal-9:~ # ll
total 27
-rw-r--r-- 2 root wheel 1023 Apr 9 2021 .cshrc
-rw-r--r-- 1 root wheel 80 Apr 9 2021 .k5login
-rw-r--r-- 1 root wheel 328 Apr 9 2021 .login
-rw-r--r-- 2 root wheel 507 Apr 9 2021 .profile
-rw-r--r-- 1 root wheel 865 Apr 9 2021 .shrc
drwxr-xr-x 3 root wheel 28 Oct 11 14:00 FAMP/
root@drupal-9:~ #
Change directory and enter the FAMP one. List all the files with ‘ls -la’ if you want to have a look.
root@drupal-9:~ # cd FAMP
root@drupal-9:~/FAMP #
Change permissions of the file script so it can be executed.
root@drupal-9:~/FAMP # chmod +x event-php-fpm-unix-socket.sh
root@drupal-9:~/FAMP #
Check the file permissions to see if it’s now executable.
root@drupal-9:~/FAMP # ll event-php-fpm-unix-socket.sh
-rwxr-xr-x 1 root wheel 4168 Oct 11 14:00 event-php-fpm-unix-socket.sh*
root@drupal-9:~/FAMP #
It is executable now so let’s install the FAMP stack now in this box.
root@drupal-9:~ # ./event-php-fpm-unix-socket.sh
After a long list of output lines the FAMP stack should be installed on this box and up and running as well.
Tip: Note your root password for MySQL is located in the /root/db_root_pwd.txt file in the system To read it and store the password safely somewhere else just use the cat command.
root@drupal-9:~/FAMP # cat /root/db_root_pwd.txt
QktQVlCvnsOEwCh1kjVneFPzcoaQLV6B
root@drupal-9:~/FAMP #
To check the FAMP stack has been correctly installed visit the server’s ip with a browser.

Alternatively, you can use the following commands for each of the processes:
Apache HTTP:
root@drupal-9:~/FAMP # ps aux | grep httpd
root 10508 0.0 0.1 18308 6224 - SsJ 14:08 0:00.01 /usr/local/sbin/httpd -DNOHTTPACCEPT
www 10510 0.0 0.2 22192 7268 - IJ 14:08 0:00.00 /usr/local/sbin/httpd -DNOHTTPACCEPT
www 10511 0.0 0.2 22192 7268 - IJ 14:08 0:00.00 /usr/local/sbin/httpd -DNOHTTPACCEPT
www 10512 0.0 0.2 22192 7560 - IJ 14:08 0:00.00 /usr/local/sbin/httpd -DNOHTTPACCEPT
root 11787 0.0 0.0 432 244 0 R+J 14:12 0:00.00 grep httpd
root@drupal-9:~/FAMP #
MySQL:
root@drupal-9:~/FAMP # ps aux | grep mysql
mysql 10522 0.0 0.1 13624 3196 - IsJ 14:08 0:00.03 /bin/sh /usr/local/bin/mysqld_safe --defaults-extra-file=/usr/local/etc/mysql/my.cnf --basedir=/usr/local --datadir=/var/db/mysql --pid-file=/v
mysql 11750 0.0 13.4 2246284 555628 - IJ 14:08 0:02.02 /usr/local/libexec/mysqld --defaults-extra-file=/usr/local/etc/mysql/my.cnf --basedir=/usr/local --datadir=/var/db/mysql --plugin-dir=/usr/loca
root 11789 0.0 0.0 432 244 0 R+J 14:13 0:00.00 grep mysql
root@drupal-9:~/FAMP #
PHP-FPM:
root@drupal-9:~/FAMP # ps aux | grep php
root 11759 0.0 0.3 161632 14012 - SsJ 14:08 0:00.01 php-fpm: master process (/usr/local/etc/php-fpm.conf) (php-fpm)
www 11761 0.0 0.3 161632 14036 - IJ 14:08 0:00.00 php-fpm: pool www (php-fpm)
www 11762 0.0 0.3 161632 14036 - IJ 14:08 0:00.00 php-fpm: pool www (php-fpm)
root 11791 0.0 0.0 432 244 0 R+J 14:14 0:00.00 grep php
root@drupal-9:~/FAMP #
We can now move on to the next step and start installing PHP dependencies for Drupal 9 on FreeBSD 13.0
Extra: Complementary to this FAMP stack you can secure the connections with TLS. I’ll make use of the enable-tls-self-signed.sh script in the collection.
Make the TLS enabler script executable.
root@drupal-9:~/FAMP # chmod +x enable-tls-self-signed.sh
root@drupal-9:~/FAMP #
Execute the script to generate a self-signed certificate, enable TLS connections in the Apache HTTP server and redirect any connection from port 80 to 443. Adjust the values of the script to generate certificates for your country, organization, email, etc.
root@drupal-9:~/FAMP # ./enable-tls-self-signed.sh
Updating FreeBSD repository catalogue...
FreeBSD repository is up to date.
All repositories are up to date.
Checking integrity... done (0 conflicting)
The most recent versions of packages are already installed
Generating a RSA private key
........................................................................................................................................................................+++++
.......+++++
writing new private key to '/usr/local/etc/apache24/server.key'
-----
Performing sanity check on apache24 configuration:
Syntax OK
Stopping apache24.
Waiting for PIDS: 10257.
Performing sanity check on apache24 configuration:
Syntax OK
Starting apache24.
SSL/TLS has been enabled on this server
Performing sanity check on apache24 configuration:
Syntax OK
Stopping apache24.
Waiting for PIDS: 11548.
Performing sanity check on apache24 configuration:
Syntax OK
Starting apache24.
root@drupal-9:~/FAMP #
To test this has worked just visit the server’s IP with a browser. Accept the risk (this is due to the self-signed certificate).
Step 2.- Install the PHP dependencies for Drupal 9
With the FAMP stack already in the box this is where we start the real install of Drupal 9 on FreeBSD 13.0. Drupal needs, aside from the php74-extensions, these two ones: php74-gd and php74-mbstring.
root@drupal-9:~ # pkg install -y php74-gd php74-mbstring php74-pdo_mysql
…..
Message from php74-gd-7.4.24:
--
This file has been added to automatically load the installed extension:
/usr/local/etc/php/ext-20-gd.ini
=====
Message from php74-mbstring-7.4.24:
--
This file has been added to automatically load the installed extension:
/usr/local/etc/php/ext-20-mbstring.ini
=====
Message from php74-pdo_mysql-7.4.24:
--
This file has been added to automatically load the installed extension:
/usr/local/etc/php/ext-30-pdo_mysql.ini
root@drupal-9:~ #
Once installed restart the php-fpm service so these newly installed PHP modules are loaded.
root@drupal-9:~ # service php-fpm restart
Performing sanity check on php-fpm configuration:
[11-Oct-2021 16:08:19] NOTICE: configuration file /usr/local/etc/php-fpm.conf test is successful
Stopping php_fpm.
Performing sanity check on php-fpm configuration:
[11-Oct-2021 16:08:19] NOTICE: configuration file /usr/local/etc/php-fpm.conf test is successful
Starting php_fpm.
root@drupal-9:~ #
With these two PHP extensions we will be able to make use of all the Drupal 9 power.
Tip: In order to list all the PHP installed extensions use the ‘php -m’ command.
root@drupal-9:~ # php -m
[PHP Modules]
Core
ctype
date
dom
filter
gd
hash
iconv
json
libxml
mbstring
mysqli
mysqlnd
pcre
PDO
pdo_mysql
pdo_sqlite
Phar
posix
Reflection
session
SimpleXML
SPL
sqlite3
standard
tokenizer
xml
xmlreader
xmlwriter
Zend OPcache
[Zend Modules]
Zend OPcache
root@drupal-9:~ #
With the FAMP stack installed and the necessary dependencies in place it’s time now to configure MySQL for Drupal.
Step 3. Configure MySQL for the Drupal installation
We’ll need a database and a username for Drupal to work. Drupal needs to store information on posts, users, tags, and many of its features in a database. In this install we are making use of MySQL, but other databases can be used such as PostgreSQL.
We’ll first log in as the database root user. Remember this root’s user password is stored in /root/db_root_pwd.txt.
root@drupal-9:~ # mysql -u root -p
Enter password:
Welcome to the MySQL monitor. Commands end with ; or \g.
Your MySQL connection id is 10
Server version: 8.0.26 Source distribution
Copyright (c) 2000, 2021, Oracle and/or its affiliates.
Oracle is a registered trademark of Oracle Corporation and/or its
affiliates. Other names may be trademarks of their respective
owners.
Type 'help;' or '\h' for help. Type '\c' to clear the current input statement.
root@localhost [(none)]>
Once logged in the MySQL program we will create a database for Drupal.
root@localhost [(none)]> CREATE DATABASE drupal;
Query OK, 1 row affected (0.01 sec)
root@localhost [(none)]>
With the database created we’ll create a user and assign a password.
root@localhost [(none)]> CREATE USER 'drupaluser'@'localhost' IDENTIFIED WITH mysql_native_password BY 'albert-XP24';
Query OK, 0 rows affected (0.01 sec)
root@localhost [(none)]>
Once we’ve created a database and a user with a password, we’ll grant rights to the user on that database.
root@localhost [(none)]> GRANT ALL PRIVILEGES ON drupal.* TO drupaluser@localhost;
Query OK, 0 rows affected (0.01 sec)
root@localhost [(none)]>
We’ll now reload all the users and privileges on the MySQL installation so these changes take immediate effect.
root@localhost [(none)]> FLUSH PRIVILEGES;
Query OK, 0 rows affected (0.01 sec)
root@localhost [(none)]>
We now exit the MySQL prompt.
root@localhost [(none)]> exit
Bye
root@drupal-9:~ #
With the FAMP stack installed and the necessary dependencies in place it’s time now to install Drupal.
Step 4. Install Drupal 9
Installing Drupal 9 on FreeBSD 13.0 it’s quite easy and we can do that by just installing a port. However, it we want the very latest version on our system we will download Drupal 9 from the Drupal’s site.
Let’s change directory and place ourselves in the /tmp directory. We’ll download Drupal there, apply the necessary changes and then copy all the structure in the Apache HTTP directory for Drupal.
root@drupal-9:~ # cd /tmp
root@drupal-9:/tmp #
We download Drupal.
root@drupal-9:/tmp # fetch https://ftp.drupal.org/files/projects/drupal-9.2.7.tar.gz
drupal-9.2.7.tar.gz 17 MB 10 MBps 02s
root@drupal-9:/tmp #
Once downloaded the decompress the tarball.
root@drupal-9:/tmp # tar -zxvf drupal-9.2.7.tar.gz
......
root@drupal-9:/tmp #
Tip: Don’t use the ‘v’ flag if you want not to see all the output flashing your screen.
List the contents in the ‘/tmp’ directory.
root@drupal-9:/tmp # ll
total 18462
drwxrwxrwt 2 root wheel 2 Oct 11 13:37 .ICE-unix/
drwxrwxrwt 2 root wheel 2 Oct 11 13:37 .X11-unix/
drwxrwxrwt 2 root wheel 2 Oct 11 13:37 .XIM-unix/
drwxrwxrwt 2 root wheel 2 Oct 11 13:37 .font-unix/
drwxr-xr-x 8 root wheel 26 Oct 6 20:18 drupal-9.2.7/
-rw-r--r-- 1 root wheel 18863167 Oct 6 20:19 drupal-9.2.7.tar.gz
srwxrwxrwx 1 mysql wheel 0 Oct 11 14:08 mysql.sock=
-rw------- 1 mysql wheel 6 Oct 11 14:08 mysql.sock.lock
srwxrwxrwx 1 mysql wheel 0 Oct 11 14:08 mysqlx.sock=
-rw------- 1 mysql wheel 7 Oct 11 14:08 mysqlx.sock.lock
srw-rw---- 1 www www 0 Oct 11 16:08 php-fpm.sock=
root@drupal-9:/tmp #
There’s a ‘drupal-9.2.7’ directory, that comes out of the tarball. In there we’ve got all the files we need for the Drupal installation. Get inside that directory and further down to the default directory.
root@drupal-9:/tmp # cd drupal-9.2.7/sites/default
root@drupal-9:/tmp/drupal-9.2.7/sites/default #
In here there’s a key file called ‘default.settings.php’. We’ll copy it and name the new file ‘settings.php’.
root@drupal-9:/tmp/drupal-9.2.7/sites/default # cp default.settings.php settings.php
root@drupal-9:/tmp/drupal-9.2.7/sites/default #
We need to modify a few of the settings for Drupal to work. For example, we have to explicit the database, username and password for Drupal to make use of MySQL.
Pick up your favorite editor of choice (mine is vi) and edit the above mentioned fields in the settings.php file.
Before:
* @code
* $databases['default']['default'] = [
* 'database' => 'databasename',
* 'username' => 'sqlusername',
* 'password' => 'sqlpassword',
* 'host' => 'localhost',
* 'port' => '3306',
* 'driver' => 'mysql',
* 'prefix' => '',
* 'collation' => 'utf8mb4_general_ci',
* ];
* @endcode
After:
* @code
* $databases['default']['default'] = [
* 'database' => 'drupal',
* 'username' => 'drupaluser',
* 'password' => 'albert-XP24',
* 'host' => 'localhost',
* 'port' => '3306',
* 'driver' => 'mysql',
* 'prefix' => '',
* 'collation' => 'utf8mb4_general_ci',
* ];
* @endcode
Notice we’ve replaced the values with the same ones we’ve used in the third step when we were configuring MySQL to be used for Drupal.
Now the bits for the Drupal installation have been put in place we will copy all the contents in the Drupal directory and place them inside the DocumentRoot directory in Apache land.
root@drupal-9:/tmp/drupal-9.2.7/sites/default # cp -r /tmp/drupal-9.2.7/ /usr/local/www/apache24/data
root@drupal-9:/tmp/drupal-9.2.7/sites/default #
We’ll now change directory to the site’s root one.
root@drupal-9:/tmp/drupal-9.2.7/sites/default # cd /usr/local/www/apache24/data
root@drupal-9:/usr/local/www/apache24/data #
In here we’ll now list all the files inside the current directory and we’ll see the owner of the files is the system’s root user and they group is the ‘wheel’ administrators one.
root@drupal-9:/usr/local/www/apache24/data # ll
total 145
-rw-r--r-- 1 root wheel 1025 Oct 11 16:40 .csslintrc
-rw-r--r-- 1 root wheel 357 Oct 11 16:40 .editorconfig
-rw-r--r-- 1 root wheel 151 Oct 11 16:40 .eslintignore
-rw-r--r-- 1 root wheel 41 Oct 11 16:40 .eslintrc.json
-rw-r--r-- 1 root wheel 3858 Oct 11 16:40 .gitattributes
-rw-r--r-- 1 root wheel 2314 Oct 11 16:40 .ht.router.php
-rw-r--r-- 1 root wheel 7572 Oct 11 16:40 .htaccess
-rw-r--r-- 1 root wheel 94 Oct 11 16:40 INSTALL.txt
-rw-r--r-- 1 root wheel 18092 Oct 11 16:40 LICENSE.txt
-rw-r--r-- 1 root wheel 3205 Oct 11 16:40 README.md
-rw-r--r-- 1 root wheel 312 Oct 11 16:40 autoload.php
-rw-r--r-- 1 root wheel 3156 Oct 11 16:40 composer.json
-rw-r--r-- 1 root wheel 171393 Oct 11 16:40 composer.lock
drwxr-xr-x 12 root wheel 48 Oct 11 16:40 core/
-rw-r--r-- 1 root wheel 1507 Oct 11 16:40 example.gitignore
-rw-r--r-- 1 root wheel 45 Oct 11 14:07 index.html
-rw-r--r-- 1 root wheel 549 Oct 11 16:40 index.php
drwxr-xr-x 2 root wheel 3 Oct 11 16:40 modules/
drwxr-xr-x 2 root wheel 3 Oct 11 16:40 profiles/
-rw-r--r-- 1 root wheel 1586 Oct 11 16:40 robots.txt
drwxr-xr-x 3 root wheel 7 Oct 11 16:40 sites/
drwxr-xr-x 2 root wheel 3 Oct 11 16:40 themes/
-rw-r--r-- 1 root wheel 804 Oct 11 16:40 update.php
drwxr-xr-x 19 root wheel 22 Oct 11 16:40 vendor/
-rw-r--r-- 1 root wheel 4016 Oct 11 16:40 web.config
root@drupal-9:/usr/local/www/apache24/data #
We have to change the permissions of all the Drupal files so the Apache HTTP ‘www’ user can make use of them.
root@drupal-9:/usr/local/www/apache24/data # chown -R www:www /usr/local/www/apache24/data
root@drupal-9:/usr/local/www/apache24/data #
We can list them all again to check the changes in ownership.
root@drupal-9:/usr/local/www/apache24/data # ll
total 145
-rw-r--r-- 1 www www 1025 Oct 11 16:40 .csslintrc
-rw-r--r-- 1 www www 357 Oct 11 16:40 .editorconfig
-rw-r--r-- 1 www www 151 Oct 11 16:40 .eslintignore
-rw-r--r-- 1 www www 41 Oct 11 16:40 .eslintrc.json
-rw-r--r-- 1 www www 3858 Oct 11 16:40 .gitattributes
-rw-r--r-- 1 www www 2314 Oct 11 16:40 .ht.router.php
-rw-r--r-- 1 www www 7572 Oct 11 16:40 .htaccess
-rw-r--r-- 1 www www 94 Oct 11 16:40 INSTALL.txt
-rw-r--r-- 1 www www 18092 Oct 11 16:40 LICENSE.txt
-rw-r--r-- 1 www www 3205 Oct 11 16:40 README.md
-rw-r--r-- 1 www www 312 Oct 11 16:40 autoload.php
-rw-r--r-- 1 www www 3156 Oct 11 16:40 composer.json
-rw-r--r-- 1 www www 171393 Oct 11 16:40 composer.lock
drwxr-xr-x 12 www www 48 Oct 11 16:40 core/
-rw-r--r-- 1 www www 1507 Oct 11 16:40 example.gitignore
-rw-r--r-- 1 www www 45 Oct 11 14:07 index.html
-rw-r--r-- 1 www www 549 Oct 11 16:40 index.php
drwxr-xr-x 2 www www 3 Oct 11 16:40 modules/
drwxr-xr-x 2 www www 3 Oct 11 16:40 profiles/
-rw-r--r-- 1 www www 1586 Oct 11 16:40 robots.txt
drwxr-xr-x 3 www www 7 Oct 11 16:40 sites/
drwxr-xr-x 2 www www 3 Oct 11 16:40 themes/
-rw-r--r-- 1 www www 804 Oct 11 16:40 update.php
drwxr-xr-x 19 www www 22 Oct 11 16:40 vendor/
-rw-r--r-- 1 www www 4016 Oct 11 16:40 web.config
root@drupal-9:/usr/local/www/apache24/data #
We’re just one configuration change away to finish our Drupal install through the browser.
As it can be seen above Drupal has an .htaccess file by default with many interesting settings and rewrites. To make use of such configuration in that file we need to change the ‘AllowOverride’ directive in the DocumentRoot path in Apache HTTP from ‘None’ to ‘All’.
We first look for the line.
root@drupal-9:/usr/local/www/apache24/data # grep -n 'DocumentRoot\|AllowOverride None' /usr/local/etc/apache24/httpd.conf
246:# DocumentRoot: The directory out of which you will serve your
250:DocumentRoot "/usr/local/www/apache24/data"
271: AllowOverride None
350: # access content that does not live under the DocumentRoot.
384: AllowOverride None
root@drupal-9:/usr/local/www/apache24/data #
Line 271 looks suspicious to be the one affecting the DocumentRoot directory. Use your favourite editor to inspect this. I have and that is the correct line. Use it and apply the changes.
Before:
AllowOverride None
After:
AllowOverride All
For this change to take effect restart the Apache HTTP service.
root@drupal-9:/usr/local/www/apache24/data # apachectl restart
Performing sanity check on apache24 configuration:
Syntax OK
Stopping apache24.
Waiting for PIDS: 12661.
Performing sanity check on apache24 configuration:
Syntax OK
Starting apache24.
root@drupal-9:/usr/local/www/apache24/data #
We can now use the browser to end up the installation of Drupal 9 on FreeBSD 13.0.
Step 5. Finish the Drupal 9 install in the browser.
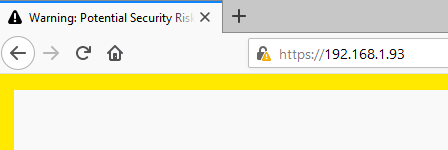
For this guide we’ll visit the following IP in the browser.
https://192.168.1.93/core/install.php
We’ll first see this screen.
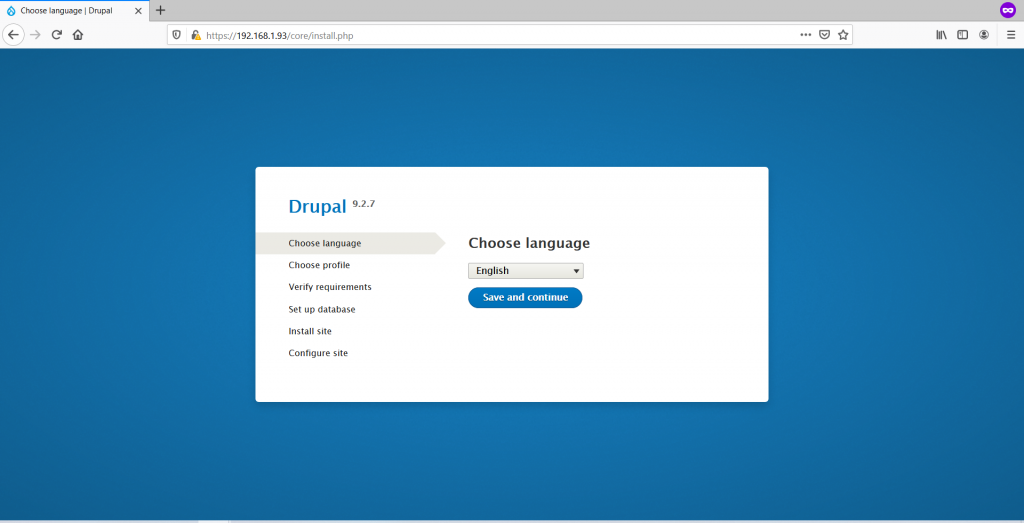
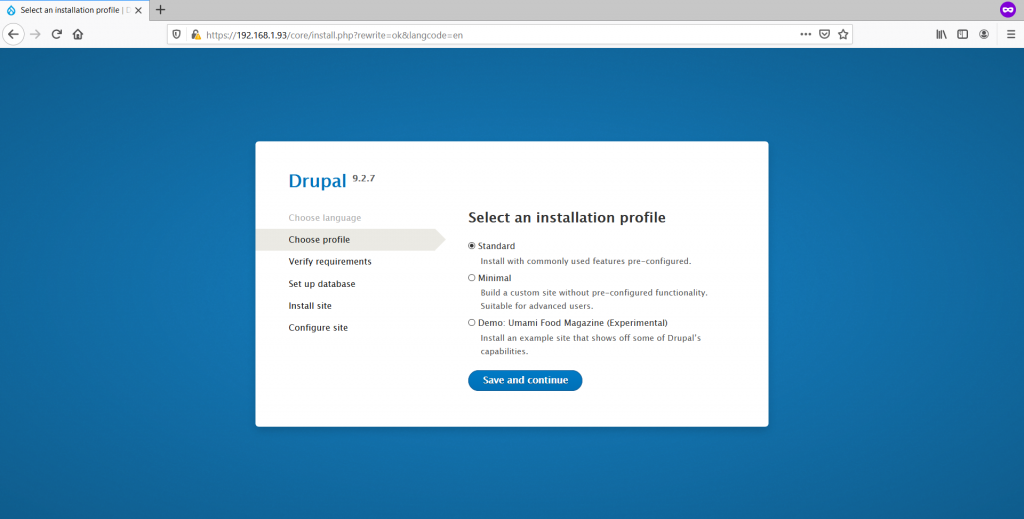
If we press continue, we can choose three levels of installation. A standard one, a minimal one and a demo. I’ll pick the demo which includes an already elaborated website with posts, pictures, structure, users, etc.
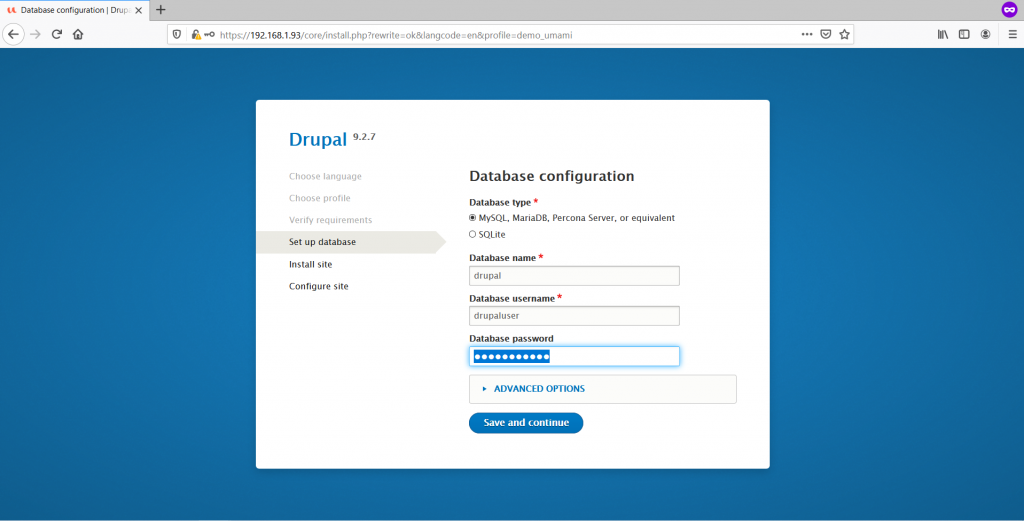
The demo install, as well as the other two ones, will require the database name, user and password.
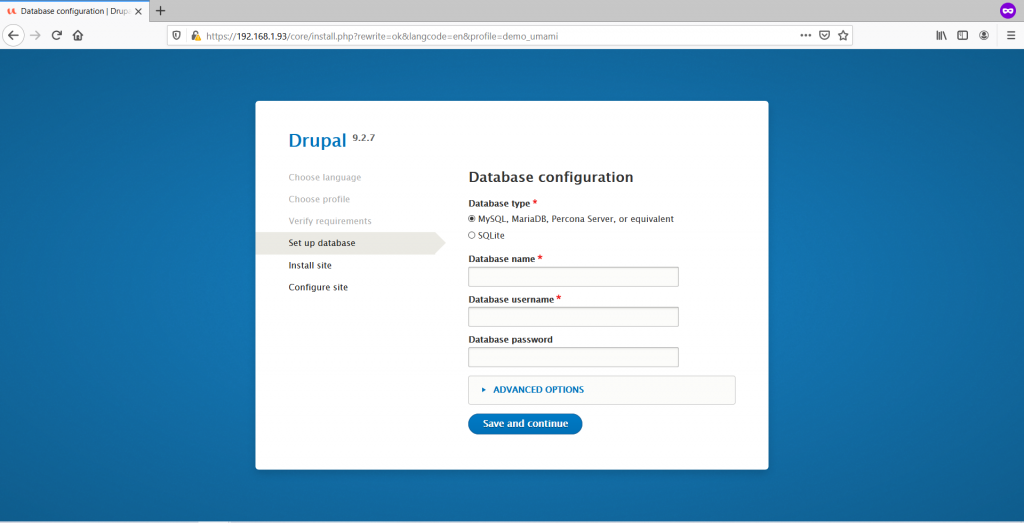
With the fields filled with the data from step 3, we press “Save and continue”.
The install of Drupal 9 on FreeBSD really starts now.

Once Drupal is installed the GUI will ask us to configure a website, asking for the name to put on it, username, password, email etc.
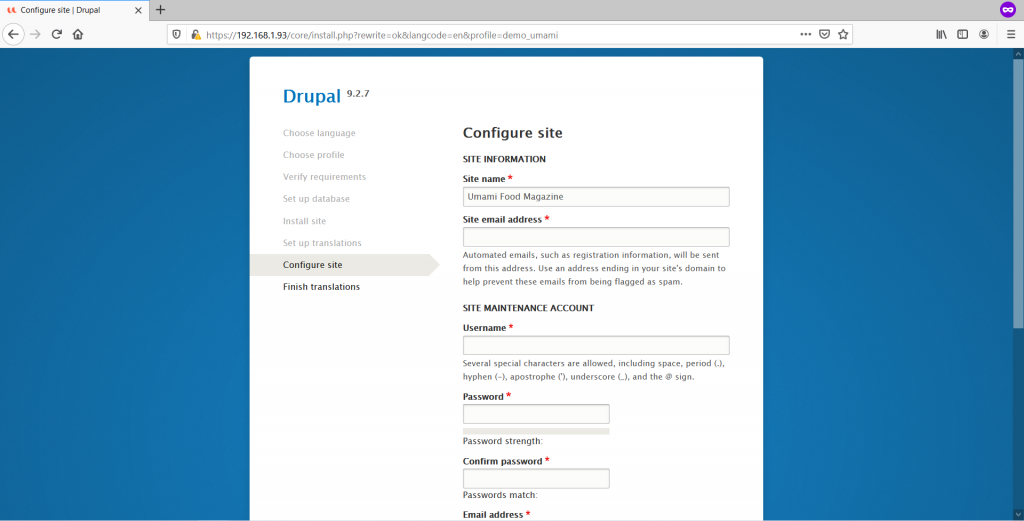
Country and other regional related data is requested.
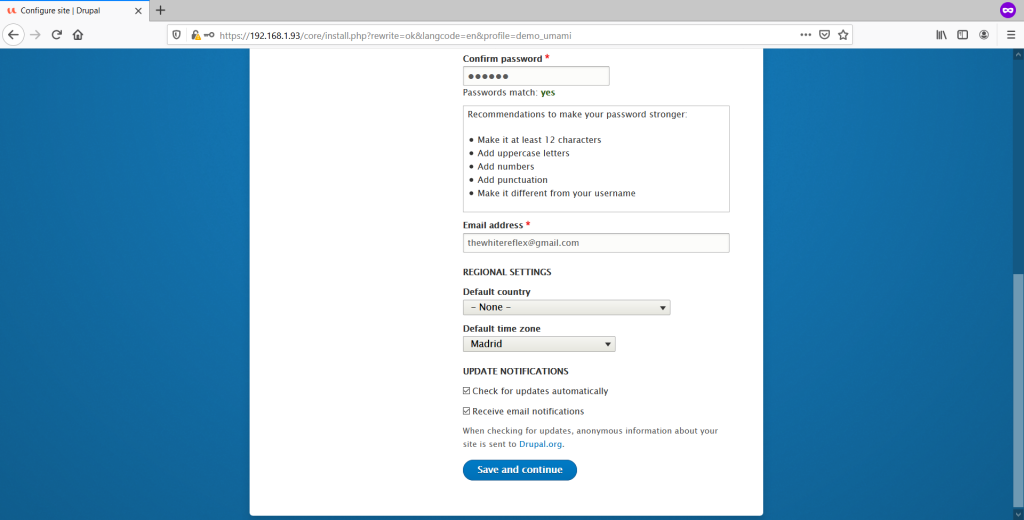
Any translation will be installed at this time too.
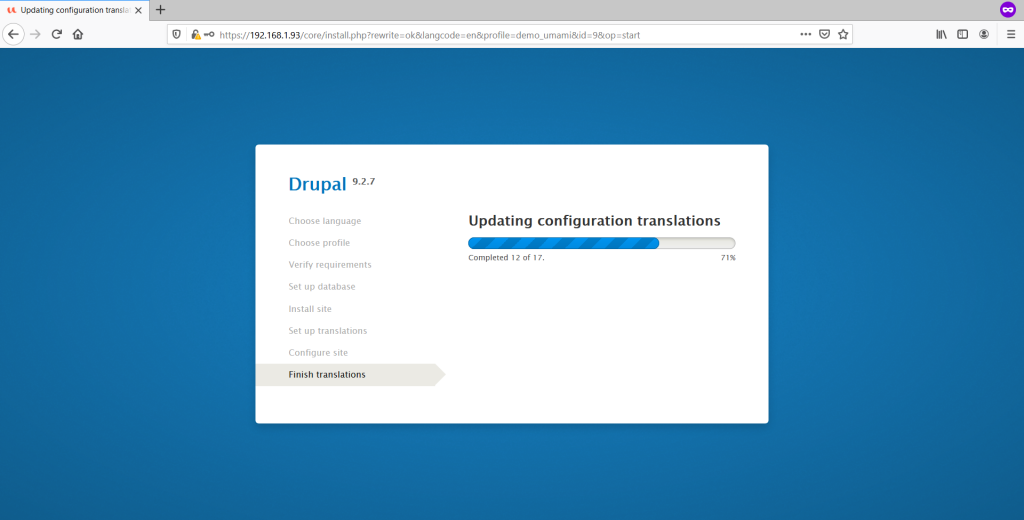
There’s a chance you get a timeout like this.

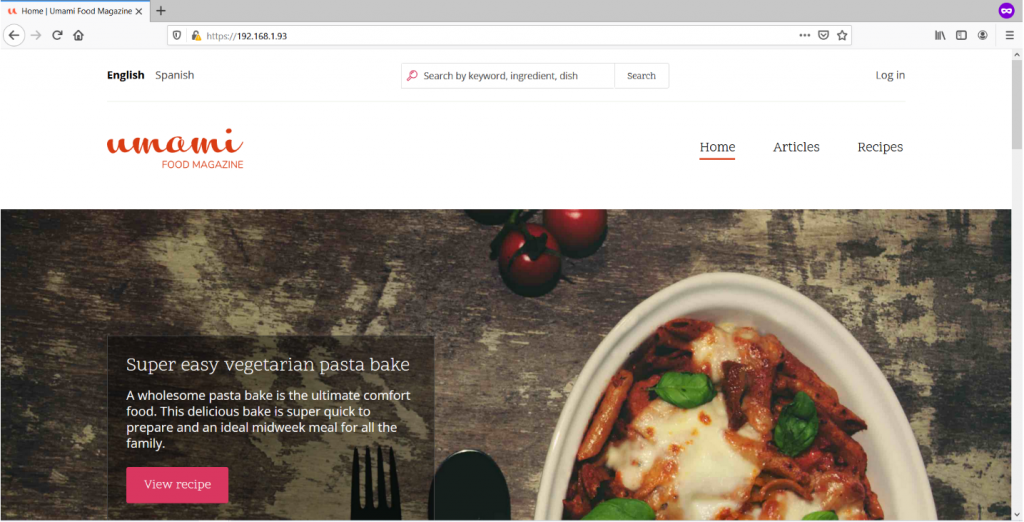
Don’t worry and visit your site (or IP) with your browser. You’ll be greeted with a Drupal 9 install.
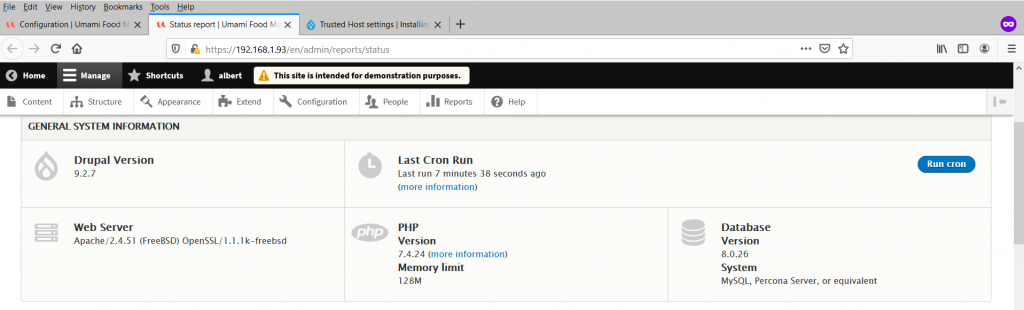
Once logged in the admin panel we’ll see this:
Conclusion
It’s a piece of cake to install Drupal 9 on FreeBSD. If you are already using Drupal you know this ground. You may be using Linux instead. Use this guide if you want to make your testing for upgrading to this Drupal version. Hope this helps. And remember to use MPM Event for Apache HTTP and PHP-FPM to extract all the performance.
If you find the articles in Adminbyaccident.com useful to you, please consider making a donation.
Use this link to get $200 credit at DigitalOcean and support Adminbyaccident.com costs.
Get $100 credit for free at Vultr using this link and support Adminbyaccident.com costs.
Mind Vultr supports FreeBSD on their VPS offer.