Operating System level virtualization is hitting hard now, as much as VM’s did just a few years ago. Docker is the popular framework for this matter, the new kid on the block so to speak. This is the hot spot now and if anyone wants to appear knowledgeable about system administration knowing this technology is the mandatory new subject to deal with. However is this technology that new? On a past article I already explained there are alternatives to Linux, for the very same reason Docker exists and kicks ass.
Leaving aside this kind of technology debuted on an open source OS back in the yesteryear of 2000 from the hands of Poul-Henning Kamp and Robert Watson with their work on FreeBSD Jails, fully extended and thoughtfully designed by Sun in the form of Solaris Zones on 2004, finally, twenty years later the world seems to get it. And because of the popularity of it and Ubuntu being one of those mainstream GNU/Linux distros, here this very article.
For those in doubt of the reliability or bleeding edge development of FreeBSD or Illumos derivatives I am very keen to share with you Netflix is heavily relying on FreeBSD for their Open Connect Appliances (their global CDN) as this presentation explains where these slides where also shown, and last but not least Joyent Inc, a cloud provider owned by ‘little’ Samsung still developing and moving forward the technology some of them developed on Solaris. So yes, there is a world outside of the Linux ecosystem ecochamber.
If you find the articles in Adminbyaccident.com useful to you, please consider making a donation.
Use this link to get $200 credit at DigitalOcean and support Adminbyaccident.com costs.
Get $100 credit for free at Vultr using this link and support Adminbyaccident.com costs.
Mind Vultr supports FreeBSD on their VPS offer.
Before digging deep into this how to install Docker on Ubuntu 18.04 let’s address a few questions first. Operating system virtualization means something similar to there is only one kernel and there is a host userland orchestrating it, but you can have several simultaneosly working guest userlands hitting the very same kernel. Sounds mad? What about traditional VM’s where a hypervisor (which has its own kernel to manage the hardware) needs to talk to the upper guest OS kernel? A kernel speaking to another kernel. Does it make sense? Isn’t more efficient to have one kernel, managed by one host userland and several disposable guest userlands so you can spin them on, off, modify them at will, etc?
Advantages of this kind of technology are: performance overhead of VM’s automatically disappears, lightness also means a minor impact on resources like memory like happens on VM’s where memory is provisioned on a fixed rate even if it’s not in active use, or disk space since containers or jails have a much less footprint, plus you have the manageability of VM’s, replicability, ease of deployment, configuration facilities like Dockerfiles or Jails’s iocage templates. This means one does not only have the capacity to have a controlled pre-configured environment, it also means it is easy to deploy anywhere, at any scale, easily, from development to production, quicker than with a traditional approach and changes can be applied with unprecedented ease. Those who have already used iocage on FreeBSD Jails already know about this for years. Solaris and Illumos guys have known this too for quite a long time.
This how to install Docker on Ubuntu 18.04 assumes you have a running system for whatever the method you’ve chosen. It doesn’t matter if you are running on bare metal or on a VM in the sense of the commands to use, configuration, use, and the like. However, as already described this technology makes more sense to be run on bare metal. And since there is a live kernel patching facility available for Ubuntu, running Docker on a VM is something beyond an evil sin.
As always first things first. Make sure everything is up to date.
$ sudo apt update
$ sudo apt upgrade
Once the system is fully updated and patched we will add a few necessary packages before getting into the Docker install itself.
The packages are apt-transport-https, ca-certificates, curl and software-properties-common. Apt-transport-https enables the apt program to get the packages via https encrypted connections. The ca-certificates package contains a bundle of certificates from certificate authorities. Do I have to tell you what curl is?
albert@BuntuVM:~$ sudo apt install apt-transport-https ca-certificates curl software-properties- common
Reading package lists... Done
Building dependency tree
Reading state information... Done
ca-certificates is already the newest version (20180409).
software-properties-common is already the newest version (0.96.24.32.7).
The following additional packages will be installed:
libcurl4
The following NEW packages will be installed:
apt-transport-https curl libcurl4
0 upgraded, 3 newly installed, 0 to remove and 0 not upgraded.
Need to get 375 kB of archives.
After this operation, 1.189 kB of additional disk space will be used.
Do you want to continue? [Y/n] y
Next step is adding the GPG repository key that will later allow us to get and install Docker from their own official repository instead of Canonical’s.
albert@BuntuVM:~$ curl -fsSL https://download.docker.com/linux/ubuntu/gpg | sudo apt-key add -
OK
albert@BuntuVM:~$
Once we’ve got the key (the OK output on the previous step is mandatory) we can now add the repository to our sources list.
albert@BuntuVM:~$ sudo add-apt-repository "deb [arch=amd64] https://download.docker.com/ linux/ubuntu bionic stable"
Get:1 http://security.ubuntu.com/ubuntu bionic-security InRelease [88,7 kB]
Hit:2 http://archive.canonical.com/ubuntu bionic InRelease
Hit:3 http://es.archive.ubuntu.com/ubuntu bionic InRelease
Get:4 http://es.archive.ubuntu.com/ubuntu bionic-updates InRelease [88,7 kB]
Get:5 https://download.docker.com/linux/ubuntu bionic InRelease [64,4 kB]
Get:6 http://es.archive.ubuntu.com/ubuntu bionic-backports InRelease [74,6 kB]
Get:7 https://download.docker.com/linux/ubuntu bionic/stable amd64 Packages [3.695 B]
Fetched 320 kB in 1s (551 kB/s)
Reading package lists... Done
albert@BuntuVM:~$
Now the new entry on the sources file has been made (located in /etc/apt/sources.list for the curious) let’s update apt again so it reads the new input.
albert@BuntuVM:~$ sudo apt update
Get:1 http://security.ubuntu.com/ubuntu bionic-security InRelease [88,7 kB]
Hit:2 https://download.docker.com/linux/ubuntu bionic InRelease
Hit:3 http://es.archive.ubuntu.com/ubuntu bionic InRelease
Hit:4 http://archive.canonical.com/ubuntu bionic InRelease
Get:5 http://es.archive.ubuntu.com/ubuntu bionic-updates InRelease [88,7 kB]
Get:6 http://es.archive.ubuntu.com/ubuntu bionic-backports InRelease [74,6 kB]
Fetched 252 kB in 1s (446 kB/s)
Reading package lists... Done
Building dependency tree
Reading state information... Done
All packages are up to date.
albert@BuntuVM:~$
Let’s now install Docker Community Edition.
albert@BuntuVM:~$ sudo apt install docker-ce
Reading package lists... Done
Building dependency tree
Reading state information... Done
The following additional packages will be installed:
aufs-tools cgroupfs-mount containerd.io docker-ce-cli git git-man liberror-perl pigz
Suggested packages:
git-daemon-run | git-daemon-sysvinit git-doc git-el git-email git-gui gitk gitweb git-cvs git- mediawiki git-svn
The following NEW packages will be installed:
aufs-tools cgroupfs-mount containerd.io docker-ce docker-ce-cli git git-man liberror-perl pigz
0 upgraded, 9 newly installed, 0 to remove and 0 not upgraded.
Need to get 55,4 MB of archives.
After this operation, 277 MB of additional disk space will be used.
Do you want to continue? [Y/n] y
.........
#### much output later ####
Setting up docker-ce (5:18.09.1~3-0~ubuntu-bionic) ...
update-alternatives: using /usr/bin/dockerd-ce to provide /usr/bin/dockerd (dockerd) in auto mode
Created symlink /etc/systemd/system/multi-user.target.wants/docker.service → /lib/systemd/system/docker.service.
Created symlink /etc/systemd/system/sockets.target.wants/docker.socket → /lib/systemd/system/docker.socket.
Processing triggers for ureadahead (0.100.0-20) ...
Processing triggers for systemd (237-3ubuntu10.12) ...
albert@BuntuVM:~$
It seems everything went fine but let’s check the docker service is up and running.
albert@BuntuVM:~$ sudo systemctl status docker
● docker.service - Docker Application Container Engine
Loaded: loaded (/lib/systemd/system/docker.service; enabled; vendor preset: enabled)
Active: active (running) since Sun 2019-02-10 13:17:39 CET; 1min 7s ago
Docs: https://docs.docker.com
Main PID: 10136 (dockerd)
Tasks: 8
CGroup: /system.slice/docker.service
└─10136 /usr/bin/dockerd -H fd://
feb 10 13:17:39 BuntuVM dockerd[10136]: time="2019-02-10T13:17:39.503649076+01:00" level=warning msg="Your kernel does not support swap memory limit"
feb 10 13:17:39 BuntuVM dockerd[10136]: time="2019-02-10T13:17:39.503766276+01:00" level=warning msg="Your kernel does not support cgroup rt period"
feb 10 13:17:39 BuntuVM dockerd[10136]: time="2019-02-10T13:17:39.503845676+01:00" level=warning msg="Your kernel does not support cgroup rt runtime"
feb 10 13:17:39 BuntuVM dockerd[10136]: time="2019-02-10T13:17:39.505519684+01:00" level=info msg="Loading containers: start."
feb 10 13:17:39 BuntuVM dockerd[10136]: time="2019-02-10T13:17:39.605792573+01:00" level=info msg="Default bridge (docker0) is assigned with an IP add
feb 10 13:17:39 BuntuVM dockerd[10136]: time="2019-02-10T13:17:39.681485239+01:00" level=info msg="Loading containers: done."
feb 10 13:17:39 BuntuVM dockerd[10136]: time="2019-02-10T13:17:39.822501114+01:00" level=info msg="Docker daemon" commit=4c52b90 graphdriver(s)=overla
feb 10 13:17:39 BuntuVM dockerd[10136]: time="2019-02-10T13:17:39.822805555+01:00" level=info msg="Daemon has completed initialization"
feb 10 13:17:39 BuntuVM systemd[1]: Started Docker Application Container Engine.
feb 10 13:17:39 BuntuVM dockerd[10136]: time="2019-02-10T13:17:39.867289132+01:00" level=info msg="API listen on /var/run/docker.sock"
albert@BuntuVM:~$
So yes, the docker daemon is running. If we want to make use of this technology the key command here is ‘docker’. I should recommend you not to enable its use without sudo. Let’s imagine for a moment you have 10 docker instances running giving services to a bunch of customers, or your in house developers and one admin makes a typo. He can make the typo even if he uses sudo, that’s fair, but how many times you’ve seen the typo after hitting enter?
Now let’s look for already built Docker images to download and play with on this how to install docker on Ubuntu 18.04 guide. For that we will type as follows:
albert@BuntuVM:~$ sudo docker search debian
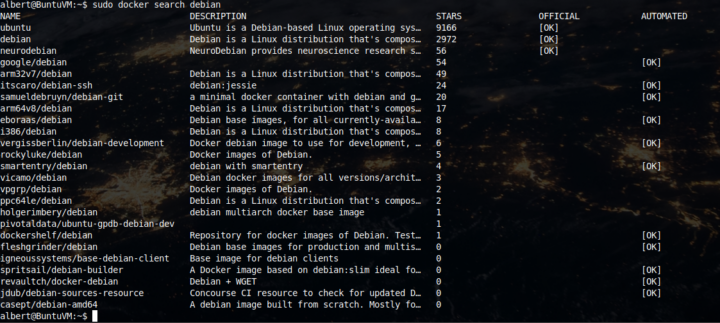
As we can see in the screenshot there is a signifficant amount of images available but notice only the three ones at the top are official ones. Be careful when you choose images since you may get into trouble.
Let’s say we want to install a Debian image on our system. We’ll do that by issuing the following command:
$ sudo docker pull debian

The total output looks like this:
albert@BuntuVM:~$ sudo docker pull debian
Using default tag: latest
latest: Pulling from library/debian
741437d97401: Pull complete
Digest: sha256:066051f6674f6a3293bbd5a190081b1ae7fcae655a3884db59ebb3a2831da623
Status: Downloaded newer image for debian:latest
albert@BuntuVM:~$
To check the image is already on your system do as follows:
albert@BuntuVM:~$ sudo docker images
REPOSITORY TAG IMAGE ID CREATED SIZE
debian latest d508d16c64cd 4 days ago 101MB
albert@BuntuVM:~$
Now that we have one image we can create a container from it. The image will stay as it is, even if we modify the container. Of course we can create, modify images and adequate those to our needs. The point is when you run an image, a container is created from it. The image stays as it is unless you expressely modify it. Derived containers can be modified, configured and run without altering the original image.
So to create our first container we will just run it.
albert@BuntuVM:~$ sudo docker run -i -t debian
root@7073b39a1983:/#
And as you can see we are now in our recently created container. It is named 7073b39a1983. However you may want to create it without getting into it immediately. Or you may type exit at the very beggining, which stops the whole thing. At this point I have to express my disappointment with the command syntax because it is counter intuitive (more on this on a future article).
So we will stress out that if we want to create a new container from an image we will just type the following:
albert@BuntuVM:~$ sudo docker run debian
albert@BuntuVM:~$
And yes, there is no output, no signal telling you something went right, or wrong…. See? You may list containers now like follows:
albert@BuntuVM:~$ sudo docker container ls
CONTAINER ID IMAGE COMMAND CREATED STATUS PORTS NAMES
albert@BuntuVM:~$
And yet no output again. Haven’t I told you a new container had been created? Yes I did. Once again broken syntax. Appalling syntax.
Moving forward. You have created a container by typing ‘sudo docker run debian’ and you may list it to see it is there by:
albert@BuntuVM:~$ sudo docker container ls -a
CONTAINER ID IMAGE COMMAND CREATED STATUS PORTS NAMES
2f7922acfdc3 debian "bash" 4 minutes ago Exited (0) 4 minutes ago heuristic_kalam
albert@BuntuVM:~$
Or you can list it by:
albert@BuntuVM:~$ sudo docker ps -a
CONTAINER ID IMAGE COMMAND CREATED STATUS PORTS NAMES
2f7922acfdc3 debian "bash" 5 minutes ago Exited (0) 5 minutes ago heuristic_kalam
albert@BuntuVM:~$
Just remember to append the -a flag at the end.
Now that we have our image, created a container and found it on our system we’ll turn it on and do a few things with it. First we will fire it up.
albert@BuntuVM:~$ sudo docker start 2f7922acfdc3
2f7922acfdc3
albert@BuntuVM:~$
And we’ll check this is correct by:
albert@BuntuVM:~$ sudo docker ps -a
CONTAINER ID IMAGE COMMAND CREATED STATUS PORTS NAMES
2f7922acfdc3 debian "bash" 14 minutes ago Exited (0) 2 seconds ago heuristic_kalam
albert@BuntuVM:~$
By shooting some cans and empty bottles in the middle of nowhere. Turns out you’d better create your containers by always doing it with the flags ‘-i’ and ‘-t’ respectively. Ain’t it funny?
We will do some cleaning by removing the not-useful container.
albert@BuntuVM:~$ sudo docker container rm 2f7922acfdc3
2f7922acfdc3
albert@BuntuVM:~$
Hey! Don’t shout at me. They did it. I am just telling you how it is. How pa-in-ful it is. This is what happened to me the very first days I started playing with this Docker thing just a month ago. And I wanted to reproduce on this how to install Docker on Ubuntu 18.04 guide so everyone can enjoy the pain for a noobie. You can be a very seasoned UNIX administrator and you will hate this syntax from the very first minute. You create a container and you can’t find it. You do something and there is no confirmation/rejection output.
We now create one container using the ‘right’ flags.
albert@BuntuVM:~$ sudo docker run -i -t debian
root@8c1586bd055c:/# exit
exit
albert@BuntuVM:~$
Let’s check this is on the list.
albert@BuntuVM:~$ sudo docker ps -a
CONTAINER ID IMAGE COMMAND CREATED STATUS PORTS NAMES
8c1586bd055c debian "bash" 31 seconds ago Exited (0) 26 seconds ago priceless_kepler
albert@BuntuVM:~$
Ok it is created but exited. Let’s fire it up so we can play and install things on it.
albert@BuntuVM:~$ sudo docker start 8c1586bd055c
8c1586bd055c
albert@BuntuVM:~$
We make sure it is up and running.
albert@BuntuVM:~$ sudo docker ps
CONTAINER ID IMAGE COMMAND CREATED STATUS PORTS NAMES
8c1586bd055c debian "bash" 2 minutes ago Up 27 seconds priceless_kepler
albert@BuntuVM:~$
So yes, there it is, up and running. Let’s now play with it. We can just update the sources, for example, like we do with a normal, bare metal or VM debian installation.
albert@BuntuVM:~$ sudo docker exec 8c1586bd055c apt update
WARNING: apt does not have a stable CLI interface. Use with caution in scripts.
Get:2 http://security-cdn.debian.org/debian-security stretch/updates InRelease [94.3 kB]
Ign:1 http://cdn-fastly.deb.debian.org/debian stretch InRelease
Get:3 http://cdn-fastly.deb.debian.org/debian stretch-updates InRelease [91.0 kB]
Get:4 http://cdn-fastly.deb.debian.org/debian stretch Release [118 kB]
Get:5 http://security-cdn.debian.org/debian-security stretch/updates/main amd64 Packages [475 kB]
Get:6 http://cdn-fastly.deb.debian.org/debian stretch-updates/main amd64 Packages [7748 B]
Get:7 http://cdn-fastly.deb.debian.org/debian stretch Release.gpg [2434 B]
Get:8 http://cdn-fastly.deb.debian.org/debian stretch/main amd64 Packages [7090 kB]
Fetched 7878 kB in 6s (1232 kB/s)
Reading package lists...
Building dependency tree...
Reading state information...
All packages are up to date.
albert@BuntuVM:~$
Funnily enough it worked despite apt says it doesn’t have a stable CLI interface. All these years… living in a lie…
Let’s install the Apache web server.
albert@BuntuVM:~$ sudo docker exec 8c1586bd055c apt install apache2 -y
WARNING: apt does not have a stable CLI interface. Use with caution in scripts.
Reading package lists...
Building dependency tree...
Reading state information...
The following additional packages will be installed:
apache2-bin apache2-data apache2-utils bzip2 file libapr1 libaprutil1
libaprutil1-dbd-sqlite3 libaprutil1-ldap libexpat1 libffi6 libgdbm3 libgmp10
libgnutls30 libgpm2 libhogweed4 libicu57 libldap-2.4-2 libldap-common
liblua5.2-0 libmagic-mgc libmagic1 libncurses5 libnghttp2-14 libp11-kit0
libperl5.24 libprocps6 libsasl2-2 libsasl2-modules libsasl2-modules-db
libsqlite3-0 libssl1.0.2 libssl1.1 libtasn1-6 libxml2 mime-support netbase
openssl perl perl-modules-5.24 procps psmisc rename sgml-base ssl-cert
xml-core xz-utils
Suggested packages:
www-browser apache2-doc apache2-suexec-pristine | apache2-suexec-custom
bzip2-doc gnutls-bin gpm libsasl2-modules-gssapi-mit
| libsasl2-modules-gssapi-heimdal libsasl2-modules-ldap libsasl2-modules-otp
libsasl2-modules-sql ca-certificates perl-doc libterm-readline-gnu-perl
| libterm-readline-perl-perl make sgml-base-doc openssl-blacklist debhelper
The following NEW packages will be installed:
apache2 apache2-bin apache2-data apache2-utils bzip2 file libapr1
libaprutil1 libaprutil1-dbd-sqlite3 libaprutil1-ldap libexpat1 libffi6
libgdbm3 libgmp10 libgnutls30 libgpm2 libhogweed4 libicu57 libldap-2.4-2
libldap-common liblua5.2-0 libmagic-mgc libmagic1 libncurses5 libnghttp2-14
libp11-kit0 libperl5.24 libprocps6 libsasl2-2 libsasl2-modules
libsasl2-modules-db libsqlite3-0 libssl1.0.2 libssl1.1 libtasn1-6 libxml2
mime-support netbase openssl perl perl-modules-5.24 procps psmisc rename
sgml-base ssl-cert xml-core xz-utils
0 upgraded, 48 newly installed, 0 to remove and 0 not upgraded.
Need to get 24.8 MB of archives.
After this operation, 104 MB of additional disk space will be used.
Get:1 http://cdn-fastly.deb.debian.org/debian stretch/main amd64 libgdbm3 amd64 1.8.3-14 [30.0 kB]
Get:2 http://security-cdn.debian.org/debian-security stretch/updates/main amd64 perl-modules- 5.24 all 5.24.1-3+deb9u5 [2722 kB]
A ton of output later….
albert@BuntuVM:~$ sudo docker exec 8c1586bd055c service apache2 status
apache2 is not running ... failed!
albert@BuntuVM:~$
We find out the Apache web server is taking a nap. Let’s wake him up.
albert@BuntuVM:~$ sudo docker exec 8c1586bd055c service apache2 start
Starting Apache httpd web server: apache2AH00558: apache2: Could not reliably determine the server's fully qualified domain name, using 172.17.0.2. Set the 'ServerName' directive globally to suppress this message.
albert@BuntuVM:~$ sudo docker exec 8c1586bd055c service apache2 status
apache2 is running.
albert@BuntuVM:~$
So, from here on you can play with your recently created container and build a LAMP stack on Debian for your projects or your WordPress install as if it were your bare metal server or VM environment.
If you want to stop your container when you are finished just do as follows:
albert@BuntuVM:~$ sudo docker stop 8c1586bd055c
8c1586bd055c
albert@BuntuVM:~$ sudo docker ps -a
CONTAINER ID IMAGE COMMAND CREATED STATUS PORTS NAMES
8c1586bd055c debian "bash" 14 minutes ago Exited (0) 4 seconds ago priceless_kepler
albert@BuntuVM:~$
So there you have it. How to install Docker on Ubuntu 18.04.
And before closing this article/guide. If you are curious about this technology and UNIX in general, do yourself a favour and give FreeBSD or any Illumos derivative a chance. Many years of well designed containerization plus the great ZFS file system. On FreeBSD I’ve also written a guide using the iocage framework.
If you find the articles in Adminbyaccident.com useful to you, please consider making a donation.
Use this link to get $200 credit at DigitalOcean and support Adminbyaccident.com costs.
Get $100 credit for free at Vultr using this link and support Adminbyaccident.com costs.
Mind Vultr supports FreeBSD on their VPS offer.