![]()
As explained in an introduction article, Nagios is a monitoring software very well established and used in production on many environments. Results are displayed in a web page so it uses a web server to publish them to the user and needs some php code to do so. It is configured through files which happen to force the software to be restarted any time you change them and want that change to be applied. Hence this is one of the most criticized points to Nagios since it looks like it assumes the infrastructure to monitor is somewhat static, where we all know there are always changes, new machines, new things to monitor, etc. The monitoring of other systems than the localhost is made through the NRPE program which stands for Nagios Remote Plugin Executor. There are thousand of plugins to extend the use and capabilities of Nagios. Anything you can envision has quite probably been put into a plugin and there is a big community. In this article you will find a simple guide to install Nagios on FreeBSD.
If you find the articles in Adminbyaccident.com useful to you, please consider making a donation.
Use this link to get $200 credit at DigitalOcean and support Adminbyaccident.com costs.
Get $100 credit for free at Vultr using this link and support Adminbyaccident.com costs.
Mind Vultr supports FreeBSD on their VPS offer.
Nagios depends on the basic AMP stack, in our case the we’ll put in place a FAMP (FreeBSD, Apache, MariaDB and PHP). You can also use Nginx instead of Apache but since I am more inclined to use Apache that’s what you’ll see here. You can find an article here on how to install the FAMP stack.
One of the greatest and useful features in FreeBSD is Jails. I strongly recommend their use, specially on development, since they simplify the provisioning process dramatically. You can set some Jails as templates and from those you can build new configurations for different things. The FAMP stack is the same if you pretend to run a WordPress website or if you plan to install Nagios. Therefore it is a good idea to have a FAMP jail to start from. (Mind one important thing: If you plan to install nagios from packages and not compile from source the default php version on January 2018 is php 5.6. So bear in mind this on your template jail or install it from scratch. You can anyway make your template jail with some other php version since the system will resolve the dependencies automatically and uninstall the unnecessary packages as well).
If we have set a jail follow this instructions. If you are working without them skip this step.
albert@BSDVM:~ % sudo iocage stop famp
* Stopping famp
+ Running prestop OK
+ Stopping services OK
+ Removing jail process OK
+ Running poststop OK
albert@BSDVM:~ %
With iocage we can manage jails as you can read in the dedicated article. Once we have stopped one jail we can set the template property which defaults to no.
albert@BSDVM:~ % sudo iocage set template=yes famp
famp converted to a template.
Property: template has been updated to yes
albert@BSDVM:~ %
We confirm this has been correctly set:
albert@BSDVM:~ % sudo iocage get all famp | grep template
template:yes
type:template
albert@BSDVM:~ %
We will now create a new jail from the template jail.
albert@BSDVM:~ % sudo iocage create -t famp -n nagios4
nagios4 successfully created!
albert@BSDVM:~ %
The -t flag specifies the template to create the jail from and the -n one gives name to the new jail. We list all the jails again to see that our new nagios4 jail has been created.
albert@BSDVM:~ % sudo iocage list
+-----+-------------+-------+--------------+---------------+
| JID | NAME | STATE | RELEASE | IP4 |
+=====+=============+=======+==============+===============+
| - | article | down | 11.1-RELEASE | 192.168.1.200 |
+-----+-------------+-------+--------------+---------------+
| - | nagios | down | 11.1-RELEASE | 192.168.1.104 |
+-----+-------------+-------+--------------+---------------+
| - | nagios4 | down | 11.1-RELEASE | - |
+-----+-------------+-------+--------------+---------------+
albert@BSDVM:~ %
As you can see the network configuration hasn’t been set on the new jail. We can do that at creation time or afterwards. We can do it now.
albert@BSDVM:~ % sudo iocage set ip4_addr="em0|192.168.1.106/24" nagios4
Property: ip4_addr has been updated to em0|192.168.1.106/24
albert@BSDVM:~ %
We now start the jail so we can proceed with the Nagios install.
albert@BSDVM:~ % sudo iocage start nagios4
* Starting nagios4
+ Started OK
+ Starting services OK
albert@BSDVM:~ %
We log into the jail and from now on if you haven’t used a jail you can follow the steps since they the same apply. As you can see we are now inside the nagios4 jail/system.
albert@nagios4:~ % hostname
nagios4
albert@nagios4:~ % uname -a
FreeBSD nagios4 11.1-RELEASE-p4 FreeBSD 11.1-RELEASE-p4 #0: Tue Nov 14 06:12:40 UTC 2017 [email protected]:/usr/obj/usr/src/sys/GENERIC amd64
albert@nagios4:~ %
First things first. Let’s update the pkg tool.
albert@nagios4:~ % sudo pkg update
Updating FreeBSD repository catalogue...
[nagios4] Fetching meta.txz: 100% 944 B 0.9kB/s 00:01
[nagios4] Fetching packagesite.txz: 100% 6 MiB 361.1kB/s 00:17
Processing entries: 100%
FreeBSD repository update completed. 28775 packages processed.
All repositories are up to date.
albert@nagios4:~ %
albert@nagios4:~ % sudo pkg upgrade
Updating FreeBSD repository catalogue...
FreeBSD repository is up to date.
All repositories are up to date.
Checking for upgrades (1 candidates): 100%
Processing candidates (1 candidates): 100%
Checking integrity... done (0 conflicting)
Your packages are up to date.
albert@nagios4:~ %
Since everything is up to date let’s look for Nagios. (A ton of things will display but I’ve shortened it).
albert@nagios4:~ % pkg search nagios
….
nagios-3.5.1_10 Powerful network monitoring system
….
nagios4-4.3.4_1,1 Powerful network monitoring system
….
albert@nagios4:~ %
You have two versions to choose from. Let’s install the latest and greatest.
albert@nagios4:~ % sudo pkg install nagios4-4.3.4_1,1
Updating FreeBSD repository catalogue...
FreeBSD repository is up to date.
All repositories are up to date.
The following 12 package(s) will be affected (of 0 checked):
New packages to be INSTALLED:
nagios4: 4.3.4_1,1
nagios-plugins: 2.2.1_5,1
png: 1.6.34
jpeg-turbo: 1.5.3
libgd: 2.2.4_1,1
fontconfig: 2.12.1,1
freetype2: 2.8_1
webp: 0.6.1
tiff: 4.0.9
jbigkit: 2.1_1
giflib: 5.1.4
libltdl: 2.4.6
Number of packages to be installed: 14
The process will require 46 MiB more space.
8 MiB to be downloaded.
Proceed with this action? [y/N]: y
This is the install message from Nagios 4.
Message from nagios4-4.3.4_1,1:
**********************************************************************
Enable Nagios in /etc/rc.conf with the following line:
nagios_enable="YES"
Configuration templates are available in /usr/local/etc/nagios as
*.cfg-sample files. Copy them to *.cfg files where required and
edit to suit your needs.
If you don't already have a web server running, you will need to
install and configure one to finish off your Nagios installation.
When used with Apache, the following should be sufficient to publish
the web component of Nagios (modify the allow list to suit):
<Directory /usr/local/www/nagios>
Require ip 127.0.0.1
php_flag engine on
php_admin_value open_basedir /usr/local/www/nagios/:/var/spool/nagios/
</Directory>
<Directory /usr/local/www/nagios/cgi-bin>
Options ExecCGI
</Directory>
ScriptAlias /nagios/cgi-bin/ /usr/local/www/nagios/cgi-bin/
Alias /nagios/ /usr/local/www/nagios/
**********************************************************************
albert@nagios4:~ %
Let’s enable Nagios at boot time by adding the nagios_enable=”YES” line into /etc/rc.conf by:
albert@nagios4:~ % sudo sysrc nagios_enable="YES"
nagios_enable: -> YES
albert@nagios4:~ %
We still can’t start Nagios since it hasn’t been configured. So let’s face that. We will first configure the Apache web server and afterwards we’ll configure Nagios itself.
We have to enable the CGI modules in the httpd.conf file. We do that by removing the # on each entry for that capability.
albert@nagios4:~ % sudo vi +164 /usr/local/etc/apache24/httpd.conf
This should be the end result:
<IfModule !mpm_prefork_module>
LoadModule cgid_module libexec/apache24/mod_cgid.so
</IfModule>
<IfModule mpm_prefork_module>
LoadModule cgi_module libexec/apache24/mod_cgi.so
</IfModule>
Now the cgi modules have been activated we’ll set the rules for Nagios to work with them. For this we will make a new dedicated configuration file into the modules.d directory in Apache which is the place to do so.
sudo vi /usr/local/etc/apache24/modules.d/002_nagios.conf
We’ll add the following lines:
ScriptAlias /nagios/cgi-bin/ /usr/local/www/nagios/cgi-bin/
Alias /nagios /usr/local/www/nagios/
<Directory /usr/local/www/nagios>
Options None
AllowOverride None
Order allow,deny
Allow from all
AuthName "Nagios Access"
AuthType Basic
AuthUSerFile /usr/local/etc/nagios/htpasswd.users
Require valid-user
</Directory>
<Directory /usr/local/www/nagios/cgi-bin>
Options ExecCGI
AllowOverride None
Order allow,deny
Allow from all
AuthName "Nagios Access"
AuthType Basic
AuthUSerFile /usr/local/etc/nagios/htpasswd.users
Require valid-user
</Directory>
Once this is done we can configure Nagios itself. As in any other third party software on FreeBSD the configuration files live in the following path: /usr/local/etc. This is what the nagios directory contains.
albert@nagios4:/usr/local/etc/nagios % ll
total 46
-rw-r--r-- 1 root wheel 12995 Dec 26 16:36 cgi.cfg-sample
-rw-r--r-- 1 root nagios 44773 Dec 26 16:36 nagios.cfg-sample
drwxr-xr-x 2 root wheel 10 Jan 6 20:34 objects/
-rw-r----- 1 root nagios 1312 Dec 26 16:36 resource.cfg-sample
albert@nagios4:/usr/local/etc/nagios %
As you can see there are three configuration sample files and one objects directory. These three configuration files matter and we can copy them into .cfg files so they work.
albert@nagios4:/usr/local/etc/nagios % sudo cp cgi.cfg-sample cgi.cfg
albert@nagios4:/usr/local/etc/nagios % sudo cp nagios.cfg-sample nagios.cfg
albert@nagios4:/usr/local/etc/nagios % sudo cp resource.cfg-sample resource.cfg
Let’s now check if they have been copied.
albert@nagios4:/usr/local/etc/nagios % ll
total 84
-rw-r--r-- 1 root wheel 12995 Jan 6 22:13 cgi.cfg
-rw-r--r-- 1 root wheel 12995 Dec 26 16:36 cgi.cfg-sample
-rw-r--r-- 1 root wheel 44773 Jan 6 22:13 nagios.cfg
-rw-r--r-- 1 root nagios 44773 Dec 26 16:36 nagios.cfg-sample
drwxr-xr-x 2 root wheel 10 Jan 6 20:34 objects/
-rw-r----- 1 root wheel 1312 Jan 6 22:14 resource.cfg
-rw-r----- 1 root nagios 1312 Dec 26 16:36 resource.cfg-sample
albert@nagios4:/usr/local/etc/nagios %
There some other things to do first. Basically the same process but into the objects directory.
albert@nagios4:/usr/local/etc/nagios/objects % sudo cp commands.cfg-sample commands.cfg
albert@nagios4:/usr/local/etc/nagios/objects % sudo cp contacts.cfg-sample contacts.cfg
albert@nagios4:/usr/local/etc/nagios/objects % sudo cp localhost.cfg-sample localhost.cfg
albert@nagios4:/usr/local/etc/nagios/objects % sudo cp printer.cfg-sample printer.cfg
albert@nagios4:/usr/local/etc/nagios/objects % sudo cp switch.cfg-sample switch.cfg
albert@nagios4:/usr/local/etc/nagios/objects % sudo cp templates.cfg-sample templates.cfg
albert@nagios4:/usr/local/etc/nagios/objects % sudo cp timeperiods.cfg-sample timeperiods.cfg
albert@nagios4:/usr/local/etc/nagios/objects % sudo cp windows.cfg-sample windows.cfg
We will now check that the Nagios configuration is working right.
albert@nagios4:~ % sudo nagios -v /usr/local/etc/nagios/nagios.cfg
Nagios Core 4.3.4
Copyright (c) 2009-present Nagios Core Development Team and Community Contributors
Copyright (c) 1999-2009 Ethan Galstad
Last Modified: 2017-08-24
License: GPL
Website: https://www.nagios.org
Reading configuration data...
Read main config file okay...
Read object config files okay...
Running pre-flight check on configuration data...
Checking objects...
Checked 8 services.
Checked 1 hosts.
Checked 1 host groups.
Checked 0 service groups.
Checked 1 contacts.
Checked 1 contact groups.
Checked 24 commands.
Checked 5 time periods.
Checked 0 host escalations.
Checked 0 service escalations.
Checking for circular paths...
Checked 1 hosts
Checked 0 service dependencies
Checked 0 host dependencies
Checked 5 timeperiods
Checking global event handlers...
Checking obsessive compulsive processor commands...
Checking misc settings...
Total Warnings: 0
Total Errors: 0
Things look okay - No serious problems were detected during the pre-flight check
albert@nagios4:~ %
So there are no errors and no warnings. But make sure the Nagios user is the owner of the three main configuration files. Otherwise Nagios will refuse to start even if you find no errors on this last check. Take this in consideration.
albert@nagios4:/usr/local/etc/nagios % sudo chown nagios:nagios nagios.cfg
albert@nagios4:/usr/local/etc/nagios % sudo chown nagios:nagios cgi.cfg
albert@nagios4:/usr/local/etc/nagios % sudo chown nagios:nagios resource.cfg
We can continue. We’ll now set a password to access. In the previous step, where we configured the Apache module there were some sentences dedicated to authentication. We are now going to finish that part.
albert@nagios4:~ % sudo htpasswd -c /usr/local/etc/nagios/htpasswd.users nagiosadmin
New password:
Re-type new password:
Adding password for user nagiosadmin
albert@nagios4:~ %
This is now the moment to start Nagios.
albert@nagios4:~ % sudo service nagios onestart
Performing sanity check of nagios configuration: OK
Starting nagios.
albert@nagios4:~ %
Restart Apache once more.
albert@nagios4:~ % sudo apachectl restart
You will now head to your browser and point to the ip address of the nagios server and put the username and password you set in the previous step.
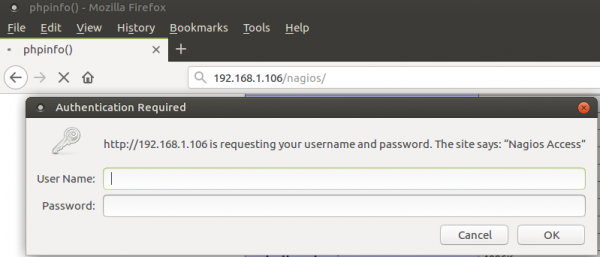
As you can see it works:
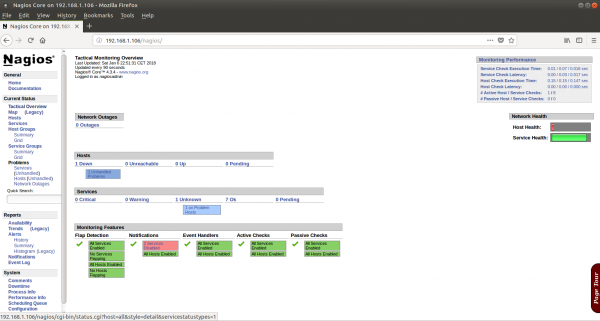
As a matter of fact jails do not allow ping from inside of the jail because it requires a raw socket access. Nagios pings hosts in order to know if they are up and running (therefore availability), so you may find your own localhost up and running but stating the host is down. Take this in consideration. You can allow ping from the jail though. Read about jails to consider this option.
If you find the articles in Adminbyaccident.com useful to you, please consider making a donation.
Use this link to get $200 credit at DigitalOcean and support Adminbyaccident.com costs.
Get $100 credit for free at Vultr using this link and support Adminbyaccident.com costs.
Mind Vultr supports FreeBSD on their VPS offer.