SSH or how to remotely control a UNIX system in a secure manner.
The SSH keys is a secure method to interact with a UNIX system remotely. They are also used to transfer data between different systems. Using clever cryptography anyone can use them. As their name state it is a pair of keys, one matching the other in a complex mathematical operation. One pair unlocks the other. The pains to unlock a key without knowing the other pair makes this method the safest and the standard around the world. Mathematical and cryptography advances have changed the implementations through the years making this method safer as time went by.
Ages ago to remotely control a UNIX machine one used Telnet. But soon the internet would become a wild place. Plain text logins became unsafe for certain tasks. Let’s be honest. Your password in some dark forum about some not very common topic is not very valuable. But your credit card information is. Server administration is not a joke and is a very valuable job if, for example, those servers keep the lights of your city on all night, keep your banking records, your medical files, etc.
If you find the articles in Adminbyaccident.com useful to you, please consider making a donation.
Use this link to get $200 credit at DigitalOcean and support Adminbyaccident.com costs.
Get $100 credit for free at Vultr using this link and support Adminbyaccident.com costs.
Mind Vultr supports FreeBSD on their VPS offer.
The SSH keys are originated with a program developed by the OpenBSD team and it is called OpenSSH. It has become a de facto standard to remotely control a UNIX box from another UNIX or unix-like system. This program uses clever encryption in order to cypher the content we type and for the logins to remote machines. This way you can get into your remote server without spilling sensible data such as your username and password or some other content you may be transmitting.
To enable ssh keys in your local machine you must use the following command and follow the prompt steps that are shown.
ssh-keygen -t rsa
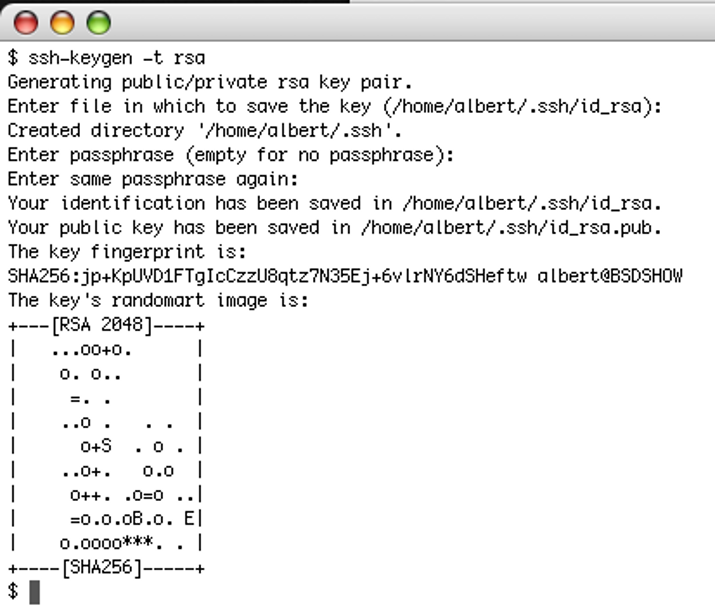
If you enter a passphrase you must always remember it our you won’t log in again since any time you log in the passphrase will be asked.
Now login into the remote machine you want to control from your local machine. If the user account doesn’t have any directory labeled as .ssh it’s quite probable that user does not have any keys ready. Again type the command “ssh-keygen -t rsa” and generate the keys.
Don’t be surprised if you are looking for that misterious .ssh labeled directory and you can’t find it. Any file or directory whose name has a dot behind its name is considered hidden. A UNIX command that lists files and directories is ls. Anytime you type ls a list of files and dirs will show up.

If you want to find the hidden files or directories you must type ls -a

As you can see in the above picture if you just type ls you just see the regular directories. But once you type ls with the flag -a, then all the hidden files and directories are shown.
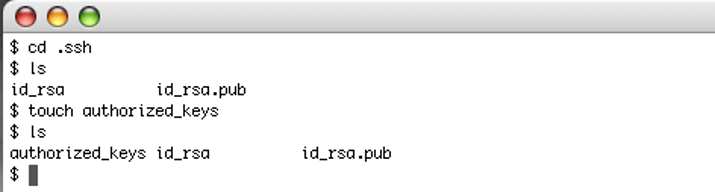
On the remote machine get into the .ssh directory, probably located in /usr/home/username/.ssh/. You have to write a new file called “authorized_keys”. You can create an empty file by typing the “touch” command and the name you wish to give to that file.
The file has to be named authorized_keys it must have since the sshd daemon will look for a file named that way (as well as authorized_keys2) by default and check the keys from there.
Use your editor of choice to write the content from your local id_rsa.pub key file into the file you’ve just created. You will first get the content by using the cat command as shown below:
 Click on the image to expand
Now select the text to copy-paste.
 Click on the image to expand
And paste the content into the authorized_keys file. Since the local public key file in your local machine matches the one you have written into the authorized_keys file on the remote machine, you can now login automatically and control your server remotely without the need of a password. If you chose to have a passphrase you may have the best of the two methods together. The security of an rsa encrypted key and the ssh program plus the passphrase as a “regular password” to use that key.
Now in order to test we have successfully set a pair of keys we will disable user login with password and try to log in. In order to do that we will have to configure the configuration file for ssh. In FreeBSD it is located in the /etc/ssh directory and it is called sshd_config.
Just remove the # before PasswordAuthentication no as follows:

Now restart the service in order to the new configuration to take effect. Be aware to have accomplished the step explained above properly or you may find yourself unable to login to any remote server you may wish to control remotely.

If you are still logged in, congratulations. If you have been pushed out just try to log in again. If you are unable to, restart again or try to boot as single user mode and fix the configuration problem by restoring the # behind PasswordAuthentication no part at the /etc/ssh/sshd_config file.
You have to also change a different line to disable the “ChallengeResponseAuthentication” feature. Just pick up your favourite editor and comment out (this means to remove this symbol # in front of a line) this line and change the “yes” for a “no” in the main configuration file for ssh located in /etc/ssh/sshd_config
# ChallengeResponseAuthentication yes
It should look like:
ChallengeResponseAuthentication no
Then the sshd service has to be restarted. After that you can test it by logging out and then login in again. The remote system doesn’t ask for a password since it is using the ssh keys. Since they match the user logs in without a hassle and safely.
Disable root login (full disabling)
As before you must edit the file /etc/ssh/sshd_config and set the PermitRootLogin part as no. Under the “# Authentication:” part you will comment out the PermitRootLogin and set it properly so it must look as follows:
PermitRootLogin no
You can forget about this step since the root login is disable by default in FreeBSD. If you are using some GNU/Linux systems this step is mandatory so no one can log in as root from the outside. Mind that includes you.
If you find the articles in Adminbyaccident.com useful to you, please consider making a donation.
Use this link to get $200 credit at DigitalOcean and support Adminbyaccident.com costs.
Get $100 credit for free at Vultr using this link and support Adminbyaccident.com costs.
Mind Vultr supports FreeBSD on their VPS offer.