Setting the firewall up is a mandatory task on any computer facing the internet. This is a simple, straightforward how to article on how to setup a box with an easy firewall configuration on FreeBSD.
If you find the articles in Adminbyaccident.com useful to you, please consider making a donation.
Use this link to get $200 credit at DigitalOcean and support Adminbyaccident.com costs.
Get $100 credit for free at Vultr using this link and support Adminbyaccident.com costs.
Mind Vultr supports FreeBSD on their VPS offer.
FreeBSD can play not only one but three firewalls. Networking is complicated by itself and firewalls can be complex too. So when they mix together your brain may collapse. Pick up one and then learn how the networks function and later how to manipulate the firewall. One of those three firewalls in FreeBSD is IPFW. The minimal configuration for IPFW is the one written on this article. Don’t think of this firewall as a dumb, too simple firewall solution. Mac OS X, for example, uses it and puts a nice interface in the System Settings so any noob can use it. Although nowadays it’s using another firewall PFCTL I guess it’s from the OpenBSD, it has had IPFW for many years as the default firewall. And quite frankly it has served many users pretty well.
We will edit the main os configuration file with vi. But you can choose another editor like nano which is easier to use. If you prefer nano just type sudo pkg install nano. Agree with the installation and you can use it. Where this article says vi you can replace it by nano.
As always under FreeBSD the /etc/rc.conf file is the one in charge to activate OS level features as well as some other important software. Type this command to set the firewall configuration into the right file:
sudo vi /etc/rc.conf
Use this if you installed nano: sudo nano /etc/rc.conf
Now edit the rules so they look as follows.
firewall_enable="YES"
firewall_quiet="YES"
firewall_type="workstation"
firewall_myservices="22 80 443 10000"
firewall_allowservices="any"
firewall_logdeny="YES"
Now you must start up the service in order for the firewall to start working. Type the following order at the terminal prompt.
sudo service ipfw onestart
The numbers appearing in the line firewall_myservices=”22 80…” are the ports the firewall leaves open. The rest of the ports to your server or workstation will remain closed. The opened ones are the basic to run a web server. Port number 22 is used for remote connections through SSH (secure shell). The number 80 is used by the HTTP protocol and since we are setting up a web server this is mandatory. Something similar happens with the port number 443 but this is the one for the https, which is the http protocol surrounded by an TLS encryption so no one can read the content in it. This is necessary to log in to let’s say your WordPress or Drupal site without anyone being able to see your password in plain text. Finally we’ll leave the port 10000 opened for the remote administration using webmin, which is a nice gui interface designed for administering servers.
There is another way to edit the /etc/rc.conf file instead of using the vi or nano editors. You can use a program called echo. With the example above if we want to a line at the end of the file using echo we would do like this:
First we have to become root so our prompt sign changes from the dollar sign or percentage (bash or sh use this sign $ and chs as well as tcsh uses this one %).

Now we will use the echo command to add the first line of the firewall configuration we need.

In order to check if the echo program has really written the configuration we wanted at the right place we will use another program called cat. Cat shows you the content of a file. So if you do cat /etc/rc.conf you will see all the content inside that particular file.
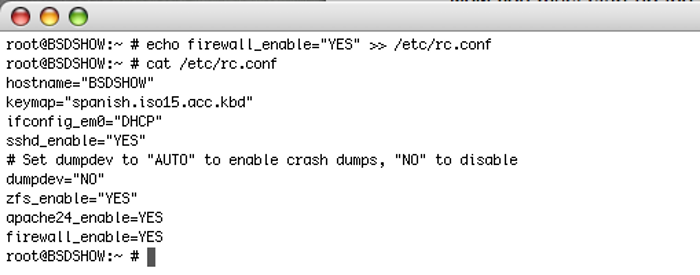
As you can see at the bottom of the file you have that line added.
Remember after adding all the rules to start the service so the firewall is really working. And if you are managing that particular machine remotely, remember to leave the port open for ssh or the one you are using for remote access. Otherwise you will be locked out. Out means out. Something you really don’t want to happen to you.
After all these steps you have now a firewall protecting your machine. Mind this is not the most powerful and secure setup. But you have a base to build on top. IPFW configuration can be way more complicated depending on your needs and knowledge. But this configuration will let you accomplish simple workstation or web server tasks securely.
If you find the articles in Adminbyaccident.com useful to you, please consider making a donation.
Use this link to get $200 credit at DigitalOcean and support Adminbyaccident.com costs.
Get $100 credit for free at Vultr using this link and support Adminbyaccident.com costs.
Mind Vultr supports FreeBSD on their VPS offer.