This article is not going to be a long, detailed, specialized how to. I just wanted to share the ease and the fantastic quality of ZFS for a dead simple need I had. A spare box with a spare disk doing nothing could be repurposed as a file share box at home. Mirroring the two disks would allow me to have a reliable file server. If one disk goes south the other one will still hold the system running with zero data loss. If that would happen placing a new hard drive could rebuild the mirror and get it back to normal. To achieve that, the solution is: to mirror disks on FreeBSD with ZFS.
If you find the articles in Adminbyaccident.com useful to you, please consider making a donation.
Use this link to get $200 credit at DigitalOcean and support Adminbyaccident.com costs.
Get $100 credit for free at Vultr using this link and support Adminbyaccident.com costs.
Mind Vultr supports FreeBSD on their VPS offer.
For those in the field still unfamiliar with ZFS, they can read this long wikipedia entry and the rest of nuances on it scattered around the internet. In here I’ll just say this is one of the most revolutionary file systems ever developed, very appreciated for large storage houses and users alike. It came out a few years ago and the interest over it has been steadily growing over time, so much so that even Linus Torvalds was able to, yet again, piss many out by diminishing its inherent qualities. He was right on the licensing difficulties and his ban on adopting inside the mainline kernel, but he was very wrong (even out of touch) on his thoughts on ZFS qualities.
Other operating systems have recently been developing similar file systems, even Microsot’s ReFS adopts many concepts originated on ZFS a few years before. On the Linux side Btrfs is still behind and its reliability has been questioned many times, so more ZFS adopters from that camp have appeared. The development of this masterpiece is now under the umbrella of the project called ZFS on Linux.
So any GNU/Linux user can not just entertain the idea of using a modern, reliable file system some day, it can be put in production right now. Yet don’t expect any support from a major vendor like RHEL if you choose to do so, at least any time soon. You may have it on Oracle’s Solaris though, maybe even on Oracle Linux. You can find how to set up a ZFS system on Linux using guides like this for Ubuntu and this other one for CentOS. If you like to roll the dice there is one for Fedora too. Choose your poison!
Now, let’s go for this how to mirror disks on FreeBSD’s ZFS thing. My use case, aside of building things on FreeBSD Jails with the ease of management of Iocage, proposing them as an alternative to Docker (as well as for developers), or how great it results to leverage its capabilities on system upgrades, is dead simple.
I had a spare box at home and a big disk which weren’t of any utility until a few days ago. I had been storing information on just one disk for way too long time using FreeBSD’s other native file system, UFS2. I wanted to store that information on the spare box, add a second disk to the mix and keep everything reliable for at least a couple of years more. The disks have been used, although not heavily for a few years now. But I don’t want to spend money on new disks. Yes, even at their cheap price.
What I’ve done is very simple. I’ve installed FreeBSD 12.1 on the spare box, under ZFS. Then I’ve transferred all the data to this new box from the ‘old’ drive from another box. Once the transfer was finished I inserted the ‘old’ UFS formatted drive into the new repurposed box and changed its layout. First by destroying the old partition table on the ‘old’ disk and then by setting up a new ZFS layout, including a boot partition. This allows one of the two disks on the system to miserably fail but keeping the system running with just one disk and more importantly not losing any data. Any.
Apply this stupid, dead simple use case, with scale and Z-Raid, and you get why a significant amount of companies relying on it and begging Linux people and Oracle to include this into the kernel.
I’ll reproduce my set up on a virtual machine, so if you want to follow this article as a template you won’t screw this up on real hardware with real data.
Disclaimer: By no means I am responsible of any data loss or damage, material or personal (even moral), if you choose to follow the underneath instructions. Use this guide at your own discretion and responsability.
This is the little VM. A just 1GB of memory, 1 CPU VirtualBox VM running a fully patched FreeBSD 12.1.
albert@BSDVM:~ % uname -a
FreeBSD BSDVM 12.1-RELEASE-p3 FreeBSD 12.1-RELEASE-p3 GENERIC amd64
albert@BSDVM:~ %
Now, as my physical box this has just one disk layout and it’s a clean install.
albert@BSDVM:~ % gpart show
=> 40 67108784 ada0 GPT (32G)
40 1024 1 freebsd-boot (512K)
1064 984 - free - (492K)
2048 4194304 2 freebsd-swap (2.0G)
4196352 62910464 3 freebsd-zfs (30G)
67106816 2008 - free - (1.0M)
albert@BSDVM:~ %
I’ll stop it now and add a virtual disk on it, the same size as the original, 32 GB in this case. In the physical world you’d do the same but a bigger disk would also work, but NOT a smaller one.
In order to reproduce my physical setup I’ve just formatted the new disk with a UFS partition.
albert@BSDVM:~ % sudo gpart create -s gpt /dev/ada1
ada1 created
albert@BSDVM:~ % sudo gpart add -t freebsd-ufs /dev/ada1
ada1p1 added
albert@BSDVM:~ % sudo newfs /dev/ada1p1
/dev/ada1p1: 32768.0MB (67108784 sectors) block size 32768, fragment size 4096
using 53 cylinder groups of 626.09MB, 20035 blks, 80256 inodes.
super-block backups (for fsck_ffs -b #) at:
192, 1282432, 2564672, 3846912, 5129152, 6411392, 7693632, 8975872, 10258112, 11540352, 12822592, 14104832, 15387072, 16669312, 17951552,
19233792, 20516032, 21798272, 23080512, 24362752, 25644992, 26927232, 28209472, 29491712, 30773952, 32056192, 33338432, 34620672, 35902912,
37185152, 38467392, 39749632, 41031872, 42314112, 43596352, 44878592, 46160832, 47443072, 48725312, 50007552, 51289792, 52572032, 53854272,
55136512, 56418752, 57700992, 58983232, 60265472, 61547712, 62829952, 64112192, 65394432, 66676672
albert@BSDVM:~ %
Now this VM has the same exact features as my real world setup. Using gpart will show the disks layout.
albert@BSDVM:~ % gpart show
=> 40 67108784 ada0 GPT (32G)
40 1024 1 freebsd-boot (512K)
1064 984 - free - (492K)
2048 4194304 2 freebsd-swap (2.0G)
4196352 62910464 3 freebsd-zfs (30G)
67106816 2008 - free - (1.0M)
=> 40 67108784 ada1 GPT (32G)
40 67108784 1 freebsd-ufs (32G)
albert@BSDVM:~ %
Time now to change the layout on the ada1 disk and mimick the setup on disk ada0.
First I’ll destroy the partition table on disk ada1.
albert@BSDVM:~ % sudo gpart destroy -F /dev/ada1
ada1 destroyed
albert@BSDVM:~ %
Then create a new partition table on disk ada1.
albert@BSDVM:~ % sudo gpart create -s gpt /dev/ada1
ada1 created
albert@BSDVM:~ %
Let’s partition disk ada1 with the same layout as ada0. Launch ‘gpart show’ so you have it just readable.
We’ll first make a boot partition of 512k.
albert@BSDVM:~ % sudo gpart add -t freebsd-boot -s 512k /dev/ada1
ada1p1 added
albert@BSDVM:~ %
We can see the results by issuing again ‘gpart show’.
albert@BSDVM:~ % gpart show
=> 40 67108784 ada0 GPT (32G)
40 1024 1 freebsd-boot (512K)
1064 984 - free - (492K)
2048 4194304 2 freebsd-swap (2.0G)
4196352 62910464 3 freebsd-zfs (30G)
67106816 2008 - free - (1.0M)
=> 40 67108784 ada1 GPT (32G)
40 1024 1 freebsd-boot (512K)
1064 67107760 - free - (32G)
albert@BSDVM:~ %
After this we can now add some swap space. Again, we’ll mimic the sizes.
albert@BSDVM:~ % sudo gpart add -t freebsd-swap -a 512k -s 2048M /dev/ada1
ada1p2 added
albert@BSDVM:~ %
This is the layout now:
albert@BSDVM:~ % gpart show
=> 40 67108784 ada0 GPT (32G)
40 1024 1 freebsd-boot (512K)
1064 984 - free - (492K)
2048 4194304 2 freebsd-swap (2.0G)
4196352 62910464 3 freebsd-zfs (30G)
67106816 2008 - free - (1.0M)
=> 40 67108784 ada1 GPT (32G)
40 1024 1 freebsd-boot (512K)
1064 984 - free - (492K)
2048 4194304 2 freebsd-swap (2.0G)
4196352 62912472 - free - (30G)
albert@BSDVM:~ %
We now need to fill those 30 G with ZFS. Let’s do that.
albert@BSDVM:~ % sudo gpart add -t freebsd-zfs -a 512k -s 30718M /dev/ada1
ada1p3 added
albert@BSDVM:~ %
Let’s see the results.
albert@BSDVM:~ % gpart show
=> 40 67108784 ada0 GPT (32G)
40 1024 1 freebsd-boot (512K)
1064 984 - free - (492K)
2048 4194304 2 freebsd-swap (2.0G)
4196352 62910464 3 freebsd-zfs (30G)
67106816 2008 - free - (1.0M)
=> 40 67108784 ada1 GPT (32G)
40 1024 1 freebsd-boot (512K)
1064 984 - free - (492K)
2048 4194304 2 freebsd-swap (2.0G)
4196352 62910464 3 freebsd-zfs (30G)
67106816 2008 - free - (1.0M)
albert@BSDVM:~ %
You may want to align the disk sectors at 4K instead of at 512k. The command for that would be as follows:
sudo gpart add -t freebsd-zfs -a 4K -s 30718M /dev/ada1
And would be perfectly replacable to the one before. However if you have already applied the other one just destroy the partition table and start over again. Yon can still do it.
Now that we have both disks with the same layout let’s take care of the ZFS pool. This is where this how to mirror disks on FreeBSD’s ZFS gets interesting.
We’ll gather some information about the ZFS pool first.
albert@BSDVM:~ % zpool status
pool: zroot
state: ONLINE
scan: none requested
config:
NAME STATE READ WRITE CKSUM
zroot ONLINE 0 0 0
ada0p3 ONLINE 0 0 0
errors: No known data errors
albert@BSDVM:~ %
As you can read the pool does only contain one disk. We’ll attach the just formated disk, ada1.
albert@BSDVM:~ % sudo zpool attach zroot ada0p3 ada1p3
Make sure to wait until resilver is done before rebooting.
If you boot from pool 'zroot', you may need to update
boot code on newly attached disk 'ada1p3'.
Assuming you use GPT partitioning and 'da0' is your new boot disk
you may use the following command:
gpart bootcode -b /boot/pmbr -p /boot/gptzfsboot -i 1 da0
albert@BSDVM:~ %
Read carefully. The pool has now two members but bootcode is only found in one of them, in our case it’s ada0. We’ll have to copy that.
However if our real world setup constains data, that will be copied from one disk to the other and ZFS will take good note of where are the blocks place on both disks. This is what resilvering is doing. Once finished we’ll be able to copy that bootcode.
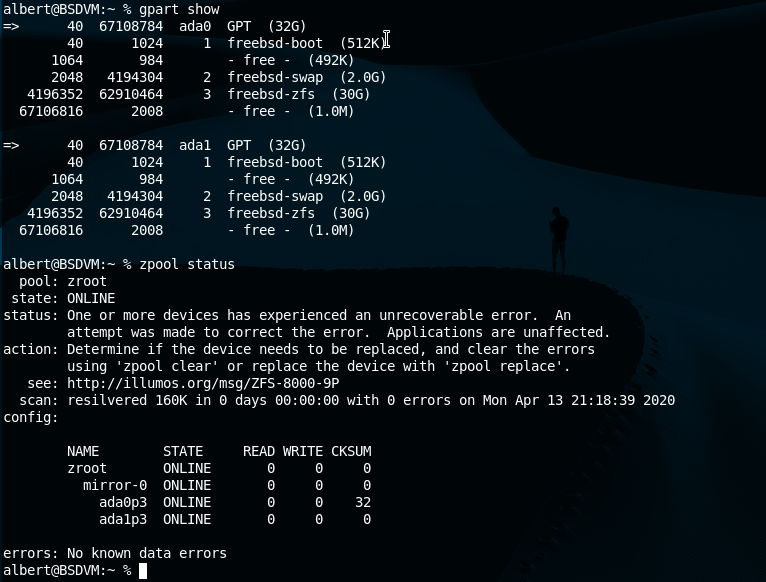
We can check how the resilvering process is going by just applying ‘zpool status’.
albert@BSDVM:~ % sudo zpool status
pool: zroot
state: ONLINE
scan: resilvered 1.37G in 0 days 00:00:04 with 0 errors on Mon Apr 13 19:01:38 2020
config:
NAME STATE READ WRITE CKSUM
zroot ONLINE 0 0 0
mirror-0 ONLINE 0 0 0
ada0p3 ONLINE 0 0 0
ada1p3 ONLINE 0 0 0
errors: No known data errors
albert@BSDVM:~ %
Since our drives are almost empty and this is a VM it’s taken no time. I spent 50 minutes for 274 GB of data on 7500 rpm disks.
Time to copy the boot code from ada0 to ada1 disk.
albert@BSDVM:~ % sudo gpart bootcode -b /boot/pmbr -p /boot/gptzfsboot -i 1 ada1
partcode written to ada1p1
bootcode written to ada1
albert@BSDVM:~ %
Once this is done you can reboot this VM with just one disk only. Preferably remove the original drive, so it makes the test more interesting.
When we get the machine back with the original disk unplugged and the new ada1 in this is the status of our ZFS pool.
albert@BSDVM:~ % sudo zpool status
pool: zroot
state: DEGRADED
status: One or more devices could not be used because the label is missing or
invalid. Sufficient replicas exist for the pool to continue
functioning in a degraded state.
action: Replace the device using 'zpool replace'.
see: http://illumos.org/msg/ZFS-8000-4J
scan: resilvered 1.37G in 0 days 00:00:04 with 0 errors on Mon Apr 13 19:01:38 2020
config:
NAME STATE READ WRITE CKSUM
zroot DEGRADED 0 0 0
mirror-0 DEGRADED 0 0 0
13790537655687366642 FAULTED 0 0 0 was /dev/ada0p3
ada0p3 ONLINE 0 0 0
errors: No known data errors
albert@BSDVM:~ %
Again, it was disk ada1 but it has now become ada0, since that one is missing. The ZFS pool is up and running on a ‘degraded’ state. But your data is still there. You can pull it out, place a new disk and resilver, or just go grab a coffee and think what to do. But your data is still there, even though one disk has failed.
This is all for my how to mirror disks on FreeBSD’s ZFS. Hope someone needs something similar.
For other configurations read somewhere else until I write about them. 😉
If you find the articles in Adminbyaccident.com useful to you, please consider making a donation.
Use this link to get $200 credit at DigitalOcean and support Adminbyaccident.com costs.
Get $100 credit for free at Vultr using this link and support Adminbyaccident.com costs.
Mind Vultr supports FreeBSD on their VPS offer.