If you are coming from the Windows, Mac or GNU/Linux world using USB drives on the desktop is a piece of cake. You plug it and it works. That’s it. Interoperability between the proprietary world and OSS (Open Source Software) has improved but there’s still a very palpable line. Just grab a new USB drive, format it on your Ubuntu workstation with ext4 format and just after adding some files to the drive, go grab some other Windows PC and plug the drive in. What does Windows say now? It is staggerinly pathetic that still nowadays systems do not recognise other’s formats than themselves. And this is not only inherent to proprietary systems but in between the OSS ones. GNU/Linux folks are so in love with themselves and the «ecosystem» they’ve created they seem to find some difficulties loading UFS (UNIX File System). Of course writting on an UFS formated drive is impossible.
Handling USB drives on vanilla FreeBSD needs some switch toggling in order to enable the facilities needed to operate USB drives as if your system was a desktop/workstation PC. Let me be clear and remark this. As if it were a desktop-workstation PC. You may not want need to plug an USB drive and get it automatically mounted. That is fine if that is your desire, you can stop reading now and of course do not follow the steps described here. However if you desire to plug an USB drive as if this were a Windows workstation from work, read on.
If you find the articles in Adminbyaccident.com useful to you, please consider making a donation.
Use this link to get $200 credit at DigitalOcean and support Adminbyaccident.com costs.
Get $100 credit for free at Vultr using this link and support Adminbyaccident.com costs.
Mind Vultr supports FreeBSD on their VPS offer.
There are several ways to enable automount on FreeBSD. Part of what you will read here comes from this other guide.
Disclaimer/reminder: Use the following instructions on your own discretion and risk. Once more and as a friendly reminder, remember to backup all the original files you modify. This way you will always maintain a pristine copy of what the system came with originally. If security is a huge concern for you double check everything you read and test before applying any changes. What is good/safe for others may not be for you. You’ve been warned.
The very first thing one must do in order to manipulate and user USB drives in FreeBSD is enabling regular users to mount file systems. That is made by enabling that capability on the file /etc/sysctl.conf where one will change the setting from the value ‘0’ to ‘1’.
To enable it just during the current session we’ll just launch the following command as root (or using sudo):
# sysctl vfs.usermount=1
To make this permanent so you don’t have to do this every time you boot (something I strongly recommend if your prettend this to be your desktop-workstation) then add the following line to the /etc/sysctl.conf file
vfs.usermount=1
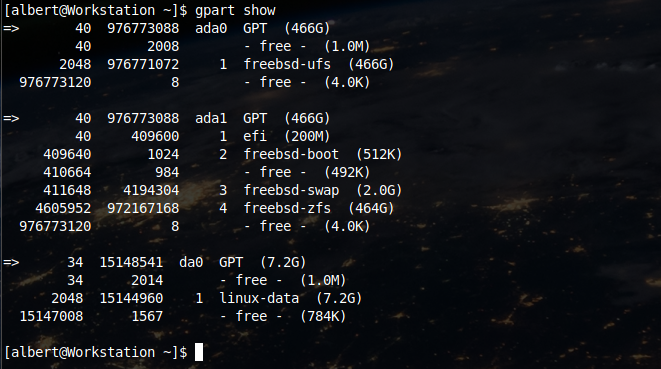
If you are new to FreeBSD naming conventions may be new to you. If you come from a GNU/Linux environment notice that usb disk devices are often named sdb, sdc, or similar. In FreeBSD they will be named da0, da1, etc. In order to find those devices and their names there are a few ways to do so. One method is plug in the device and launch gpart like so:
$ gpart show
And gpart will show all the drives it finds connected to the system independently of the file system.
There is another method to find those devices and it is by issuing the following command:
# camcontrol devlist
On a box I own you can see the following devices at the current time of this writting:
albert@T430:~ % camcontrol devlist
<Samsung SSD 860 EVO 500GB RVT01B6Q> at scbus0 target 0 lun 0 (pass0,ada0)
<AHCI SGPIO Enclosure 1.00 0001> at scbus1 target 0 lun 0 (pass1,ses0)
<TOSHIBA TransMemory 1.00> at scbus2 target 0 lun 0 (da0,pass2)
albert@T430:~ %
And there is a third way to find the USB drive devices, although I do not recommend unless you want to list all the hard disks and all the partitions, cdrom drives included because it spits out a ton of content and may confuse you:
# egrep ‘ad[0-9]|cd[0-9]|da[0-9]’ /var/run/dmesg.boot
Now that we have found our USB drive and how it is called in our system (probably da0) we move on to the next step. It is now turn to set the permissions on the devices available at boot by editing the /etc/devfs.conf file. At the bottom of the file add the two following lines:
own /dev/da0 root:operator
perm /dev/da00 0666
You can add two other lines if you want to have two USB drives at the same time. Just change da0 for da1, so you can have both.
As you have seen the owner of the da0 drive has been set as root and the group is now the operator one. Pretty surely you are not in that group. Add yourself to it by typing this:
# pw groupmod operator -m yourusername
Check you have been added:
$ pw groupshow operator
If your name appears now at the end of the resulting line it is because you’ve been successfully been added to the group. If not appearing, check this by issuing another command. This will show the groups you are in:
$ id yourusername
In my particular case:
albert@T430:~ % id albert
uid=1001(albert) gid=0(wheel) groups=0(wheel),5(operator),920(vboxusers)
albert@T430:~ %
Arrived to this point you should be now able to mount USB drives. But the nice part of having a desktop-workstation is plug in the device and have it automatically mounted without issuing a command. For that there are several ways to do it but we will use the method included in the base system which is using the autofs.
In order make autofs work the kernel module has to be loaded. If we want this for once just launch this command as root (or use sudo)
# kldload autofs
Check it’s been loaded by:
# kldstat | grep autofs
If you see ‘autofs.ko’ back, the module is loaded. If nothing appears, the module isn’t loaded. If else just read back the last command you launched, you may have mistypped it, or something else is wrong and you need to pay attention to the error message.
This is what I got back:
albert@T430:~ % sudo kldstat | grep autofs
23 1 0xffffffff8292d000 3fb8 autofs.ko
albert@T430:~ %
However you may want this kernel module loaded any time you boot the system. Then add the following line into /boot/loader.conf:
autofs_enable="YES"
Tip: If you don’t want to use vi or nano, basically avoid any editor, you can use sysrc like so:
# sysrc autofs_enable="YES"
Be aware if you just added this, the module ins’t loaded. To load it now type (as already explained):
# kldload autofs
Now, second step comes in. You need not only the kernel module loaded at boot time but the related services running too. Add the following line into /etc/rc.conf:
autofs_enable="YES"
Turn to start the related services. First we will start automountd, the automount daemon. As root, or using sudo, type:
# service automountd onestart
You should get a message stating the service is fired up.
Let’s now start the service to unmount devices. Again as root, or using sudo, type:
# service autounmountd onestart
Again, as before you should get a system message warning you about the service being started up. To check they are running use the ps command like so:
# ps aux | grep autmountd
You should get something close to:
albert@T430:~ % ps aux | grep automount
root 2224 0,0 0,0 6428 2244 - Is 17:29 0:00,00 /usr/sbin/automountd
albert 2254 0,0 0,0 6668 2652 2 S+ 17:34 0:00,00 grep automount
albert@T430:~ %
To check the autounmountd service is running just change the name of the service you are looking for after the grep command. Like this:
# ps aux | grep autounmountd
The result should look similar to:
albert@T430:~ % ps aux | grep autounmountd
root 2265 0,0 0,0 6428 2244 - Is 17:35 0:00,00 /usr/sbin/autounmountd
albert 2273 0,0 0,0 6668 2648 2 S+ 17:38 0:00,00 grep autounmountd
albert@T430:~ %
We are not finished yet. There is more to do here. As the master it is there is a file in the /etc directory to be edited so everything works out right. The file in question is /etc/auto_master. First uncomment the following line:
#/media -media -nosuid,noatime
Then modify it so it matches this:
/media -media -nosuid,m=770, -L=ca_ES.UTF-8
What we’ve done here?
We’ve removed the noatime entry. By definition this means: Do not update inode access times on this filesystem (e.g., for faster access on the new spool to speed up news servers).
We’ve added ‘m=770’. This changes file permissions for the auto mounted USB drives and adds read-write-execute permissions to the wheel group. So, if at install time, when you created your user you already included your user to the wheel group, this is enough. If you didn’t do it don’t panic. You can add your user to the wheel group by typing the following line and login out and back in.
# pw groupmod wheel -m yourusername
We’ve also added UTF-8 support. So now whenever USB drives containing ‘funny’ names with symbols and other stuff they will be correctly displayed instead of seeing crazy things.
When all this is done, you have to be aware of one other detail. You are using a desktop environment (DE) so FreeBSD is your desktop/workstation OS, so there is some DE working on it. It may have some facilities to make you aware of newly plugged devices, or not. It all depends on your choice. KDE 4 and 5 both work with this described set up. And if you click on the icons to mount, unmount and basically use the USB drives you will have no issues so far.
This is all in the how to manipulate and use USB drives in FreeBSD
PS: At the time I wrote this FreeBSD hadn’t released its 12th release which is able to read and write ext4 formatted Linux partitions.
If you find the articles in Adminbyaccident.com useful to you, please consider making a donation.
Use this link to get $200 credit at DigitalOcean and support Adminbyaccident.com costs.
Get $100 credit for free at Vultr using this link and support Adminbyaccident.com costs.
Mind Vultr supports FreeBSD on their VPS offer.