A couple of years ago I wrote a guide on how to install Modsecurity on FreeBSD. Now the program is on its third iteration so a new article is needed. Or so I think. In this article I’ll be covering Modsecurity 3 applied to protect Apache HTTP.
If you find the articles in Adminbyaccident.com useful to you, please consider making a donation.
Use this link to get $200 credit at DigitalOcean and support Adminbyaccident.com costs.
Get $100 credit for free at Vultr using this link and support Adminbyaccident.com costs.
Mind Vultr supports FreeBSD on their VPS offer.
For those unfamiliar to ModSecurity, this is now a standalone program, that acts as an application firewall. It is typically used to protect web servers from malicious attempts to break into a system or to jump over the fence. It’s capable to be used with Apache HTTP, NGINX and Microsoft’s IIS as well. SQL injection attacks can be blocked with this tool and a series of other common attacks such as Cross-Site Scripting attacks. A series of rules help implement policies and actions. Those rules are nowadays hosted by the OWASP project. Specific configurations for common uses, such as CPanel, WordPress, Drupal, Nextcloud, plus generic rules dedicated to DoS attacks, PHP, Java, Scanning detection and a bunch more.
Similarly to what an IDS, such as Suricata, would do to network packets, ModSecurity filters web server requests, it parses them, looks for any match to a known attack pattern within the rules, and acts passing the request as if nothing had happened serving the content normally if nothing is found, or follows what the order has in it, if a malicious pattern has been detected. This allows ModSecurity being able to block bad requests. It does also log activity, but not just incoming requests, but full headers, the request body and the response as well, so this can be called ‘full transaction logging’.
Let’s start this how to install ModSecurity 3 on FreeBSD.
Pre-requisites.
First and foremost this system needs to have some Apache HTTP web server in place. I’ve written a few guides on how to do this on this very site but some others can be found at DigitalOcean. Choose your favourite configuration.
Adminbyaccident.com articles:
- FAMP stack with pre-fork configuration guide. Github script.
- FAMP stack with ‘event’ MPM configuration article. Github script.
Similar guides I wrote on DOcean:
- FAMP stack with the ‘event’ MPM + PHP-FPM module configuration guide. Github script.
- FAMP stack with the default pre-fork configuration article. Github script.
1.- Install ModSecurity 3
We log in our system and start this. First we need to install the modsecurity3 package for Apache HTTP. This will download modsecurity 3 and the plugin for the web server.
root@modsec3:~ # pkg install -y modsecurity3-apache
Updating FreeBSD repository catalogue...
FreeBSD repository is up to date.
All repositories are up to date.
The following 9 package(s) will be affected (of 0 checked):
New packages to be INSTALLED:
binutils: 2.33.1_4,1
gcc9: 9.3.0_1
gmp: 6.2.1
libmaxminddb: 1.4.3
modsecurity3: 3.0.4_2
modsecurity3-apache: 0.0.9.b1.19_1
mpc: 1.1.0_2
mpfr: 4.1.0
yajl: 2.1.0
Number of packages to be installed: 9
The process will require 394 MiB more space.
64 MiB to be downloaded.
[modsec3] [1/9] Fetching modsecurity3-apache-0.0.9.b1.19_1.txz: 100% 15 KiB 14.9kB/s 00:01
[modsec3] [2/9] Fetching modsecurity3-3.0.4_2.txz: 100% 841 KiB 861.2kB/s 00:01
[modsec3] [3/9] Fetching libmaxminddb-1.4.3.txz: 100% 36 KiB 36.6kB/s 00:01
[modsec3] [4/9] Fetching gcc9-9.3.0_1.txz: 100% 44 MiB 4.6MB/s 00:10
[modsec3] [5/9] Fetching mpfr-4.1.0.txz: 100% 445 KiB 455.2kB/s 00:01
[modsec3] [6/9] Fetching gmp-6.2.1.txz: 100% 478 KiB 489.5kB/s 00:01
[modsec3] [7/9] Fetching mpc-1.1.0_2.txz: 100% 85 KiB 87.0kB/s 00:01
[modsec3] [8/9] Fetching binutils-2.33.1_4,1.txz: 100% 18 MiB 6.4MB/s 00:03
[modsec3] [9/9] Fetching yajl-2.1.0.txz: 100% 56 KiB 56.9kB/s 00:01
Checking integrity... done (0 conflicting)
[modsec3] [1/9] Installing gmp-6.2.1...
[modsec3] [1/9] Extracting gmp-6.2.1: 100%
[modsec3] [2/9] Installing mpfr-4.1.0...
[modsec3] [2/9] Extracting mpfr-4.1.0: 100%
[modsec3] [3/9] Installing mpc-1.1.0_2...
[modsec3] [3/9] Extracting mpc-1.1.0_2: 100%
[modsec3] [4/9] Installing binutils-2.33.1_4,1...
[modsec3] [4/9] Extracting binutils-2.33.1_4,1: 100%
[modsec3] [5/9] Installing libmaxminddb-1.4.3...
[modsec3] [5/9] Extracting libmaxminddb-1.4.3: 100%
[modsec3] [6/9] Installing gcc9-9.3.0_1...
[modsec3] [6/9] Extracting gcc9-9.3.0_1: 100%
[modsec3] [7/9] Installing yajl-2.1.0...
[modsec3] [7/9] Extracting yajl-2.1.0: 100%
[modsec3] [8/9] Installing modsecurity3-3.0.4_2...
[modsec3] [8/9] Extracting modsecurity3-3.0.4_2: 100%
[modsec3] [9/9] Installing modsecurity3-apache-0.0.9.b1.19_1...
[modsec3] [9/9] Extracting modsecurity3-apache-0.0.9.b1.19_1: 100%
[activating module `security3' in /usr/local/etc/apache24/httpd.conf]
=====
Message from gcc9-9.3.0_1:
--
To ensure binaries built with this toolchain find appropriate versions
of the necessary run-time libraries, you may want to link using
-Wl,-rpath=/usr/local/lib/gcc9
For ports leveraging USE_GCC, USES=compiler, or USES=fortran this happens
transparently.
root@modsec3:~ #
So far this is all to install ModSecurity 3 on FreeBSD. However the rules are not found here. Let’s find them and configure all this.
2.- Download the CRS (CoreRuleSet) rules.
In order to make ModSecurity 3 work, as well as we needed them on the older version, a series of rules are needed. Nurtured by OWASP they can be found here.
To get those rules we’ll first install ‘git’ and then download the repository so we get all them in place.
root@modsec3:~ # pkg install -y git
Updating FreeBSD repository catalogue...
FreeBSD repository is up to date.
All repositories are up to date.
The following 48 package(s) will be affected (of 0 checked):
New packages to be INSTALLED:
bash: 5.1.4
bash-completion: 2.11,2
cvsps: 2.1_2
git: 2.30.0
glib: 2.66.4_1,1
gnupg: 2.2.26
gnutls: 3.6.15
libassuan: 2.5.4
libffi: 3.3_1
libgcrypt: 1.8.7
libgpg-error: 1.41
libidn2: 2.3.0_1
libksba: 1.5.0
libtasn1: 4.16.0
libunistring: 0.9.10_1
nettle: 3.6
npth: 1.6
p11-kit: 0.23.22
p5-Authen-SASL: 2.16_1
p5-CGI: 4.51
p5-Clone: 0.45
p5-Digest-HMAC: 1.03_1
p5-Encode-Locale: 1.05
p5-Error: 0.17029
p5-GSSAPI: 0.28_1
p5-HTML-Parser: 3.75
p5-HTML-Tagset: 3.20_1
p5-HTTP-Date: 6.05
p5-HTTP-Message: 6.26
p5-IO-HTML: 1.001_1
p5-IO-Socket-INET6: 2.72_1
p5-IO-Socket-SSL: 2.068
p5-LWP-MediaTypes: 6.04
p5-Mozilla-CA: 20200520
p5-Net-SSLeay: 1.88
p5-Socket6: 0.29
p5-Term-ReadKey: 2.38_1
p5-TimeDate: 2.33,1
p5-URI: 5.05
p5-subversion: 1.14.0
pinentry: 1.1.0_7
pinentry-tty: 1.1.0
python37: 3.7.9_1
serf: 1.3.9_5
subversion: 1.14.0
tpm-emulator: 0.7.4_2
trousers: 0.3.14_3
utf8proc: 2.6.1
Number of packages to be installed: 48
The process will require 240 MiB more space.
41 MiB to be downloaded.
….
root@modsec3:~ #
Once git is installed we can proceed to clone the rules repo.
root@modsec3:~ # git clone https://github.com/coreruleset/coreruleset /usr/local/etc/modsecurity/coreruleset/
S'està clonant a «/usr/local/etc/modsecurity/coreruleset»...
remote: Enumerating objects: 42, done.
remote: Counting objects: 100% (42/42), done.
remote: Compressing objects: 100% (36/36), done.
remote: Total 11790 (delta 24), reused 14 (delta 6), pack-reused 11748
S'estan rebent objectes: 100% (11790/11790), 2.55 MiB | 3.60 MiB/s, fet.
S'estan resolent les diferències: 100% (8858/8858), fet.
root@modsec3:~ #
Now the rules are in place we need to configure ModSecurity 3 to make use of them.
3.- Configure ModSecurity 3.
The Core Rule Set (CRS) we’ve downloaded already contains a sample configuration file we can make use of, so ModSecurity 3 can work with such rules.
root@modsec3:~ # cp /usr/local/etc/modsecurity/coreruleset/crs-setup.conf.example /usr/local/etc/modsecurity/coreruleset/crs-setup.conf
root@modsec3:~ #
A look at its content is recommended. However be aware the file contains quite many settings and changing any of those can considerably alter the way ModSecurity 3 works. Testing of every bit is recommended for production systems. The file is quite well commented so a read will help you understand the bits of it.
less /usr/local/etc/modsecurity/coreruleset/crs-setup.conf
Furthermore we have to know this configuration comes with a ‘detection only’ policy activated as the default. If we want the tool to be activated straight away we may need to change this setting.
root@modsec3:~ # sed -i -e 's/SecRuleEngine DetectionOnly/SecRuleEngine On/g' /usr/local/etc/modsecurity/modsecurity.conf
root@modsec3:~ #
After applying this change we should read the ‘SecRuleEngine’ is on. Let’s check this.
root@modsec3:~ # grep -n 'SecRuleEngine' /usr/local/etc/modsecurity/modsecurity.conf
7:SecRuleEngine On
43:# when SecRuleEngine is set to DetectionOnly mode in order to minimize
root@modsec3:~ #
Indeed it is on. Let’s move on to configure Apache HTTP so it can work with the plugin. This next is the last step on how to install ModSecurity 3 on FreeBSD. The last one is for testing purposes.
Note. Sure you will bang your head a bit with the rules and the crs-setup-conf file, but in the end you will be satisfied. Loading this WAF gives you a piece of mind.
4.- Configure Apache HTTP to use ModSecurity3.
In order for Apache HTTP to leverage ModSecurity 3 capabilities it needs to be aware of its existence in the system. So first we create a configuration file where we will point out what configuration for ModSecurity3 will be loaded, what CRS rules configuration will be set up and what rules to apply.
We create the configuration file first.
root@modsec3:~ # touch /usr/local/etc/apache24/modsecurity-rules.conf
root@modsec3:~ #
Once the file is created, we fill it with the content we need. Use your favourite editor to include the following lines:
Include /usr/local/etc/modsecurity/modsecurity.conf
Include /usr/local/etc/modsecurity/coreruleset/crs-setup.conf
Include /usr/local/etc/modsecurity/coreruleset/rules/*.conf
As the last configuration step in Apache HTTP we will turn on the plugin in the main httpd.conf file and point where the rules above are. With your favorite editor, find the last line in the httpd.con file and place the following two directives.
modsecurity on
modsecurity_rules_file /usr/local/etc/apache24/modsecurity-rules.conf
Let’s test Apache HTTP configuration is right.
root@modsec3:~ # apachectl configtest
Performing sanity check on apache24 configuration:
Syntax OK
root@modsec3:~ #
Since the configuration is OK we can proceed to restart Apache HTTP so this new configuration can be loaded.
root@modsec3:~ # apachectl restart
Performing sanity check on apache24 configuration:
Syntax OK
Stopping apache24.
Waiting for PIDS: 19808.
Performing sanity check on apache24 configuration:
Syntax OK
Starting apache24.
root@modsec3:~ #
So far we have installed ModSecurity 3, downloaded and configured the CRS rules from OWASP and configured Apache HTTP to leverage all this. Let’s see if this works.
5.- Test ModSecurity 3 (Optional)
We’ve come all the way until here, where we can make a simple test to check if this WAF works.
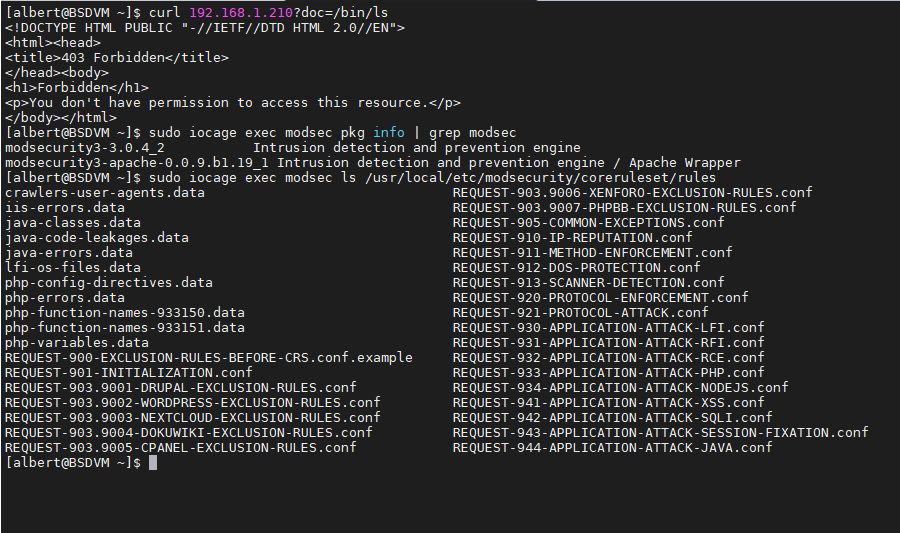
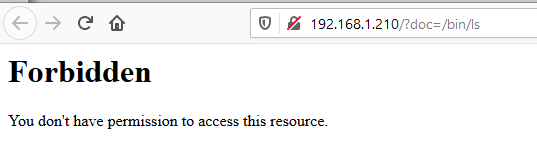
We will try a command injection attack, so we try to list content with the ‘ls’ command from the system through the http protocol. Instead of doing this with a browser we’ll do it with curl. From another box:
[albert@BSDVM ~]$ curl 192.168.1.211?doc=/bin/ls
<!DOCTYPE HTML PUBLIC "-//IETF//DTD HTML 2.0//EN">
<html><head>
<title>403 Forbidden</title>
</head><body>
<h1>Forbidden</h1>
<p>You don't have permission to access this resource.</p>
</body></html>
[albert@BSDVM ~]$
The result with the browser is exactly the same.
If you deactivate the module in Apache you will see the content is listed.
[albert@BSDVM ~]$ curl 192.168.1.211?doc=/bin/ls
<html><body><h1>It works!</h1></body></html>
[albert@BSDVM ~]$
You can deactivate the entry in Apache HTTP configuration with the following command.
sed -i -e 's/modsecurity/#modsecurity/g' /usr/local/etc/apache24/httpd.conf
Activate it with this other command.
sed -i -e 's/#modsecurity/modsecurity/g' /usr/local/etc/apache24/httpd.conf
Remember to restart Apache HTTP each time you apply any of these two commands above so the new setting is loaded.
Conclusion.
Tunning Modsecurity is obviously necessary, so take your time to read the documentation and apply the rules that are in your scope. You can tune them and even write your own. It’s obvious with the modern times a WAF for a web server is a must for almost every scenario. Take care of your systems and in the end you’ll be happier.
Official documentation for Modsecurity can be found here, where their own sources but also recommended books.
A script to install Modsecurity 3 on FreeBSD is found here. Hope this can be useful to you.
This is all on this how to install ModSecurity 3 on FreeBSD.
If you find the articles in Adminbyaccident.com useful to you, please consider making a donation.
Use this link to get $200 credit at DigitalOcean and support Adminbyaccident.com costs.
Get $100 credit for free at Vultr using this link and support Adminbyaccident.com costs.
Mind Vultr supports FreeBSD on their VPS offer.