Why would anyone need to install Matomo 4 on FreeBSD? Because you’re the admin of a website, or a few of them, and you want/need to count the visitors, how long do the stay looking at the content and some other fancy stuff. This is what Matomo does.
But it also does this without you needing Google Analytics, one of the most used platforms, meaning there’s no need to share those insights to anyone. The tool does also comply with several privacy laws, once properly configured, which is a more than welcome bonus.
If you find the articles in Adminbyaccident.com useful to you, please consider making a donation.
Use this link to get $200 credit at DigitalOcean and support Adminbyaccident.com costs.
Get $100 credit for free at Vultr using this link and support Adminbyaccident.com costs.
Mind Vultr supports FreeBSD on their VPS offer.
The best way to test this tool is to install it and dig out what it can do for you.
Prerequisites.
To install Matomo 4 on FreeBSD the most basic prerequisite is a system with the FAMP stack on it.
0.- A LAMP stack if you happen to live in GNU/Linux land.
Check this guide I co-authored for the FAMP installation:
Or read this one here at adminbyaccident.com
https://www.adminbyaccident.com/freebsd/how-to-install-famp-stack/
1.- To complete the prerequisites list we need to configure Apache HTTP with TLS connections either with self signed certificates or using Letsencrypt.
A guide for a self signed certificate configuration on Apache HTTP:
https://www.adminbyaccident.com/freebsd/how-to-enable-ssl-on-apache-on-freebsd/
A guide on how to install a Letsencrypt certficate in Apache HTTP on FreeBSD:
Overview of the process.
With this prerequisites in place we can now start the install Matomo 4 on FreeBSD process, which consists on:
-
preparing a database and a user to record data
-
configuring Apache HTTP to serve the content processed by the tool itself
-
install the PHP package for Matomo 4 (the tool is made with the PHP language)
Step 1. Accommodate a user and a database on the MySQL install.
Matomo 4 needs a user and a database to store the data it records from visits. On a typical configuration you may place a piece of javascript on every page, so whenever the page is loaded on a browser the visit will be counted. Furthermore this code will recognize a returning visitor and other information from the visit, such as the time it’s spent on the site. Such information needs to be stored and that is on the MySQL (or MariaDB) database in the FAMP stack. This is why we need to create a user and a dedicated database entry for Matomo.
Let’s create the database. Log into your database as the root user. Maybe you need to catch your old mysql install script or file where you store that root password. And now run:
root@localhost [(none)]> CREATE DATABASE mysite_matomo;
Query OK, 1 row affected (0.01 sec)
root@localhost [(none)]>
With the database in the system it’s turn for the user. Lets create one.
root@localhost [(none)]> CREATE USER 'matomo_user'@'localhost' IDENTIFIED WITH mysql_native_password BY 'blanesrulesXP-64';
Query OK, 0 rows affected (0.02 sec)
root@localhost [(none)]>
Now grant privileges for it to manage the just created database.
root@localhost [(none)]> GRANT ALL PRIVILEGES ON mysite_matomo.* TO 'matomo_user'@'localhost';
Query OK, 0 rows affected (0.00 sec)
root@localhost [(none)]>
Refresh privileges on the database.
root@localhost [(none)]> FLUSH PRIVILEGES;
Query OK, 0 rows affected (0.01 sec)
root@localhost [(none)]>
All is done in database land.
root@localhost [(none)]> exit
Bye
root@cargols:~ #
Tip. The username and database name here are only descriptive and demonstration oriented. Use the naming convention that suits your needs. Generally speaking naming your Matomo database ‘matomo’ may be very helpful for anyone that doesn’t know anything about your system. But if an attacker is trying to steal your data helping him by pointing out how the visitor’s data DB is named isn’t that smart. The same apply for the username.
Step 2. Configure Apache HTTP to display Matomo 4.
This is a critical point in this how to install Matomo 4 on FreeBSD. Instead of placing the configuration bits in the main configuration file (httpd.conf) we will place a dedicated configuration bit in the already existing ‘extra’ directory. We will ‘call’ this dedicated configuration file from the main one with an ‘Include’ directive.
We create the dedicated file. But empty.
root@cargols:~ # touch /usr/local/etc/apache24/extra/httpd-matomo.conf
root@cargols:~ #
We now edit the ‘httpd-matomo.conf’ file and place this configuration in it. Use vi, nano or whatever you fancy to use.
Alias /matomo /usr/local/www/matomo/
AcceptPathInfo On
<Directory /usr/local/www/matomo>
AllowOverride None
Options Indexes FollowSymLinks
# Apache 2.4 no longer accepts "Order" or "Allow from ..."
Require all granted
</Directory>
Let’s describe a few bits of this configuration:
The ‘Alias’ bit states that anything on the URL that looks for ‘/matomo’ is located in the described path. So any query to an URL that contains the ‘/matomo’ string will be served content from ‘/usr/local/www/matomo/’.
The ‘AcceptPathInfo’ directive will override a negative handler’s decision when processing a request and always allow to serve content whenever an URL request contains a file that exists.
The ‘Directory’ directive is a configuration block that allows one to configure a series of directives and apply those only to the directory, sub-directories and their respective files. In this case the directives in between the two ‘Directory’ declarations (one to open and the second to close the configuration block) will be applied to ‘/usr/local/www/matomo’.
The ‘AllowOverride’ directive with the ‘None’ setting will ignore any ‘.htaccess’ files in the directory or sub-directories found in ‘/usr/local/www/matomo’.
The ‘Options’ directive allows a series of Apache HTTP features to be enabled. A list of them can be found on the link inside Options. Here we will enable the ‘Indexes’ and ‘FollowSymLinks’ ones. Content from the directory will be served instead of just being listed and links will be followed in this particular case.
The ‘Require’ directive is an access control one that allows to fine tune who can see what. In this case any authenticated user has unconditional access to the resources found in ‘/usr/local/www/matomo’.
With this configuration in the ‘extra’ directory let’s call it from the main Apache HTTP configuration file (httpd.conf).
Just edit the ‘httpd.conf’ file in /usr/local/etc/apache24 directory with your favourite editor and place the following ‘Include’ directive or just use this next command.
root@cargols:~ # echo "Include /usr/local/etc/apache24/extra/httpd-matomo.conf" >> /usr/local/etc/apache24/httpd.conf
root@cargols:~ #
With this configuration in place, we need to restart Apache HTTP.
root@cargols:~ # apachectl restart
Performing sanity check on apache24 configuration:
Syntax OK
Stopping apache24.
Waiting for PIDS: 7218.
Performing sanity check on apache24 configuration:
Syntax OK
Starting apache24.
root@cargols:~ #
We can now proceed to install Matomo 4 on FreeBSD with its own PHP package, which will create and populate the ‘/usr/local/www/matomo’ directory.
Step 3. Install Matomo 4 on FreeBSD
Matomo 4 is a PHP program and has its own package. Look for it and choose the one that fits the already existing PHP version on the system you need to install Matomo 4.
root@cargols:~ # pkg search matomo
php73-matomo-4.1.0_1 Open Source Web Analytics Software Program
php74-matomo-4.1.0_1 Open Source Web Analytics Software Program
php80-matomo-4.1.0_1 Open Source Web Analytics Software Program
root@cargols:~ #
If you can’t remember your PHP version just type:
php --version
Now you know the right PHP version already installed on your system. Don’t choose a different one!
In my case I’m using PHP 7.4 so I need to install the php74-matomo-4.1.0_1 package.
root@cargols:~ # pkg install php74-matomo-4.1.0_1
Updating FreeBSD repository catalogue...
FreeBSD repository is up to date.
All repositories are up to date.
The following 5 package(s) will be affected (of 0 checked):
New packages to be INSTALLED:
php74-matomo: 4.1.0_1
php74-pecl-memcache: 8.0
php74-readline: 7.4.16
php74-tidy: 7.4.16
tidy-lib: 090315.c_3
Number of packages to be installed: 5
The process will require 46 MiB more space.
11 MiB to be downloaded.
Proceed with this action? [y/N]: y
....
root@cargols:~ #
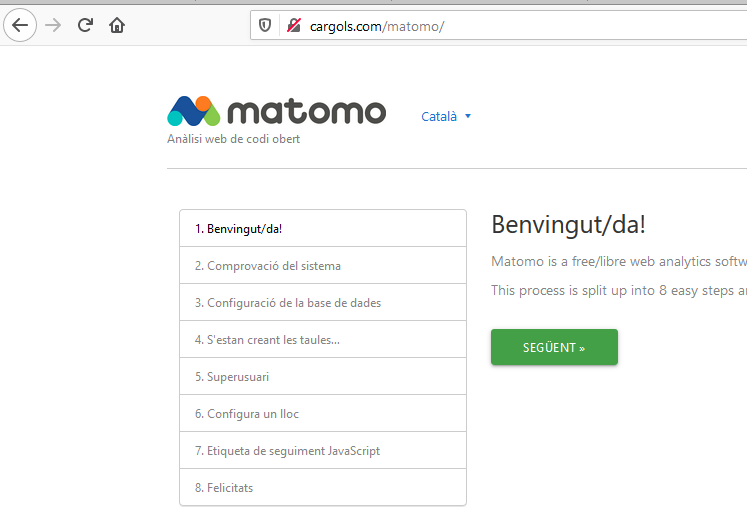
Once installed it’s time to finish the installation through your browser. Point the URL address to the site or server IP you pretend to use Matomo 4 from and finish the install there.
Something close to this has to be found there.
Conclusion
Matomo 4 is a great tool to grasp how many hits a site has per day, per period of time, the country of origin of those visits, how long do they stay on the site, etc. You don’t even need to store personal identifiable information to grasp how a site is performing. Matomo 4 will asign an ID to a visitor but will not collect or associate it to the visitor’s specific IP. In this way, the individual visitor is accessing the site at the same time there’s a registration of such activity. All without storing specific and identifiable information from the individual. More on this inside this Matomo’s website entry.
This is all on this how to install Matomo 4 on FreeBSD. On a separate piece we will configure it to be used with a WordPress install.
If you find the articles in Adminbyaccident.com useful to you, please consider making a donation.
Use this link to get $200 credit at DigitalOcean and support Adminbyaccident.com costs.
Get $100 credit for free at Vultr using this link and support Adminbyaccident.com costs.
Mind Vultr supports FreeBSD on their VPS offer.