Ansible is a very useful tool geared to system’s configuration and applications deployment. In this how to install Ansible on FreeBSD I will briefly explain what the tool is, what it does, what it does not and how to install it on FreeBSD. I will also demonstrate very basic use and on a later article I will write about software deployment and maintenance through Ansible.
Ansible is open source software and actively being developed by Red Hat the company behind the most relevant GNU/Linux product on the market the Red Hat Linux OS and its cousins CentOS and Fedora. These guys know one thing or two about controlling hundreds of servers at once and in the process everyone has got very aware of the issues those ‘fine tunned’ shell scripts can arise. So they came out with a solution similar to Puppet or Chef in functionality but with a different model.
Ansible is agentless. Meaning the client boxes do not need special software to be installed and received the configuration changes or application deployment on them. In that sense Ansible is a more of a ‘push’ tool than a ‘pull’ one, although uses both. A master node needs Ansible and Python installed on it to control the clients, or hosts. Clients will receive the changes via SSH connections and will need Python to get going. However one can set Python on them remotely as I’ll demonstrate below. The whole thing works using Playbooks, which are set on the master node and serve as a configuration template for the client nodes to follow.
If you find the articles in Adminbyaccident.com useful to you, please consider making a donation.
Use this link to get $200 credit at DigitalOcean and support Adminbyaccident.com costs.
Get $100 credit for free at Vultr using this link and support Adminbyaccident.com costs.
Mind Vultr supports FreeBSD on their VPS offer.
Playbooks are configuration files that system and network administrators alike can write in order to control their environments, no matter how large those are. In there they will declare the state of the systems they want them to be. The tool is simple and has some advantages over old school shell scripts.
– Playbooks are easy to write.
– They provide consistency. Ever found the same line written twice or more times on the same config file?
– Changes are not applied if they aren’t needed.
– Can be applied to groups of servers or individually.
– Simplification of the abstractions at hand.
– Uniformity across the environment.
Things Ansible will not do for you in any case:
– Reduce your workload. Playbooks do not write themselves as shell scripts don’t either.
– Solve all your mistakes. Ansible is safer to work with, but issues may arise if you make a mistake.
– Copy files from box A to box B, unless they are found in the master node.
– Grab your existing shell scripts and magically convert them into playbooks. It would be nice though, wouldn’t it?
FreeBSD is not a first citizen on Ansible land however it works beyond ‘fairly good’, although not being excellent as it is on the Linux world. This said most available modules work on all the BSDs, not just FreeBSD, so people is using the tool, because it works.
In this how to install Ansible on FreeBSD guide you’ll read about:
– The prerequisites.
– How to install Ansible on the master node.
– How to configure Ansible on the master node.
– How to install Python on the client nodes.
– How to write a very simple Ansible Playbook.
– References to gather further information.
Prerequisites
This is the list of prerequisites one needs to fulfill before using Ansible.
– One FreeBSD node as a ‘master node’.
– One or more FreeBSD node or jail as ‘client nodes’.
– Every box needs the OpenSSH service to be on.
– One non-root user on each client, accessible from the master.
– This user must be on the ‘wheel’ group’.
– An SSH key pair, with the public keys installed on each client so the master can access the clients.
On my setup I will be using three VMs on VirtualBox, but you may want to use FreeBSD Jails instead. BSDVM will be the master node and FreeBSD-A and FreeBSD-B will be the client nodes. So the first two prerequisites are done.
To enable the SSH service we need to add one config line into the /etc/rc.conf file, which is one of the master configuration ones in the BSD realm. We’ll first check if it’s already running.
$ grep -n 'ssh' /etc/rc.conf
If some output comes out there is nothing you have to do. So you can jump into adding the ansible user. If there’s output it should be similar to:
[albert@BSDVM ~]$ grep -n 'ssh' /etc/rc.conf
4:sshd_enable="YES"
[albert@BSDVM ~]$
If there is no result you need to start up the service. First append the missing configuration line into /etc/rc.conf with this command:
$ sudo sysrc sshd_enable="YES"
Once the configuration is set up you can start the SSH service.
$ sudo service sshd start
All the three VMs in my setup have a user created just for ansible. The user is conveniently named ‘ansible’ but you can choose whatever you see fit. I’ll show you how to add a user on FreeBSD, although there is enough information around the internet and on the official documentation for this though.
root@BSDVM:~ # adduser
Username: ansible
Full name: ansible
Uid (Leave empty for default):
Login group [ansible]: wheel
Login group is wheel. Invite ansible into other groups? []:
Login class [default]:
Shell (sh csh tcsh git-shell bash rbash nologin) [sh]: bash
Home directory [/home/ansible]:
Home directory permissions (Leave empty for default):
Use password-based authentication? [yes]:
Use an empty password? (yes/no) [no]:
Use a random password? (yes/no) [no]:
Enter password:
Enter password again:
Lock out the account after creation? [no]:
Username : ansible
Password : *****
Full Name : ansible
Uid : 1002
Class :
Groups : wheel
Home : /home/ansible
Home Mode :
Shell : /usr/local/bin/bash
Locked : no
OK? (yes/no): yes
adduser: INFO: Successfully added (ansible) to the user database.
Add another user? (yes/no): no
Goodbye!
root@BSDVM:~ #
Once I’ve created the ‘ansible’ user on each box I create the SSH key pair on the BSDVM master node.
[albert@BSDVM ~]$ su - ansible
Password:
Any user that is a member of the wheel group can use "su -" to simulate
a root login. You can add a user to the wheel group by editing /etc/group.
-- Konstantinos Konstantinidis <[email protected]>
[ansible@BSDVM ~]$ ssh-keygen -t rsa
Generating public/private rsa key pair.
Enter file in which to save the key (/home/ansible/.ssh/id_rsa):
Created directory '/home/ansible/.ssh'.
Enter passphrase (empty for no passphrase):
Enter same passphrase again:
Your identification has been saved in /home/ansible/.ssh/id_rsa.
Your public key has been saved in /home/ansible/.ssh/id_rsa.pub.
The key fingerprint is:
SHA256:hrBFvEcg2t8CcrPoP9821clm8EckimbNYSwJ0llQ8T0 ansible@BSDVM
The key's randomart image is:
+---[RSA 2048]----+
| oo=B++ |
| o ++ +.+.. . |
| o * .o *.oEo |
| + O.o= = .. |
| . o ++S = o |
| . o . B . |
| . . o . |
| .. .o |
| .o.... |
+----[SHA256]-----+
[ansible@BSDVM ~]$
Now the key pair has been created into the ansible home directory (/usr/home/ansible/.ssh) it’s time to place the public key inside every client. What and where.
The what.
My public key on the master node is:
[ansible@BSDVM ~]$ cat /home/ansible/.ssh/id_rsa.pub
ssh-rsa AAAAB3NzaC1yc2EAAAADAQABAAABAQCsIpDAeudRoSakzVbPBmbJpetXDv3BIKPWe4+ZVPCJ3BtdGY1YOnSGdB5TVnsk8UqvxKRS/msyF0/+SfxSqTu23ixNMqExfuoR3puKMys+DOiGPNrQTXGuNKE2z/2/CiiOswZ+/WQ7fJf4eUlX7sfK3gTtHqBuyzN6Loc6irwppoed0HCF/YWPi+ZuZelZ6TvDLvQN85WJYmlHcoZ3F9aUjch9o3HBEAaXi3x7te2f10up8c8UwvEa8l4w+k58V/Ld0Fms1at6BpwO1GwQz/iQPfmQ/CDmP+yKlBAHowoAJwurO987bsRbUMPdXymEgE0SKhmZB+Rf4M12whQS2rqr ansible@BSDVM
[ansible@BSDVM ~]$
The where.
Place the public into each client in the following path /home/ansible/.ssh/authorized_keys. You may need to create the path first though.
[ansible@FreeBSD-B ~]$ mkdir .ssh
[ansible@FreeBSD-B ~]$ cd .ssh
[ansible@FreeBSD-B ~/.ssh]$
[ansible@FreeBSD-B ~/.ssh]$ vi authorized_keys
[ansible@FreeBSD-B ~/.ssh]$ cat authorized_keys
ssh-rsa AAAAB3NzaC1yc2EAAAADAQABAAABAQCsIpDAeudRoSakzVbPBmbJpetXDv3BIKPWe4+ZVPCJ3BtdGY1YOnSGdB5TVnsk8UqvxKRS/msyF0/+SfxSqTu23ixNMqExfuoR3puKMys+DOiGPNrQTXGuNKE2z/2/CiiOswZ+/WQ7fJf4eUlX7sfK3gTtHqBuyzN6Loc6irwppoed0HCF/YWPi+ZuZelZ6TvDLvQN85WJYmlHcoZ3F9aUjch9o3HBEAaXi3x7te2f10up8c8UwvEa8l4w+k58V/Ld0Fms1at6BpwO1GwQz/iQPfmQ/CDmP+yKlBAHowoAJwurO987bsRbUMPdXymEgE0SKhmZB+Rf4M12whQS2rqr ansible@BSDVM
[ansible@FreeBSD-B ~/.ssh]$
We now have all the prerequisites satisfied. Three nodes, one master and two clients. The SSH service is running on all three. A non-root user on the nodes. That user is on the ‘wheel group’. A key-pair for that user on the three boxes.
Install Ansible on the Master Node
There are several versions of Ansible available on FreeBSD. I’ll use the latest in this example but you may be familiar with a particular version or have seen someone using some specific. Choose your poison. I tend to use the latest, not just to have the most newer features.
[albert@BSDVM ~]$ sudo pkg install python37 py37-ansible
Updating FreeBSD repository catalogue...
FreeBSD repository is up to date.
All repositories are up to date.
Checking integrity... done (0 conflicting)
The following 14 package(s) will be affected (of 0 checked):
New packages to be INSTALLED:
libsodium: 1.0.18
python37: 3.7.7
py37-Babel: 2.8.0
py37-Jinja2: 2.10.1
py37-MarkupSafe: 1.1.1
py37-ansible: 2.9.7
py37-bcrypt: 3.1.7
py37-jmespath: 0.9.5
py37-netaddr: 0.7.19_1
py37-paramiko: 2.7.1
py37-pyasn1: 0.4.7
py37-pynacl: 1.3.0
py37-pytz: 2019.3,1
py37-yaml: 5.3.1
Number of packages to be installed: 14
The process will require 182 MiB more space.
Proceed with this action? [y/N]: y
Once Python 3.7 and Ansible are installed we can start the configuration.
Two key files have been placed into /usr/local/share/examples.
/usr/local/share/examples/py37-ansible/hosts
/usr/local/share/examples/py37-ansible/ansible.cfg
We will copy them and place them into the /etc/ directory. However, this is FreeBSD and the /etc/ directory is reserved for the OS. Applications have their own /etc/ directory placed in /usr/local/etc.
First we create the ansible directory.
$ sudo mkdir /usr/local/etc/ansible
Now we copy the files.
$ sudo cp /usr/local/share/examples/py37-ansible/hosts /usr/local/etc/ansible
$ sudo cp /usr/local/share/examples/py37-ansible/ansible.cfg /usr/local/etc/ansible
Once the tool has been installed, let’s configure it.
Configure Ansible on the Master Node
Time for configuration bits in this how to install Ansible on FreeBSD. The ‘hosts’ file in the ansible directory is very important. In there I will declare the list of nodes who will act as clients. How will the master connect to those, with what user and with what key.
At the end of the ‘hosts’ file in Ansible I’ve set my two nodes as one group called ‘freebsd’.
[freebsd]
freebsd-a ansible_ssh_host=192.168.1.133
freebsd-b ansible_ssh_host=192.168.1.134
One can avoid naming them and just place the IPs straight away, but for the sake of clarity I’ve decided to include this as well.
Undertneath of this group declaration I’ve also set the variables.
[freebsd:vars]
ansible_python_interpreter=/usr/local/bin/python3.7
ansible_user=ansible
ansible_become=yes
ansible_become_method=sudo
ansible_connection=ssh
ansible_ssh_private_key_file=/usr/home/ansible/.ssh/id_rsa
These are important. The first one is the python binary location, the user that the master node will connect to the client with come next, followed by if the user can become ‘root’ using ‘sudo’ and finally the authentication method, set here with ‘ssh’ and the private key location as well.
Furthermore you can make your own arrangements. If you read the ‘hosts’ file in Ansible you will see some examples that can help you out on your particular set up.
Before moving on I’ve set one change in the main Ansible configuration file. I’ve disabled SSH key host checking just for the sake of testing, by removing the ‘#’ at the beginning of the line. You can find it with the following command.
$ grep -n 'host_key_checking' ansible.cfg
Mine sits on line 71 and reads as follows:
[albert@BSDVM ~/ansible]$ grep -n 'host_key_checking' ansible.cfg
71:host_key_checking = False
[albert@BSDVM ~/ansible]$
Once Ansible is installed on the master node I can move forward and use the ‘raw’ module in order to install Python on the client nodes without having to log in into every single one of them. Just from the master node.
Install Python on the Client Nodes
Another critical step on this how to install Ansible on FreeBSD guide. Ansible has a module called ‘raw’. It is useful in this case to somehow ‘force’ the installation of Python on the clients. This is the command, same as in the official Ansible documentation and adatpted for my example.
$ sudo ansible -m raw -a "pkg install -y python37" freebsd
The output I’ve received:
[albert@BSDVM /usr/local/etc/ansible]$ sudo ansible -m raw -a "pkg install -y python37" freebsd
freebsd-b | CHANGED | rc=0 >>
Updating FreeBSD repository catalogue...
FreeBSD repository is up to date.
All repositories are up to date.
Checking integrity... done (0 conflicting)
The following 3 package(s) will be affected (of 0 checked):
New packages to be INSTALLED:
libffi: 3.2.1_3
python37: 3.7.7
readline: 8.0.4
Number of packages to be installed: 3
The process will require 112 MiB more space.
[1/3] Installing readline-8.0.4...
[1/3] Extracting readline-8.0.4: 100%
[2/3] Installing libffi-3.2.1_3...
[2/3] Extracting libffi-3.2.1_3: 100%
[3/3] Installing python37-3.7.7...
[3/3] Extracting python37-3.7.7: 100%
=====
Message from python37-3.7.7:
--
Note that some standard Python modules are provided as separate ports
as they require additional dependencies. They are available as:
py37-gdbm databases/py-gdbm@py37
py37-sqlite3 databases/py-sqlite3@py37
py37-tkinter x11-toolkits/py-tkinter@py37
Shared connection to 192.168.1.134 closed.
freebsd-a | CHANGED | rc=0 >>
Updating FreeBSD repository catalogue...
FreeBSD repository is up to date.
All repositories are up to date.
Checking integrity... done (0 conflicting)
The following 3 package(s) will be affected (of 0 checked):
New packages to be INSTALLED:
libffi: 3.2.1_3
python37: 3.7.7
readline: 8.0.4
Number of packages to be installed: 3
The process will require 112 MiB more space.
[1/3] Installing readline-8.0.4...
[1/3] Extracting readline-8.0.4: 100%
[2/3] Installing libffi-3.2.1_3...
[2/3] Extracting libffi-3.2.1_3: 100%
[3/3] Installing python37-3.7.7...
[3/3] Extracting python37-3.7.7: 100%
=====
Message from python37-3.7.7:
--
Note that some standard Python modules are provided as separate ports
as they require additional dependencies. They are available as:
py37-gdbm databases/py-gdbm@py37
py37-sqlite3 databases/py-sqlite3@py37
py37-tkinter x11-toolkits/py-tkinter@py37
Shared connection to 192.168.1.133 closed.
[albert@BSDVM /usr/local/etc/ansible]$
As you can see, it worked. Now that Python is present on the client nodes, we can test Ansible is working and the client nodes are reachable by pinging them with Ansible. This is the command for that.
$ sudo ansible -m ping freebsd
This is my received output.
[albert@BSDVM /usr/local/etc/ansible]$ sudo ansible -m ping freebsd
freebsd-a | SUCCESS => {
"changed": false,
"ping": "pong"
}
freebsd-b | SUCCESS => {
"changed": false,
"ping": "pong"
}
[albert@BSDVM /usr/local/etc/ansible]$
Write a Simple Playbook
First things first. What is a Playbook? Think of a playbook of a reference template which states and reflects in what conditions the node clients have to be configured. What applications should be in them, what configuration files should be in place and what critical configuration bits have to be in such files.
Very interestingly one can run a new playbook specifically for a set of nodes, like in our example. The first time changes will be committed, however the second time we launch the same exact playbook the system will not change at all. New lines won’t be placed underneath the previous ones as often happens when one forgets if the shell script was lauched in the past in a particular node.
Playbooks are key in Ansible and there is a lot to read about. The list of modules tackles almost every aspect of system’s configuration. There are dedicated modules for Cisco products, Fortinet, Windows, you name it and they have it. All playbooks are written in YAML format, a human-readable data-serialization language.
I’ll use a playbook to install Apache HTTP in the freebsd group of servers. For exmaple this could well be a group of servers called ‘webservers’.
This is the beginning of this test playbook.
---
# Install minimal packages for the webservers
- hosts: freebsd
tasks:
At the beginning of every playbook we need to place three dashes. Then we have to declare what boxes does this has to be ‘played’ in. After that we need to detail one or a series of tasks.
- name: Install Apache HTTP
pkgng:
name: apache24
- name: Enable Apache HTTP
lineinfile:
dest: /etc/rc.conf
backup: yes
line: apache24_enable="YES"
- name: Start Apache HTTP
service:
name: apache24
enabled: yes
state: started
If we take a closer look there are three tasks in this play. The first is installing Apache HTTP, the second enables it and the third starts up the service.
I’ll write this playbook as apache_install.yml inside /usr/local/etc/ansible and play it.
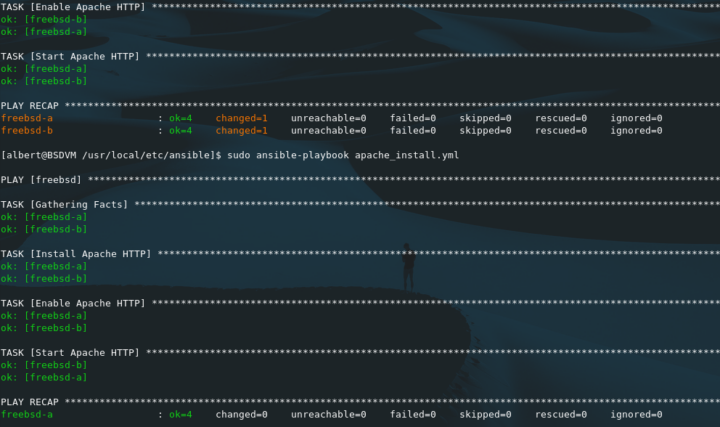
[albert@BSDVM /usr/local/etc/ansible]$ sudo ansible-playbook apache_install.yml
PLAY [freebsd] ****************************************************************************************************************************
TASK [Gathering Facts] ********************************************************************************************************************
ok: [freebsd-a]
ok: [freebsd-b]
TASK [Install Apache HTTP] ****************************************************************************************************************
changed: [freebsd-b]
changed: [freebsd-a]
TASK [Enable Apache HTTP] *****************************************************************************************************************
ok: [freebsd-b]
ok: [freebsd-a]
TASK [Start Apache HTTP] ******************************************************************************************************************
ok: [freebsd-a]
ok: [freebsd-b]
PLAY RECAP ********************************************************************************************************************************
freebsd-a : ok=4 changed=1 unreachable=0 failed=0 skipped=0 rescued=0 ignored=0
freebsd-b : ok=4 changed=1 unreachable=0 failed=0 skipped=0 rescued=0 ignored=0
[albert@BSDVM /usr/local/etc/ansible]$
As it can be seen from the output the master node first makes contact with the clients, gathers information about their status and configuration and then applies the necessary changes.
Visting one of the two client nodes we can check Apache HTTP was indeed installed.
[ansible@FreeBSD-A ~]$ pkg info | grep apache
apache24-2.4.43 Version 2.4.x of Apache web server
[ansible@FreeBSD-A ~]$
By running the same playbook a second time we will check if Ansible makes further changes or it leaves the client nodes as they already are.
PLAY RECAP ********************************************************************************************************************************
freebsd-a : ok=4 changed=0 unreachable=0 failed=0 skipped=0 rescued=0 ignored=0
freebsd-b : ok=4 changed=0 unreachable=0 failed=0 skipped=0 rescued=0 ignored=0
As it can be seen in the ‘changed’ column, no modifications have been applied. That’s because the client nodes were already in the state the playbook demanded.
Playbooks can be extended to unthinkable levels once you start using the tool. They are a great solution for quickly deployments and maintain tens or hundreds of servers in good shape with relative ease and piece of mind. Down below a list of useful resources for those willing to dig deeper.
Tip. YAML files can be a bit annoying. Respect the chosen indentation at all times. The one you want or the one you find, but respect it. Otherwise… things may not work.
Resources
Ansible installation on FreeBSD
https://docs.ansible.com/ansible/latest/user_guide/intro_bsd.html
Playbook introduction.
https://docs.ansible.com/ansible/latest/user_guide/playbooks_intro.html
Working with Playbooks.
https://docs.ansible.com/ansible/latest/user_guide/playbooks.html
Playbook nomenclature.
https://docs.ansible.com/ansible/latest/reference_appendices/playbooks_keywords.html
Playbook modules.
https://docs.ansible.com/ansible/latest/modules/modules_by_category.html
Conclusions
I remember my days working the fourth largeest bank in Spain as an operator applying changes to configuration files and deploying Java applications left and right. We were all very careful at the CLI making sure we had typed everything correctly and following the instructions and steps one at a time, making sure everything had been executed correctly. Sometimes we did even make extra copies of some configuration files just in case the one who had written the steps had made a mistake. Script with loops were discouraged sometimes because when you have 48 instances of an application and you’ve messed it all, rolling back can be a pain, specially on long change operations. Ansible would have been a great tool to operate with. Only if…
This is all on this how to install Ansible on FreeBSD. The sky is the only limit. Go fly!
If you find the articles in Adminbyaccident.com useful to you, please consider making a donation.
Use this link to get $200 credit at DigitalOcean and support Adminbyaccident.com costs.
Get $100 credit for free at Vultr using this link and support Adminbyaccident.com costs.
Mind Vultr supports FreeBSD on their VPS offer.