In this guide we’ll see how to install a simple, clean, new WordPress site. In order to run this site we’ll have to have a LAMP (or FAMP if you prefer FreeBSD over Linux) stack in place. Read the correspondent guides in order to get the necessary software layers all together, rightly configured.
If you find the articles in Adminbyaccident.com useful to you, please consider making a donation.
Use this link to get $200 credit at DigitalOcean and support Adminbyaccident.com costs.
Get $100 credit for free at Vultr using this link and support Adminbyaccident.com costs.
Mind Vultr supports FreeBSD on their VPS offer.
The first step to install WordPress on Debian is creating a database into MariaDB (or MySQL) and a user. To start we have to log in to MariaDB as the root user. Whenever you installed MariaDB (or MySQL, Percona, etc) you set the root password, so go grab it.
albert@debian:~$ mysql -u root -p
Enter password:
Welcome to the MariaDB monitor. Commands end with ; or \g.
Your MariaDB connection id is 3
Server version: 10.1.26-MariaDB-0+deb9u1 Debian 9.1
Copyright (c) 2000, 2017, Oracle, MariaDB Corporation Ab and others.
Type 'help;' or '\h' for help. Type '\c' to clear the current input statement.
MariaDB [(none)]>
Once we are in we will have to create a database to host the WordPress installation. We will set the database name as wordpress but for God’s sake don’t do that and thing of something smarter.
MariaDB [(none)]> CREATE DATABASE wordpress;
Query OK, 1 row affected (0.00 sec)
MariaDB [(none)
After this we will create a new user and will give it rights to use the database we’ve just created.
MariaDB [(none)]> GRANT ALL PRIVILEGES ON wordpress.* TO 'wpuser'@'localhost' IDENTIFIED BY 'wppasswd';
Query OK, 0 rows affected (0.00 sec)
MariaDB [(none)]>
As you can see the sentence includes giving the rights on the database as well as create the user on the local machine and giving it a password. Again don’t use this wording as example and find some interesting names and passwords for your use. These will be later used to connect the WordPress configuration file to connect with the database.
Let’s now reload the MariaDB internal caches by using the FLUSH command so all the changes get loaded. And then quit.
MariaDB [(none)]> FLUSH PRIVILEGES;
Query OK, 0 rows affected (0.00 sec)
MariaDB [(none)]> exit
Bye
albert@debian:~$
The second step to install wordpress on Debian is getting the missing dependencies for PHP since our LAMP stack installation is at the bare minimum. We need extra functionality from PHP so we will achieve this by typing:
sudo apt-get install php-curl php-gd php-mbstring php-mcrypt php-xml php-xmlrpc
These php packages have themselves other dependencies the system will pull and install all together by itself. Just type yes when asked for them.
The third step is tweaking the Apache web server. Apache can a hidden file (those with a dot in the beginning) called .htaccess in order to make configuration changes on a per-directory basis. The Apache folks themselves claim this kind of file should be avoided if one has full access to the httpd server configuration file, which we do. However WordPress itself and many of its plugins make use of this file to work, setting rules and conditions in it to get good and useful functionality of our WordPress install. So like it or not we have to have it. Because of this we will modify one line on the Directory block in our apache configuration.
albert@debian:~$ sudo vi /etc/apache2/apache2.conf
You will have to find this section:
<Directory /var/www/>
Options Indexes FollowSymLinks
AllowOverride None
Require all granted
</Directory>
and change it to this:
<Directory /var/www/html>
Options Indexes FollowSymLinks
AllowOverride All
Require all granted
</Directory>
Once this is done we will enable to mod_rewrite module so we can change and modify the permalinks on WordPress. And yes, you want this.
albert@debian:~$ sudo a2enmod rewrite
Enabling module rewrite.
To activate the new configuration, you need to run:
systemctl restart apache2
albert@debian:~$
As the message states, since we have made some configuration changes on Apache we will restart the web server for the changes be effective. But first we will check our configuration does not contain fatal errors.
albert@debian:~$ sudo apachectl configtest
AH00558: apache2: Could not reliably determine the server's fully qualified domain name, using 127.0.1.1. Set the 'ServerName' directive globally to suppress this message
Syntax OK
albert@debian:~$
What we are looking for is that sentence where it says “Syntax OK”. Since it’s ok we can forget about the error appearing on the prompt. However if it bothers you, the way to fix this is by setting the ServerName directive correctly on the main Apache configuration file ( /etc/apache2/apache2.conf ) , by adding the domain name you own or by putting in the ip from the server.
Let’s now restart the Apache web server because our syntax is ok.
albert@debian:~$ sudo systemctl restart apache2
albert@debian:~$
We are now ready for the final step to install WordPress on Debian. We finally get our fingers on the main software piece we were willing to tackle, WordPress itself.
We first download wordpress to a directory we can write on to. That can be the /tmp or our home user directory.
albert@debian:~$ wget https://wordpress.org/latest.tar.gz
--2018-01-11 18:16:35-- https://wordpress.org/latest.tar.gz
Resolving wordpress.org (wordpress.org)... 66.155.40.250, 66.155.40.249
Connecting to wordpress.org (wordpress.org)|66.155.40.250|:443... connected.
HTTP request sent, awaiting response... 200 OK
Length: 9638827 (9.2M) [application/octet-stream]
Saving to: 'latest.tar.gz'
latest.tar.gz 100% [===========================================================>] 9.19M 826KB/s in 15s
2018-01-11 18:16:51 (648 KB/s) - 'latest.tar.gz' saved [9638827/9638827]
albert@debian:~$
Now that we have the tar ball let’s unpack it. We will make use of the tar commnad. Since we will use the v (verbose) flag don’t get mad if you see lot of output on your screen.
albert@debian:~$ tar -zxvf latest.tar.gz
albert@debian:~$
A new directory has been created called wordpres. All the content has been extracted there. And now we will configure a file from this wordpress directory so when we move it to the right place and give ownership to the Apache user it will make everything work because it will be able to talk to the database.
albert@debian:~$ cd wordpress
albert@debian:~/wordpress$
albert@debian:~/wordpress$ cp wp-config-sample.php wp-config.php
albert@debian:~/wordpress$
Now that the file is in place we will write in the correct database name, user and passord. Use your editor of choice. I happen to like vi.
albert@debian:~/wordpress$ vi wp-config.php
As explained fine this sectio which is near the top and change the values accordingly to the configuration you set at the database creation, etc.
// ** MySQL settings - You can get this info from your web host ** //^M
/** The name of the database for WordPress */^M
define('DB_NAME', 'database_name_here');^M
^M
/** MySQL database username */^M
define('DB_USER', 'username_here');^M
^M
/** MySQL database password */^M
define('DB_PASSWORD', 'password_here');^M
^M
/** MySQL hostname */^M
define('DB_HOST', 'localhost');^M
This is what we set here in the article and this is how it has to look like:
// ** MySQL settings - You can get this info from your web host ** //^M
/** The name of the database for WordPress */^M
define('DB_NAME', 'wordpress');^M
^M
/** MySQL database username */^M
define('DB_USER', 'wpuser');^M
^M
/** MySQL database password */^M
define('DB_PASSWORD', 'wppasswd');^M
^M
/** MySQL hostname */^M
define('DB_HOST', 'localhost');^M
^M
Once the configuration file is correctly set we will move all the contents from this wordpress directory to the web server root. Mind this is for one wordpress site installation. You can have several wordpress installs into the web server root in different directories which will have to be called through the virtualhosts mechanism. This is out of the scope of this guide. However you can enable wordpress multisite using the configuration on this article so will will maintain the ability to use multiple wordpress sites with one install.
We now copy the contents of the wordpress directory to the web server root.
albert@debian:~/wordpress$ sudo cp -a ~/wordpress/* /var/www/html
[sudo] password for albert:
albert@debian:~/wordpress$
The a flag allows permissions to be maintained.
We will now set an empty .htaccess so any plugins needing it will find it. We will also give it the right permissions. This is a very sensible file so do not miss type the permissions.
albert@debian:~/wordpress$ cd /var/www/html
We create the empty file using the touch command.
albert@debian:/var/www/html$ sudo touch .htaccess
We give it the permissions using the chmod command.
albert@debian:/var/www/html$ sudo chmod 660 .htaccess
albert@debian:/var/www/html$
Now we will set the right ownership and permissions for the whole web server root.
albert@debian:~$ sudo chown -R www-data:www-data /var/www/html
albert@debian:~$
With this we have given the user and group www-data respectively ownership over the directory and below directories of the indicated path.
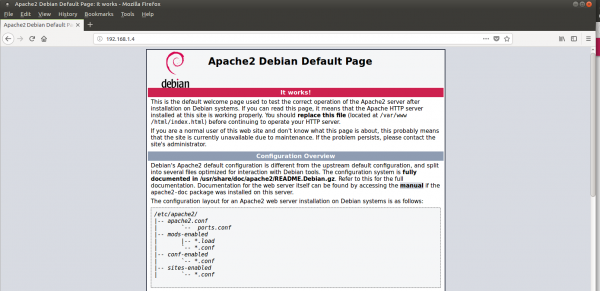
We are just one step away from getting WordPress installed in here. If you now go and point your browser to the ip or domain where you’ve just set this web server there is a good chance you still see the default Debian web server page.
So in order to get the install screen from WordPress we just have to rename or delete one file. I happen to prefer renaming it but you can “kill” it if you want to.
albert@debian:/var/www/html$ sudo mv index.html index.html.original
albert@debian:/var/www/html$
You can now point your browser to the ip or domain name you need this WordPress to be installed in.
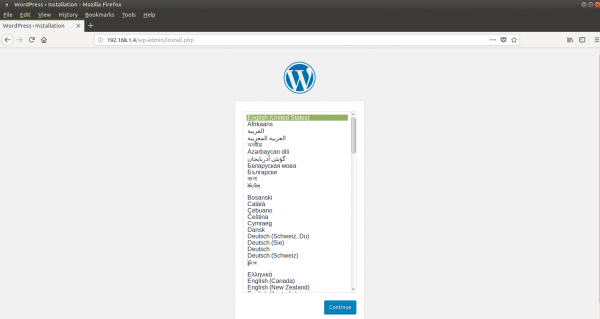
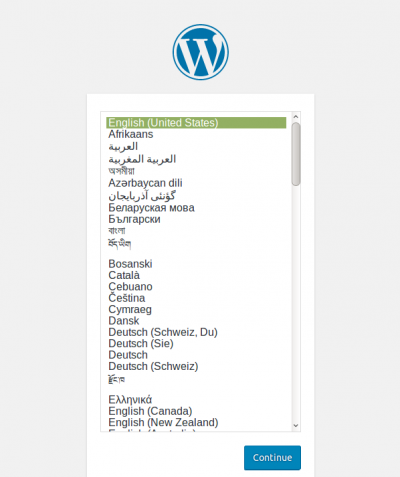
And there you go, the WordPress install screen finally appears. From now on I believe any sane human being who has touched a computer can follow on the steps without my guidance. If anyone gets lost just look for the error messages appearing (if any, none should appear) on the internet.
This is almost all on how to install WordPress on Debian. Don’t forget to read these last two paragraphs.
Now be aware you will set a user name and password for your wordpress install. They will be sent in plain text so anyone in between you and the server (mainly the ISP and the host company) or someone sniffing traffic on your same network has the potential possibility to see it. Therefore other securization steps should be followed before completing the install, such as getting an SSL certificate and redirecting at least the administrator traffic for your website through https.
Do also make sure the firewall rules allow traffic to the correct ports. The port 80 is used by the http protocol. And the port 443 is used by the https one. Notice the difference is if the content it’s encrypted or not. That little ‘s’ refers to TLS (Transfer Layer Security). If you plan to have your site where users can create accounts and that sort of thing you will be better off using the port 443 only and redirecting all your traffic (not only yours) from the port 80 to the 443. To enable the use of port 443 you will have to get an SSL certificate and make use of it as mentioned before. Mind these topics are out of the scope of this article although they complete the good and safe use of your whole web site.
Update 05-2020: In this Github repository you can read a few scripts for automatic LAMP stack installations.
If you find the articles in Adminbyaccident.com useful to you, please consider making a donation.
Use this link to get $200 credit at DigitalOcean and support Adminbyaccident.com costs.
Get $100 credit for free at Vultr using this link and support Adminbyaccident.com costs.
Mind Vultr supports FreeBSD on their VPS offer.