I happen to self-host a few WordPress sites on FreeBSD. And as much as one can configure OP-Cache to improve PHP’s performance, object cache is a must for many WordPress sites. This how to install Redis for WordPress on FreeBSD will explain how to install an object cache (Redis) for WordPress (via plugin) on this great OS (FreeBSD).
Mind this will be only useful if you are not using a CDN. Those services typically have their own set of tools to increase performance by caching. Consult their own guidelines and other posts for that specific kind of setup.
Pre-requisites:
- A FreeBSD box with all updates.
- A FAMP or FEMP stack installed.
- A WordPress installation on top of the FAMP or FEMP
- The OPCache enabled in the PHP.ini file. (Not a must, but very recommended)
- Patience
Tip: The scripts in the links above may help you set up a clean new WordPress installation from scratch in a matter of minutes. Use them at your own discretion. Mind certificates are self-signed in those scripts. If you need/want LetsEncrypt certificates you can use this other guide I wrote back on the day.
Summary:
We will first install the Redis package from the OS. We will make some configuration arrangements for it to work as we intend. Later we will install the PHP module so WordPress can make use of this in-memory key-value database software named Redis. Once the PHP module for Redis is in place we will configure WordPress to consume an object cache by editing the key file wp-config.php. At last, we will install the Redis plugin for WordPress and enable it. Two test sites can be found at the end of the article if anyone wants to test the performance.
If you find the articles in Adminbyaccident.com useful to you, please consider making a donation.
Use this link to get $200 credit at DigitalOcean and support Adminbyaccident.com costs.
Get $100 credit for free at Vultr using this link and support Adminbyaccident.com costs.
Mind Vultr supports FreeBSD on their VPS offer.
Step 1.- Install Redis
This is the first step to install Redis for WordPress. We need to grab the package manager and install Redis. Simple. If you want to compile it, use ports, but I wouldn’t recommend wasting time since the default flags are enough for our purpose.
[albert@BSD-Backup ~]$ sudo pkg install redis-7.4.1
Updating FreeBSD repository catalogue...
FreeBSD repository is up to date.
All repositories are up to date.
The following 1 package(s) will be affected (of 0 checked):
New packages to be INSTALLED:
redis: 7.4.1
Number of packages to be installed: 1
The process will require 9 MiB more space.
962 KiB to be downloaded.
Proceed with this action? [y/N]: y
[1/1] Fetching redis-7.4.1.pkg: 100% 962 KiB 985.3kB/s 00:01
Checking integrity... done (0 conflicting)
[1/1] Installing redis-7.4.1...
===> Creating groups
Creating group 'redis' with gid '535'
===> Creating users
Creating user 'redis' with uid '535'
[1/1] Extracting redis-7.4.1: 100%
=====
Message from redis-7.4.1:
--
To setup "redis" you need to edit the configuration file:
/usr/local/etc/redis.conf
To run redis from startup, add redis_enable="YES"
in your /etc/rc.conf.
[albert@BSD-Backup ~]$
Once Redis has been installed we need to prepare the service for startup.
[albert@BSD-Backup ~]$ sudo sysrc redis_enable="YES"
redis_enable: -> YES
[albert@BSD-Backup ~]$
Now, let’s configure Redis for WordPress.
Step 2.- Configure Redis for WordPress
There is multiple configuration changes needed to accommodate Redis for WordPress as an object cache system.
Redis can be configured to use either a TCP socket or a UNIX socket. On standalone machines it’s wise to use UNIX sockets but TCP ones can be also used provided they are bound to the localhost IP 127.0.0.1. However, if our installation is complex and we need to separate concerns and we have another box (server) hosting the WordPress installation, we will be forced to use TCP sockets.
You can pick whatever option you like from the following 2. After this first configuration step, apply all the resting configuration adjustments.
UNIX socket configuration example. (Option 1)
Redis will need to open a UNIX socket, so PHP can interact with it. Look for the ‘unixsocket’ entry in the main Redis configuration file /usr/local/etc/redis.conf.
[albert@BSD-Backup ~]$ grep -n 'unixsocket' /usr/local/etc/redis.conf
156:# unixsocket /run/redis.sock
157:# unixsocketperm 700
414:# {unixsocket} Unix domain socket listening on, or "".
[albert@BSD-Backup ~]$
We need to uncomment line 156 and place the path we want.
unixsocket /var/run/redis/redis.sock
And we also need to uncomment line 157 and change permissions to 770.
unixsocketperm 770
We will open the socket in the following path:
/var/run/redis/redis.sock
Yet the file does not exist. Let’s create it.
[albert@BSD-Backup ~]$ sudo touch /var/run/redis/redis.sock
[albert@BSD-Backup ~]$
Verify it exists and its permissions.
[albert@BSD-Backup ~]$ ls -al /var/run/redis/redis.sock
-rw-r--r-- 1 root redis 0 Oct 29 15:36 /var/run/redis/redis.sock
[albert@BSD-Backup ~]$
Let’s change ownership from root to the redis user and www group for the folder holding the redis.pid and redis.sock.
[albert@BSD-Backup ~]$ sudo chown -R redis:www /var/run/redis/
[albert@BSD-Backup ~]$
Verify again the changed really applied.
[albert@BSD-Backup ~]$ ll /var/run/redis/
total 10
drwxr-xr-x 2 redis www 3B Oct 30 17:30 .
drwxr-xr-x 12 root wheel 33B Oct 30 17:21 ..
-rw-r--r-- 1 redis www 5B Oct 30 17:21 redis.pid
[albert@BSD-Backup ~]$
Adjust permissions for the Redis socket.
[albert@BSD-Backup ~]$ sudo chmod 770 /var/run/redis/redis.sock
[albert@BSD-Backup ~]$
Verify permissions have been set correctly.
[albert@BSD-Backup ~]$ ls -al /var/run/redis/redis.sock
-rwxrwx--- 1 redis www 0 Oct 30 17:29 /var/run/redis/redis.sock
[albert@BSD-Backup ~]$
We must add the web server user ‘www’ to the redis group so it can then access the socket we are going to create.
[albert@BSD-Backup ~]$ sudo pw usermod redis -G www
[albert@BSD-Backup ~]$
Once we have added the ‘www’ user into the redis group we now verify both users and groups.
[albert@BSD-Backup ~]$ id www
uid=80(www) gid=80(www) groups=80(www)
[albert@BSD-Backup ~]$ id redis
uid=535(redis) gid=535(redis) groups=535(redis),80(www)
[albert@BSD-Backup ~]$
As we can see, the www user is now part of the redis group.
TCP socket configuration example. (Option 2)
We must add the web server user ‘www’ to the redis group so it can then access the socket we are going to create.
[albert@BSD-Backup ~]$ sudo pw usermod redis -G www
[albert@BSD-Backup ~]$
Once we have added the ‘www’ user into the redis group we now verify both users and groups.
[albert@BSD-Backup ~]$ id www
uid=80(www) gid=80(www) groups=80(www)
[albert@BSD-Backup ~]$ id redis
uid=535(redis) gid=535(redis) groups=535(redis),80(www)
[albert@BSD-Backup ~]$
Let’s change ownership from root to the redis user and www group for the folder holding the redis.pid and redis.sock.
[albert@BSD-Backup ~]$ sudo chown -R redis:www /var/run/redis/
[albert@BSD-Backup ~]$
Verify again the changed really applied.
[albert@BSD-Backup ~]$ ll /var/run/redis/
total 10
drwxr-xr-x 2 redis www 3B Oct 30 17:30 .
drwxr-xr-x 12 root wheel 33B Oct 30 17:21 ..
-rw-r--r-- 1 redis www 5B Oct 30 17:21 redis.pid
[albert@BSD-Backup ~]$
Redis, by default, has a bind configuration to the localhost IP 127.0.0.1 and port 6379. There is no need to adjust this configuration, but you can check if it’s enabled with the following two commands.
[albert@BSD-Backup ~]$ grep -n 'bind 127.0.0.1' /usr/local/etc/redis.conf
71:# bind 127.0.0.1 ::1 # listens on loopback IPv4 and IPv6
88: bind 127.0.0.1 -::1
[albert@BSD-Backup ~]$
As we can see in the result above, in line 88, we can see it’s uncommented, and the service socket will be bound to the localhost IP.
To verify the 6379 port, corresponding to Redis, is open use the following command:
[albert@BSD-Backup ~]$ grep -n 'port 6379' /usr/local/etc/redis.conf
139:port 6379
196:# tls-port 6379
1817:# cluster-announce-tls-port 6379
[albert@BSD-Backup ~]$
With the socket configuration out of the way, with whatever option we have chosen, we can continue configuring Redis.
Tip 1.- Mind the configuration for the TCP socket is for a “full self-hosted” instance, where WordPress and Redis are sitting in the same host.
Tip 2.- If you want to use a separate host for Redis than the one hosting your WordPress installation more directives need to be adjusted, such as authentication and probably TLS. Those are out of the scope of this guide.
Maxmemory configuration.
It’s the turn now for the ‘maxmemory’ parameter to allocate a memory chunk for Redis. Configure the size as you wish. Let’s look for it.
[albert@BSD-Backup ~]$ grep -n 'maxmemory' /usr/local/etc/redis.conf
1112:# according to the eviction policy selected (see maxmemory-policy).
1122:# WARNING: If you have replicas attached to an instance with maxmemory on,
1130:# limit for maxmemory so that there is some free RAM on the system for replica
1133:# maxmemory <bytes>
1135:# MAXMEMORY POLICY: how Redis will select what to remove when maxmemory
1162:# maxmemory-policy noeviction
1174:# maxmemory-samples 5
1182:# maxmemory-eviction-tenacity 10
1184:# Starting from Redis 5, by default a replica will ignore its maxmemory setting
1196:# memory than the one set via maxmemory (there are certain buffers that may
1200:# master hits the configured maxmemory setting.
1202:# replica-ignore-maxmemory yes
1245:# 1) On eviction, because of the maxmemory and maxmemory policy configurations,
1904:# e Evicted events (events generated when a key is evicted for maxmemory)
2095:# Client eviction is configured using the maxmemory-clients setting as follows:
2100:# maxmemory-clients 1g
2103:# is based on a percentage of the maxmemory setting. For example, to set client
2104:# eviction at 5% of maxmemory:
2105:# maxmemory-clients 5%
2158:# Redis LFU eviction (see maxmemory setting) can be tuned. However, it is a good
[albert@BSD-Backup ~]$
So, the parameter we need it’s sitting in the line 1133. Uncomment the line by removing the hashtag and set the parameter as the size you wish.
maxmemory 256mb
Time now for another memory related parameter. If the Redis memory allocation reaches its limit we need to configure how it will behave. Let’s find out that parameter location first.
Maxmemory Policy configuration.
[albert@BSD-Backup ~]$ grep -n 'maxmemory-policy' /usr/local/etc/redis.conf
1112:# according to the eviction policy selected (see maxmemory-policy).
1162:# maxmemory-policy noeviction
[albert@BSD-Backup ~]$
Now we have found it in line 1162, this is our configuration to place.
maxmemory-policy allkeys-lru
Data Store configuration.
Time now to tell Redis where to store the data. Nowhere in our case, we don’t want to go to disk, we want memory only. For that look for the ‘save “”‘ parameter.
[albert@BSD-Backup ~]$ grep -n 'save ""' /usr/local/etc/redis.conf
436:# save ""
[albert@BSD-Backup ~]$
So, let’s edit line 436, uncomment it and leave it as it is found.
Redis service start up.
We have now configured Redis, and we can fire the service up.
[albert@BSD-Backup ~]$ sudo service redis start
Starting redis.
[albert@BSD-Backup ~]$
Let’s verify the service is up and running.
[albert@BSD-Backup ~]$ sudo service redis status
redis is running as pid 1244.
[albert@BSD-Backup ~]$
It is, so we can now move on and install the PHP package that will allow WordPress to talk to Redis.
Step 3.- Install Redis’ PHP module.
This is a critical step on this how to install Redis for WordPress on FreeBSD. If we don’t install this package WordPress won’t be able to talk to the Redis key-value database we have installed on step 1.
Let’s verify first what PHP version we are running.
[albert@BSD-Backup ~]$ php --version
PHP 8.2.24 (cli) (built: Oct 10 2024 01:19:31) (NTS)
Copyright (c) The PHP Group
0Zend Engine v4.2.24, Copyright (c) Zend Technologies
with Zend OPcache v8.2.24, Copyright (c), by Zend Technologies
[albert@BSD-Backup ~]$
I am running PHP 8.2. You may be running something else. Just make sure you select the right package version corresponding to your PHP version.
[albert@BSD-Backup ~]$ pkg search php82-pecl-redis
php82-pecl-redis-5.3.7_1 Extension to access Redis
[albert@BSD-Backup ~]$
At the time of writing (October 2024), the available versions are PHP 8.1, 8.2, 8.3 and 8.4. Let’s install the right one.
[albert@BSD-Backup ~]$ sudo pkg install php82-pecl-redis
Updating FreeBSD repository catalogue...
FreeBSD repository is up to date.
All repositories are up to date.
The following 1 package(s) will be affected (of 0 checked):
New packages to be INSTALLED:
php82-pecl-redis: 5.3.7_1
Number of packages to be installed: 1
169 KiB to be downloaded.
Proceed with this action? [y/N]: y
[1/1] Fetching php82-pecl-redis-5.3.7_1.pkg: 100% 169 KiB 172.9kB/s 00:01
Checking integrity... done (0 conflicting)
[1/1] Installing php82-pecl-redis-5.3.7_1...
[1/1] Extracting php82-pecl-redis-5.3.7_1: 100%
=====
Message from php82-pecl-redis-5.3.7_1:
--
This file has been added to automatically load the installed extension:
/usr/local/etc/php/ext-30-redis.ini.sample
[albert@BSD-Backup ~]$
Now, if we are running Apache HTTP on the web server with the pre-fork module you can skip the following bit and move on to step 4. However, if you happen to run the event or worker MPM modules, or NGINX just reload the PHP-FPM service, so it’s made aware of this newly installed package.
[albert@BSD-Backup ~]$ sudo service php_fpm reload
Performing sanity check on php-fpm configuration:
[29-Oct-2024 16:19:25] NOTICE: configuration file /usr/local/etc/php-fpm.conf test is successful
[albert@BSD-Backup ~]$
Let’s verify the PHP-FPM service is up and running.
[albert@BSD-Backup ~]$ sudo service php_fpm status
php_fpm is running as pid 1295.
[albert@BSD-Backup ~]$
It’s running. Time to move on in this how to install Redis for WordPress on FreeBSD.
Step 4.- Configure WordPress’ wp-config.php for caching
This is another critical step in this guide. Please, make sure you have a working backup copy of this file just in case something goes wrong.
First, we need to tell WordPress how and where to use Redis. We will edit the wp-config.php file and place the following directives just before the ‘Authentication Unique Keys and Salts’ section.
If we have chosen to use UNIX sockets edit the wp-config.php file and include these directives:
define( 'WP_REDIS_PATH', '/var/run/redis/redis.sock' );
define( 'WP_REDIS_SCHEME', 'unix' );
If on the contrary, you have chosen to use TCP sockets include these directives in the wp-config.php file.
define('WP_REDIS_HOST', '127.0.0.1');
define('WP_REDIS_PORT', 6379);
Tip 1.- If you want to use a separate host for Redis than the one hosting your WordPress installation more directives need to be adjusted, such as authentication and probably TLS. Those are out of the scope of this guide. Adjust the host IP here to match the one you are using to host Redis.
Tip 2.- Avoid using all four directives above inside wp-config.php. Either choose the first block of two for a UNIX socket configuration or choose the second block for a TCP configuration. Make sure whatever selection matches the Redis configuration.
With this small change we can now move on and install the Redis plugin for WordPress.
Step 5.- Install the Redis plugin for WordPress
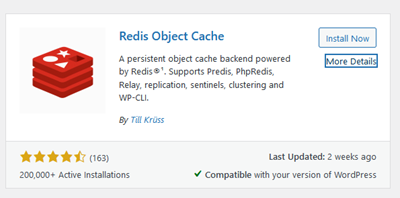
Login into your WordPress dashboard and look for the Redis Object Cache plugin.
Click on “Install Now”. And once installed, click on “Activate”.
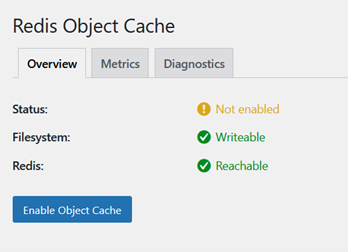
One the plugin has been activated we will be prompted with a dialog similar to this below:
Just click on “Enable Object Cache” and enjoy it.
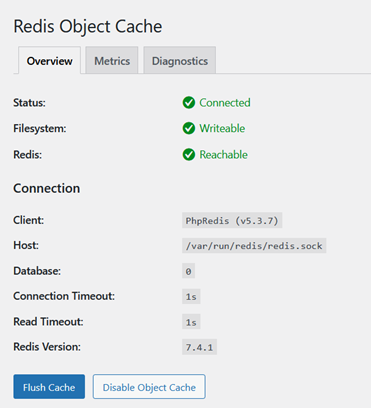
The result we should see if we have chosen a UNIX socket connection looks as follows:

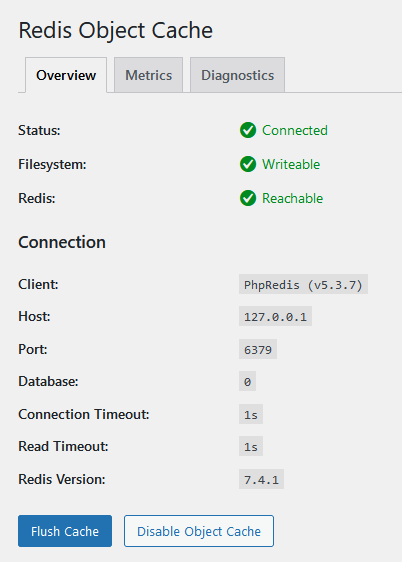
The result we should see if we have chosen a TCP socket connection looks as follows:
Troubleshooting tips for errors:
You may encounter errors such as:
“Redis is unreachable: Permission denied [unix:/var/run/redis/redis.sock]”
Or another example like:
“Redis is unreachable: Socket operation on non-socket [unix:/var/run/redis/redis.sock]”
Other errors may appear, and a Google search may be useful. This said, please have a read first to the following tips before you smash your luck with a search engine.
Tip 1.- Make sure the path where Redis stores its process is owned by the ‘redis’ user, but the group is set to the ‘www’ user.
[albert@BSD-Backup ~]$ ls -al /var/run/ | grep redis
drwxr-xr-x 2 redis www 3 Oct 30 17:30 redis
[albert@BSD-Backup ~]$
If your configuration is not correct apply the following command.
[albert@BSD-Backup ~]$ sudo chown -R redis:www /var/run/redis/
[albert@BSD-Backup ~]$
Tip 2.- Verify and make sure the redis group does include the web user ‘www’.
[albert@BSD-Backup ~]$ id redis
uid=535(redis) gid=535(redis) groups=535(redis),80(www)
[albert@BSD-Backup ~]$
If you forgot to achieve this, remember to execute the following.
[albert@BSD-Backup ~]$ sudo pw usermod redis -G www
[albert@BSD-Backup ~]$
Tip 3.- Avoid at all cost setting the ‘unixsocketperm’ parameter to 777. It’s a security risk you don’t want to take. Cache poisoning attacks are a thing, depending on what type of data you are managing you may be in serious trouble.
The trick which does permit the use of 770 permissions on the ‘unixsocketperm’ parameter in /usr/local/etc/redis.conf configuration file and not set everything wide open with a 777 is having the ‘www’ user be part of the redis group as already stated above in step 2, as well as having the user www being group owner in the /var/run/redis path.
Tip 4.- In case, for whatever reason, you visit your WordPress and find a message Redis can’t connect to the database, and the remediation it’s being proposed to you contains the elimination of the object-cache.php file inside the wp-content folder, just do it. Restart all services if necessary after the elimination (you shouldn’t need this though).
Step 6.- Test your site speed (Optional)
As promised in the beginning of the guide I am leaving here a couple of testing sites which will analyze, score and recommend performance tips for your sites.
This site can emulate different locations and user profiles, desktop, mobile, cable, 4G, etc. Very useful.
The original from Google. If anything is off by their standards and needs improvement will be shown here. Recommendations are also given.
Conclusion
This is the last bit in this how to install Redis for WordPress on FreeBSD guide. I hope your objects are now cached and your site is now a bit better performant than before.
If you find the articles in Adminbyaccident.com useful to you, please consider making a donation.
Use this link to get $200 credit at DigitalOcean and support Adminbyaccident.com costs.
Get $100 credit for free at Vultr using this link and support Adminbyaccident.com costs.
Mind Vultr supports FreeBSD on their VPS offer.