I happen to self-host my websites using Cloudflare’s services (article 1, article 2). Since the FreeBSD port seems to be delaying its releases and Cloudflare’s policy on maintaining versions only considers 1 year old code, in an act of prevention I have learnt, and I am publishing, how to compile cloudflared in FreeBSD.
Note: At the time of writing the cloudflared FreeBSD port is at version 2023.10.0_2, and today is October 21st 2024, so it’s now a 1 year old base. I am not blaming anyone, I just prepare just in case the port I rely on gets too late. It will probably won’t lose usability and it will get updated soon.
Requirements:
- A FreeBSD box running a supported FreeBSD version (currently 13.3, 13.4 and 14.1).
- gmake needs to be installed.
- The go language also needs to be installed.
- The git versioning control program must be installed.
If you find the articles in Adminbyaccident.com useful to you, please consider making a donation.
Use this link to get $200 credit at DigitalOcean and support Adminbyaccident.com costs.
Get $100 credit for free at Vultr using this link and support Adminbyaccident.com costs.
Mind Vultr supports FreeBSD on their VPS offer.
Step 1.- Download cloudflared from Github.
We need the code and obtaining it is as simple as using git as follows.
[albert@compilecloud ~]$ git clone -q https://github.com/cloudflare/cloudflared.git
Step 2.- Compile cloudflared
This step the easiest bit in this how to compile cloudflared in FreeBSD. We first need to change our directory into the cloudflared one.
[albert@compilecloud ~]$ cd cloudflared
[albert@compilecloud ~]$
Once in we need to issue the following command.
[albert@compilecloud ~/cloudflared]$ gmake install-go cloudflared cleanup-go
The whole process should look similar to this:
[albert@compilecloud ~/cloudflared]$ gmake install-go cloudflared cleanup-go
go: downloading go1.22.0 (freebsd/amd64)
rm -rf /tmp/go
./.teamcity/install-cloudflare-go.sh
Building Go cmd/dist using /usr/local/go121. (go1.21.13 freebsd/amd64)
Building Go toolchain1 using /usr/local/go121.
Building Go bootstrap cmd/go (go_bootstrap) using Go toolchain1.
Building Go toolchain2 using go_bootstrap and Go toolchain1.
Building Go toolchain3 using go_bootstrap and Go toolchain2.
Building packages and commands for freebsd/amd64.
---
Installed Go for freebsd/amd64 in /tmp/go
Installed commands in /tmp/go/bin
GOOS=freebsd GOARCH=amd64 go build -mod=vendor -ldflags='-X "main.Version=2024.10.0-5-g92e0f5fc" -X "main.BuildTime=2024-10-21-1124 UTC" ' github.com/cloudflare/cloudflared/cmd/cloudflared
rm -rf /tmp/go
[albert@compilecloud ~/cloudflared]$
NOTE: At this stage you may want to skip the steps below and follow (from step 2) the first guide I published some time ago. The steps are almost identical, I just wrote these below to test the self-compiled binary worked as intended.
Step 3.- Use the self-compiled clouflared binary to login into cloudflare
The compiled binary will be placed in the current directory, as follows:
[albert@compilecloud ~/cloudflared]$ ll cloudflared
-rwxr-xr-x 1 albert wheel 36M Oct 21 13:43 cloudflared
[albert@compilecloud ~/cloudflared]$
So, we can now copy it into /usr/local/sbin/ or wherever we see fit.
[albert@compilecloud ~/cloudflared]$ sudo cp cloudflared /usr/local/sbin
[albert@compilecloud ~/cloudflared]$
Verify the binary permissions are the correct ones, with root as the main owner and the wheel group can also access it.
[albert@compilecloud ~/cloudflared]$ ll /usr/local/sbin/cloudflared
-rwxr-xr-x 1 root wheel 36M Oct 21 13:56 /usr/local/sbin/cloudflared
[albert@compilecloud ~/cloudflared]$
Now, this could be run as a service, where root would launch it, or we can invoke it with a non-privileged user. I typically run this as a non-privileged user, my login user. However, you may want to create a dedicated user who can also have access to the binary. For that do the following, otherwise skip this bit.
Optional.
$ sudo group add cloudflared

$ sudo user add -g cloudflared -c Cloudflared -s /sbin/nologin -d /var/empty cloudflared
The first run of cloudflared is the key point here. Let’s use it.
[albert@compilecloud ~]$ /usr/local/sbin/cloudflared login
Please open the following URL and log in with your Cloudflare account:
https://dash.cloudflare.com/argotunnel?aud=&callback=https%3A%2F%2Flogin.cloudflareaccess.org%_the_rest_of_my_key_you_don’t_need_to_see...
Once you input the given URL into your browser, you will see something similar to this:
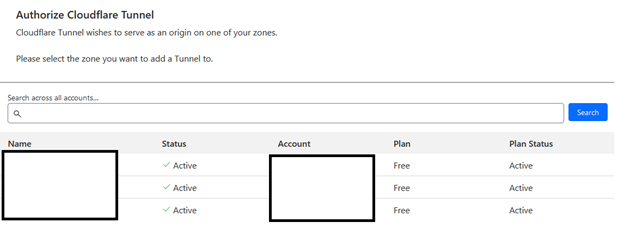
Select one site and authorize its use.
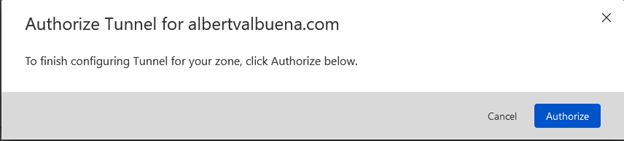
Once its authorized you will be greeted with the following:
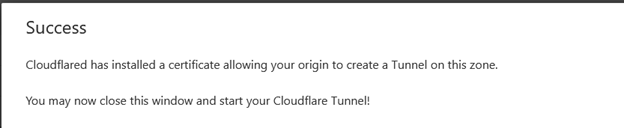
On the terminal you will see the following content:
[albert@compilecloud ~]$ /usr/local/sbin/cloudflared login
Please open the following URL and log in with your Cloudflare account:
https://dash.cloudflare.com/argotunnel?aud=&callback=https%3A%2F%2Flogin.cloudflareaccess.org%_the_rest_of_my_key_you_don’t_need_to_see...
Leave cloudflared running to download the cert automatically.
2024-10-21T12:08:35Z INF Waiting for login...
2024-10-21T12:09:28Z INF Waiting for login...
You have successfully logged in.
If you wish to copy your credentials to a server, they have been saved to:
/home/albert/.cloudflared/cert.pem
[albert@compilecloud ~]$
Step 4.- Configure the cloudflared program
This step is the key piece in this how to compile cloudflared in FreeBSD guide. As explained in my other article, under the user who launched the login a new directory will be created, named .cloudflared.
[albert@compilecloud ~]$ pwd
/home/albert
[albert@compilecloud ~]$ ll .cloudflared
total 14
drwx------ 2 albert wheel 3B Oct 21 14:10 .
drwxr-xr-x 6 albert wheel 14B Oct 21 14:07 ..
-rw------- 1 albert wheel 1.9K Oct 21 14:10 cert.pem
[albert@compilecloud ~]$
Now that we have a key, stored as a cert.pem file, we can create a new tunnel.
Note: I am actively hiding the real tokens and the real tunnel’s IDs. Be a good netizen and do not attempt to use the gibberish I am showing in this article for nefarious purposes.
[albert@compilecloud ~]$ cloudflared tunnel create compiletest
Tunnel credentials written to /home/albert/.cloudflared/26870f56-v6e5-4854-879h-11m5p81mlt168.json. cloudflared chose this file based on where your origin certificate was found. Keep this file secret. To revoke these credentials, delete the tunnel.
Created tunnel compiletest with id 26870f56-v6e5-4854-879h-11m5p81mlt168
[albert@compilecloud ~]$
With this done we can now configure the tunnel itself. The official documentation can be used as a guide, but you can use the following for web services.
Create a config.yaml file inside the .cloudflared directory and add this content:
url: http://server-ip
tunnel: <tunnel_id_here>
credentials-file: /home/user./cloudflared/<tunnel_id>.json
Mine reads as follows:
url: http://192.168.1.84:80
tunnel: 26870f56-v6e5-4854-879h-11m5p81mlt168
credentials-file: /home/albert/.cloudflared/26870f56-v6e5-4854-879h-11m5p81mlt168.json
With the configuration for cloudflared in place we can move on and run the tunnel.
Step 5.- Run the tunnel
This is the step we were all waiting for in this how to compile cloudflared in FreeBSD guide.Now the tunnel has been configured we can fire it up.
[albert@compilecloud ~]$ /usr/local/sbin/cloudflared tunnel --url http://192.168.1.84 run 26870f56-v6e5-4854-879h-11m5p81mlt168
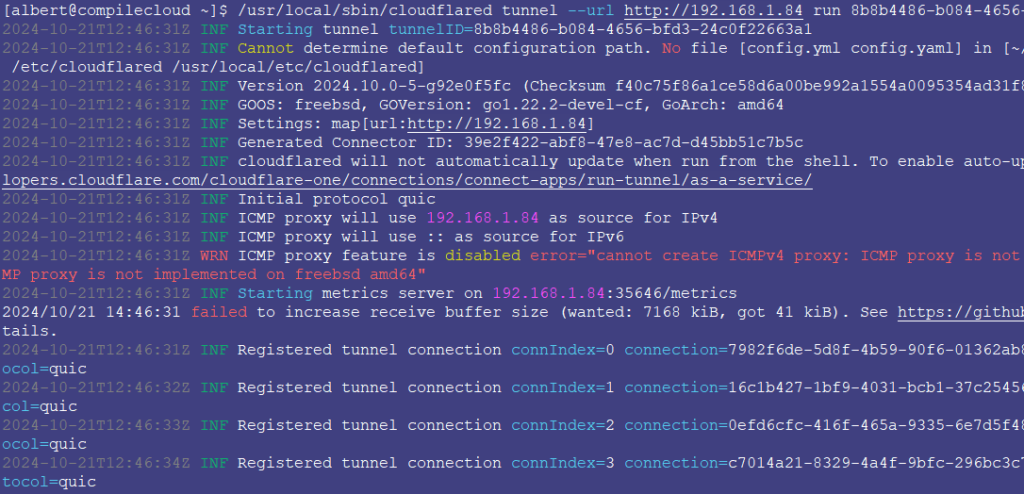
The expected output should look similar to:
[albert@compilecloud ~]$ /usr/local/sbin/cloudflared tunnel --url http://192.168.1.84 run 25330f56-b4e5-4755-868c-10f5e34bd825
2024-10-21T12:46:31Z INF Starting tunnel tunnelID=25330f56-b4e5-4755-868c-10f5e34bd825
2024-10-21T12:46:31Z INF Cannot determine default configuration path. No file [config.yml config.yaml] in [~/.cloudflared ~/.cloudflare-warp ~/cloudflare-warp /etc/cloudflared /usr/local/etc/cloudflared]
2024-10-21T12:46:31Z INF Version 2024.10.0-5-g92e0f5fc (Checksum youdontneedtoseethecontent)
2024-10-21T12:46:31Z INF GOOS: freebsd, GOVersion: go1.22.2-devel-cf, GoArch: amd64
2024-10-21T12:46:31Z INF Settings: map[url:http://192.168.1.84]
2024-10-21T12:46:31Z INF Generated Connector ID: 25330f56-b4e5-4755-868c-10f5e34bd825
2024-10-21T12:46:31Z INF cloudflared will not automatically update when run from the shell. To enable auto-updates, run cloudflared as a service: https://developers.cloudflare.com/cloudflare-one/connections/connect-apps/run-tunnel/as-a-service/
2024-10-21T12:46:31Z INF Initial protocol quic
2024-10-21T12:46:31Z INF ICMP proxy will use 192.168.1.84 as source for IPv4
2024-10-21T12:46:31Z INF ICMP proxy will use :: as source for IPv6
2024-10-21T12:46:31Z WRN ICMP proxy feature is disabled error="cannot create ICMPv4 proxy: ICMP proxy is not implemented on freebsd amd64 nor ICMPv6 proxy: ICMP proxy is not implemented on freebsd amd64"
2024-10-21T12:46:31Z INF Starting metrics server on 192.168.1.84:35646/metrics
2024/10/21 14:46:31 failed to increase receive buffer size (wanted: 7168 kiB, got 41 kiB). See https://github.com/quic-go/quic-go/wiki/UDP-Buffer-Sizes for details.
2024-10-21T12:46:31Z INF Registered tunnel connection connIndex=0 connection=aconnectionidyoudontneedtosee event=0 ip=198.41.200.63 location=mad03 protocol=quic
2024-10-21T12:46:32Z INF Registered tunnel connection connIndex=1 connection=aconnectionidyoudontneedtosee event=0 ip=198.41.192.7 location=mad02 protocol=quic
2024-10-21T12:46:33Z INF Registered tunnel connection connIndex=2 connection=aconnectionidyoudontneedtosee event=0 ip=198.41.200.13 location=mad04 protocol=quic
2024-10-21T12:46:34Z INF Registered tunnel connection connIndex=3 connection=aconnectionidyoudontneedtosee event=0 ip=198.41.192.107 location=mad01 protocol=quic
Now, to run this permanently without having to configure a FreeBSD service, use the following command:
nohup /usr/local/bin/cloudflared tunnel --url http://yourserverip run <tunnelID> &
For TLS enabled tunnels you can use my specific article.
In order to verify the tunnel is working, you may want to edit the DNS entry for a given domain managed by Cloudflare.
Use the CNAME entry and add the tunnel id in the target field as follows:
<tunnelID. cfargotunnel.com>
Remember to do it for your domain.com as well as for your subdomain www.domain.com.
To confirm everything is working visit your domain with your browser and see if everything is working fine.
Conclusion
Running cloudflared, a tunnel solution from Cloudflare has been great for me for almost two years now. I can self-host my services without needing to open ports in my firewalls. Of course, the services I run need to be carefully monitored and hardened, since using the free tier gives you little security features. However, I’m more than satisfied. I hope the package in FreeBSD gets soon updated to the latest version, but if that takes some time here is a guide on how to compile cloudflared in FreeBSD. Hope this helps.
If you find the articles in Adminbyaccident.com useful to you, please consider making a donation.
Use this link to get $200 credit at DigitalOcean and support Adminbyaccident.com costs.
Get $100 credit for free at Vultr using this link and support Adminbyaccident.com costs.
Mind Vultr supports FreeBSD on their VPS offer.